
Table of contents:
- Author Bailey Albertson [email protected].
- Public 2023-12-17 12:53.
- Last modified 2025-01-23 12:41.
Internet speed from Dom.ru: how to measure and increase

Internet speed can sometimes drop for all providers and users for various reasons. In the article we will analyze what a Dom.ru client should do if his speed has dropped. We will also talk about the factors that can affect the connection to the network.
Content
-
1 What determines the speed of the Internet and why it can drop
1.1 Video: What Can Reduce Internet Speed
-
2 How to check Internet speed from "Dom.ru"
2.1 Video: How to Measure Connection Speed Using SpeedTest
-
3 How to increase the speed of the Internet from "Dom.ru"
- 3.1 Checking the system with an antivirus
- 3.2 Turn off QoS
- 3.3 Flushing the DNS cache
- 3.4 Increasing the DNS cache
- 3.5 Disable automatic tuning
- 3.6 Turn on the "Turbo" mode and load the extension to save traffic
- 3.7 Video: Speed Up the Internet with Effective Techniques
What determines the speed of the Internet and why it can drop
The speed of connection to the network is usually measured in the amount of data (megabits) transmitted or received from the "World Wide Web" by a certain device per second. The speed can be outgoing or incoming. In the first case, it is the speed of uploading a file from a computer to the Internet, for example, photos and videos to a social network. The speed of the incoming connection will depend on the loading time of sites, downloading files from the Internet to your computer.
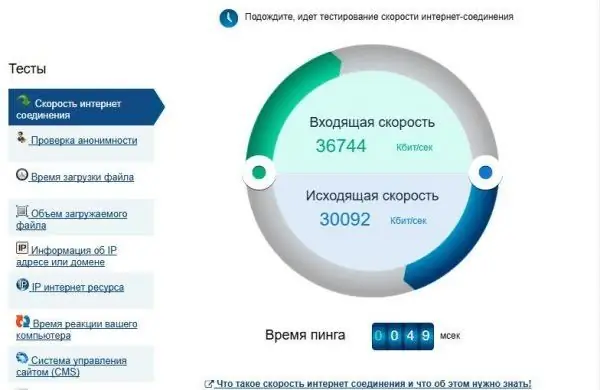
Internet speed is divided into two types: incoming stream and outgoing
The data transfer rate is affected by the equipment (devices through which signals are received), as well as software factors:
- The tariff that was originally selected by the user. Generally, the higher the cost, the better the internet speed.
- The quality of the provider's equipment (cables; routers installed in the house, equipment for signal transmission on towers, etc.) and the user himself (router, sockets, modem, network adapters, etc.).
- The degree of congestion of the provider's channels. If they cannot cope with the requests of a large number of subscribers (load), the speed is significantly reduced or the Internet disappears. This can be seen especially often in the evening.
- Malicious software on the user's computer. The connection can be weakened due to the harmful effects of viruses in the system.
- High load while downloading large files through download managers (MediaGet, Torrent and others).
- Updating programs in the background. Windows services take away part of the channel for these needs.
- Incorrect operation of the network card drivers. In this case, they need to be updated.
It is also necessary to highlight in a separate list additional factors that affect the speed of data transfer via Wi-Fi (wireless Internet):
- The standard that the router uses. If it is old, the Wi-Fi speed can be very slow as it will not match the new connection technologies and modern equipment of the provider. Thus, when choosing a router, you must rely primarily on the support of the latest communication standards, as well as on the power of the internal antenna.
- The location of the router, the thickness of the walls of the house and the material from which it is built. If the wall is thick, it can muffle the signal from the adapter (modem). The Wi-Fi speed is always the best in the room where the modem is. The signal may also simply not reach a particular room. The signal is also influenced by nearby metal objects and mirrors.
- The presence of a large number of other wireless networks nearby. They can interrupt each other's signal.
- Configuring the router. Incorrectly set parameters can affect its operation.
Naturally, the client will not be able to do anything about the factors for which the provider is responsible, unless he decides to change it.

Low Internet speed can be for several reasons: from viruses in the PC system to cable damage
Nevertheless, the user is able to do everything possible on his part to improve the speed: replace the old router, remove viruses, clean the PC system of "junk" files, etc.
Video: What Can Reduce Internet Speed
How to check Internet speed from "Dom.ru"
You can find out the exact speed of the network connection in various services that work online. They have the following principle of operation: the service specifically transfers network packets to the device, and then calculates how much of these packets the computer received in one second.
Internet speed measurement from Dom.ru is carried out on the official website of the provider. The company has partnered with a speed measurement service called SpeedTest. This check is embedded into the provider's page. Let's describe in detail the steps in the instructions:
- To make the measurement result as accurate as possible, stop downloading files in browsers and download managers; turn off radio, video, audio recording; close all pages in the browser (except for the one where the check will take place), as well as instant messengers.
- Now we go to the official page of the provider "Dom.ru", where you can directly measure the speed yourself.
-
Press the left key on the big round "Forward" button.

Official site "Dom.ru" Click on the "Forward" button to start scanning the speed
-
The service will start measuring the speed of the incoming connection first, and then the outgoing one.

Scanning process Wait for the process of scanning your internet speed to complete
-
When the check is complete, the final analysis results will appear on the page. If you want to run a second check, click on the "Again" circle.

Test results Estimate the internet speed that the site showed in the results
- On the same page, you can copy the link to the results, as well as share them on Facebook or Twitter.
The check can be carried out directly on the official website of the SpeedTest service. To start the analysis, just click on the big round button "Start".
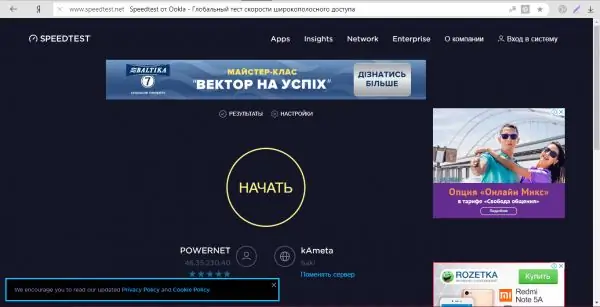
Click on the "Start" button to start the speed test
Video: How to Measure Connection Speed Using SpeedTest
How to increase the speed of the Internet from "Dom.ru"
If you initially have a low connection speed in accordance with your Dom.ru tariff, set up additional high-speed functions offered by this provider in your personal account on the official website. You can also choose another tariff there with a higher internet speed.
If you are supposed to have a high connection speed initially, make sure first that no factors interfere on your part: the presence of viruses, remoteness from the router, downloading Torrent files through download managers. Install the router in an optimal place in the room so that the computer is not separated from it by thick walls or metal objects that interfere with the signal.
If you have another computer device, turn it on and try surfing the Internet on it: if the speed is as low, then the problem is still in the router or provider.
System check with antivirus
Malicious programs can slow down your Internet speed, so you need to check if they are present on your PC. To do this, use the antivirus installed on your device. You can also install such a utility in your personal account on the official website "Dom.ru". To check, do the following:
-
In the Windows tray, we are looking for the icon of our antivirus. In this case, we have Avast. We click on it once to bring up its window on the screen.

Trey Windows Find your antivirus icon in the Windows tray
-
If the utility requires an update on the start page, click on "Update" to update the virus databases.

Antivirus update Click on the "Update" button to update the virus signatures
-
Upon completion of the update, go to the "Protection" tab. In the menu, select the very first tile "Scanning".

Protection tab Click on the "Scan" tile in the "Protection" tab
-
Then you need to decide on the type of check. Complete is recommended. In some antiviruses, it may be called deep. Click on the appropriate tile to start the system analysis.

Selecting the scan type Choose full scan for more efficient analysis
-
Now you need to wait for the procedure to complete. It can take a long time, but it will be carried out in the background, that is, you can work on your computer.

Virus scanning process The scanning process will take some time, so please be patient
- In the results, the antivirus will show whether and what threats have been found, and will also offer solutions: deleting or adding files to the so-called quarantine.
- When the problem is resolved, check your internet speed again using the SpeedTest service.
Turn off QoS
You can artificially increase the speed with a little trick - disabling the QoS service, which is responsible for automatically backing up part of the channel for some system needs (sometimes this volume reaches 20%). Deactivation will not disrupt the operation of the computer at the same time - you should not worry about this. So, what you need to do for this:
-
We call the "Run" window with a combination of the Win + R buttons, designed to start standard Windows services and not only. In it we print or paste the gpedit.msc code, and then click on OK. This will bring up the window "Local Group Policy Editor" of interest to us.

Gpedit.msc command Paste the gpedit.msc command into the Open box
-
In the right part of the editor window, double-click to open the "Computer configuration" section.

Local Group Policy Editor Open the "Computer Configuration" section
-
After that, in turn, launch the folders with the following names: "Administrative Templates" - "Network" - "QoS Packet Scheduler".

QoS Packet Scheduler folder Open the "QoS Packet Scheduler" folder
-
In the last open block, we look for the entry "Limit the reserved capacity" in the small list. Open it with a double click or click on the link "Policy setting" on the left panel.

Clause "Limit the reserved capacity" Expand the item "Limit Reserved Capacity" by double-clicking
-
A new window with a gray background will appear on the screen. Here we set the value "Enabled", and in the field below we write 0. Click on "Apply", and then on OK to close the window. After that, you can close the editor, restart your computer and check the speed.

Enable parameter Put the value "Enabled" and write 0 in the bottom field
Flushing the DNS cache
Slow connections may be due to a file-filled DNS cache. The free CCleaner utility from the developer Piriform will help you to remove everything unnecessary from it. She has a clear interface in Russian. Follow the simple instructions:
-
We pass to the official resource of the utility. Click on the green button "Download free version". Launch the installer that just downloaded and install the cleaning application following the instructions in the window.

CCleaner official website Click on the "Download free version" button to download the utility installer
-
Launch CCleaner. The "Cleaning" block will open immediately. We need it: in the first Windows tab in the "System" list, put a checkmark to the left of "DNS cache". Look at the other items and decide which ones you want to clear and which ones you don't.

Analysis button Make sure there is a check mark next to "DNS cache" and click on "Analyze"
- Now click on "Analysis" for the system to determine the files to delete and their total size.
-
When the check is completed, we look at the amount of memory that can be freed, and click on the second button "Clear".

Completed analysis For the system to remove garbage, click on "Cleanup"
- The system will delete all found data. After that we check the internet speed again.
Increasing the DNS cache
Another secret to increasing Internet speed is to set a higher value for the maximum size of the DNS cache, which stores the data of the sites that the user visits most often. If you constantly visit the same resources, this method will suit you: your favorite pages will load much faster, because parts of them will already be stored in the system. We will increase the cache through the "Registry Editor":
-
Open the Run service again using the Win + R combination. Enter another command in the line: regedit. It will launch the Registry Editor window.

Regedit command Enter the command regedit in the "Open" field
-
We will open all sections in the third main branch HKEY_LOCAL_MACHINE, so we start it first with a double click.

HKEY_LOCAL_MACHINE branch Open the master branch called HKEY_LOCAL_MACHINE
-
Now, one by one, in the same way, we pass sequentially into the following blocks: SYSTEM - CurrentControlSet - Services - DNScache - Parameters.

Parameters Open the Parameters folder in the left pane of the window
-
In the last opened Parameters folder, right-click on the right side of the window to open an additional menu. In it, point the arrow to "Create", and then to "Parameter DWORD".

Parameter creation Select "DWORD Value" from the context menu
-
We give the following name to the created parameter: CacheHashTableBucketSize. We click on it twice to open an additional window with a value.

Record name Name the new entry CacheHashTableBucketSize
-
On the line we write 1 as the value.

Change value In the "Value" field write 1
-
In the same way, we create three more entries in the Parameters folder:
- CacheHashTableSize with a value of 384;
- MaxCacheEntryTtlLimit with a value of 64000;
- MaxSOACacheEntryTtlLimit with a value of 301.
- After that, close the editor and all other open applications, and then restart the device.
-
When Windows starts up, go to the "Command Prompt". To do this, use the "Windows Search" panel ("magnifier" on the "taskbar"): enter the code cmd in the line.

Search bar Enter cmd or "Command Prompt" into the search bar
-
Right-click on the item in the results and select the option to run the utility with administrator rights.

Run as administrator Select "Run as administrator"
- Click on "Yes" to allow the program to make changes on the PC.
-
In the black editor, one by one, insert and execute the following commands:
- ipconfig / registerdns;
- ipconfig / release;
-
ipconfig / renew.

Command line Run three commands one by one in the "Command Line"
This method will help increase the speed of loading pages, but not files: downloading them will take longer.
Disable automatic tuning
If you visit a different site each time, you are advised to turn off the TCP auto-tuning feature, which slows down your Internet speed. It is quite easy to do this in the "Command Line". Follow the simple instructions:
- Launch "Command Prompt" through the "Windows Search" panel: using the cmd command with administrator rights. Follow the instructions in the section above.
-
Copy and paste the code into the black editor: netsh interface tcp set global autotuninglevel = disabled. Then press Enter to execute it immediately. This will deactivate the Windows option described above.

Command execution Paste the command netsh interface tcp set global autotuninglevel = disabled into the editor window
-
To turn it back on, just run the netsh interface tcp set global autotuninglevel = normal command in the same "Command Line" window.

Enabling the function Copy and paste the netsh interface tcp set global autotuninglevel = normal command in the editor
Turn on "Turbo" mode and load the extension to save traffic
Many browsers have a feature called Turbo. This mode allows you to speed up the loading of sites by reducing the quality of images on it and turning off automatically appearing videos. If your connection is initially slow, this mode will help you surf the Internet faster. Let's first look at how to activate it in Opera.
-
Left-click on the Opera icon in the upper left corner of the browser. In the gray menu, select the "Settings" item, which is located closer to the end of the list.

Opera menu Open the "Settings" section in the Opera menu
- We pass on the inner page of the browser to the "Browser" tab.
-
Scrolls it to the very bottom. The last parameter will be the "Turbo" mode. We put a tick to the left of it.

Opera settings Activate "Turbo" mode in Opera settings
In Yandex Browser, you can activate this mode much faster (in just two clicks): on the menu icon in the form of three horizontal lines, and then on the first item “Turn on Turbo”.
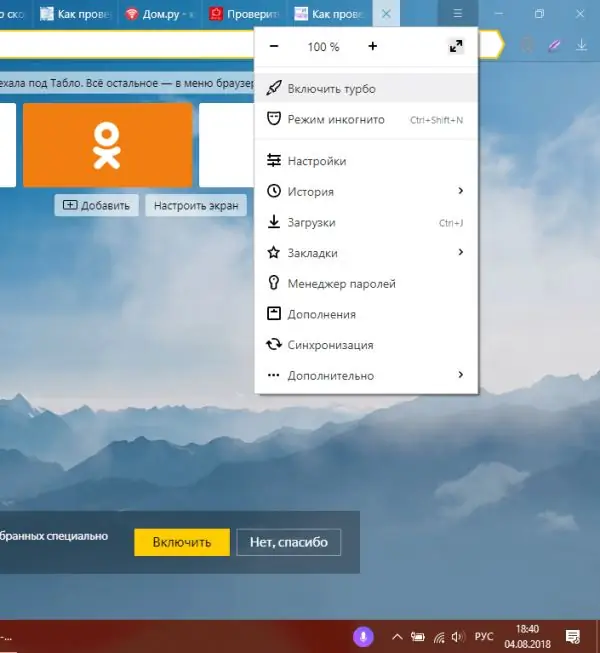
Click on "Turn on Turbo" in the "Yandex Browser" menu
Google Chrome cannot boast of this mode, so a different method must be used here - downloading an add-on (a mini-program that is embedded in the browser). To slightly speed up page loading, install the "Traffic Saving" extension from the Google developer, which is native to the browser:
-
Go to the Google Chrome browser. Click on the icon in the form of three vertical dots. So, we will call the browser menu, in which you need to hover over the "Additional tools" item, and then select the fourth section "Extensions".

Google Chrome menu Open "More Tools" and then "Extensions" from the Google Chrome menu
-
On the page with extension tiles, click on the left panel and at its bottom we find the link “Open the Chrome Web Store”. We immediately click on it.

Store link Click on the link to the Google Chrome Extension Store
-
In the search bar of the store, we type the query "Saving traffic".

Search extension Enter in the search box "Saving traffic"
-
In the search results, click on the blue "Install" button, which is located to the right of the extension.

Traffic Saving Extension Click on the "Install" button for the browser to download the add-on
-
We confirm our action: click on "Install extension".

Installation confirmation Confirm that you want to install the "Traffic Saver" extension
-
Now click on the add-on icon located in the upper right corner.

Extension icon Click on the add-on icon in the upper right corner to activate it
-
Its panel will open, in which you will find information about how much traffic has already been collected.

Add-on panel On the add-on panel, you can monitor the amount of saved traffic
- If you want to disable the extension, just click on the checkmark at the top of the panel.
Video: speeding up the Internet with effective methods
Slow loading sites due to low internet speeds can annoy every web user. However, the reason may not be in the provider, but on your side: viruses, a full DNS cache, an incorrectly located router, etc. Having eliminated these reasons, you will notice that the Internet began to work much faster. You can also use some tricks: disabling the QoS option and auto-tuning.
Recommended:
How To Make A Speed Controller For A Grinder With Your Own Hands, How To Decrease Or Increase The Speed + Video Instructions

Speed controller and smooth start of the grinder. What unites them. How to make a device yourself
How To Crop, Flip, Overlay Music, Slow Down Or Speed Up Video On IPhone

How to process video captured on smartphones or tablets from Apple: crop, rotate or overlay music. Step-by-step instructions included
How To Check A House For Internet Connection Or Find Out Which Provider Serves It
How to find out if it is possible to conduct the Internet in a certain house. How to determine which providers are currently serving a building: help desks and sites
How To Update The Internet Explorer Browser - Why And When Is It Done, Check The Existing Version And Install A New One

Why update the standard Windows Internet Explorer browser. How to download a new version of the browser: several ways. What to do if you can't update IE
How To Check Internet Speed From Rostelecom: Sites For Checking Online And Other Methods

Factors affecting the speed of the Internet connection. What is ping, upload speed and reception speed. Different ways to measure internet speed
