Table of contents:
- Author Bailey Albertson albertson@usefultipsdiy.com.
- Public 2023-12-17 12:53.
- Last modified 2025-01-23 12:41.
High-speed PPPoE connection: features, configuration and possible errors

Many providers offer their customers a high-speed PPPoE Internet connection, but most subscribers have no idea what this technology is. What is the principle of its operation, what are the advantages and disadvantages of this connection? How easy and simple is it to set up this kind of connection and solve the connection problem if it occurs?
Content
- 1 PPPoE connection: how it works, pros and cons
-
2 Configuring PPPoE-connection on different versions of "Windows"
- 2.1 For Windows 7
-
2.2 For the top ten
2.2.1 Video: how to configure PPPoE on Windows 10
- 2.3 We connect using the PPPoE protocol through a router
-
3 What errors can a high-speed PPPoE connection give and how to solve them
- 3.1 Error 633 "The modem is already in use or not configured"
- 3.2 Error 651: equipment malfunction, incorrect settings or operation on the line
- 3.3 Error 720: corrupted system files or network card driver
- 3.4 Error 711: Unsuccessful attempt to start the Remote Access Manager service
- 3.5 Error 678 and 815 "The remote computer is not responding"
-
3.6 Error 691: incorrect data for authorization or minus on the balance
3.6.1 Video: How to fix errors 651 and 691
- 3.7 Error 813: There is a duplicate connection
-
3.8 Error 797: Connection Failure, Incorrect Network Settings
- 3.8.1 Setting correct network settings
- 3.8.2 Reinstalling the modem software
- 3.9 Error 629: Connection closed by remote server
-
3.10 Error 628: Incorrect profile settings or initialization error
- 3.10.1 Profile settings
- 3.10.2 Initialization of the modem
-
4 How to remove a high-speed connection
-
4.1 Using the "Control Panel"
4.1.1 Video: How to Delete Unnecessary Connections in Windows
- 4.2 In the "Device Manager"
- 4.3 Through the "Registry Editor"
-
PPPoE connection: how it works, pros and cons
PPPoE (aka Point-to-point protocol over Ethernet) is a network data transfer protocol that works on a point-to-point basis. Before the direct data transmission in the Ethernet environment, a virtual encrypted communication channel (tunnel) is created: a specific session identifier is established, the MAC addresses of the subscriber and the provider's server are connected, a PPP connection (Point-to-Point Protocol) is formed. After that, IP traffic is packed into PPP data packets with an identifier - the user gets access to the Internet.
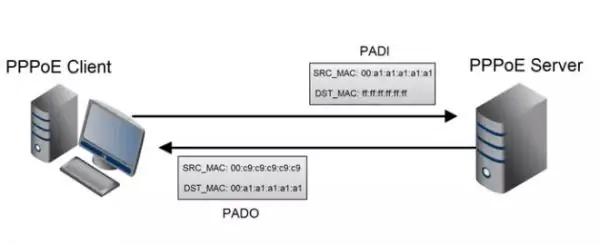
When accessing the network via PPPoE protocol, an encrypted channel is created between the subscriber's PC and the provider's server
This type of connection has the following strengths:
- Compressing data during transmission and, accordingly, increasing the speed of the Internet.
- Inexpensive way to connect. There is no binding in the IP address - the provider can distribute the available addresses among active users, which significantly reduces the cost of servicing subscribers.
- Encryption of transmitted information without reducing the bandwidth - there will be no data leakage.
- High resilience to network failures - the Internet is stable.
- There is no risk that unauthorized access to the network will occur - for the network to work, you need to enter a username and password.
- Cross-platform - the connection can be configured on most operating systems: Windows, Linux, Ubuntu, Mac OS and others.
This protocol also has some disadvantages. In particular, the MTU requirements (the maximum amount of data packet that is transmitted at one time) are lower, which can negatively affect the operation of firewalls. However, if the Internet is needed to watch movies or search for information, there should be no interruptions in the connection.
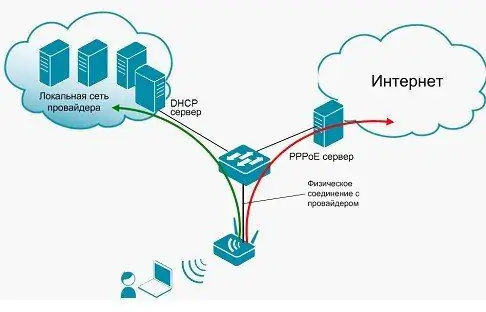
The PPPoE connection has a drawback: a limitation on the amount of data packet that is transmitted at a time over the channel
In addition, the network password can also be forgotten or the agreement with authorization data can be lost. This problem is solved by calling the provider or visiting the office of the digital service provider.
Configuring PPPoE connection on different versions of Windows
Creating a connection with the protocol in question differs depending on the version of Windows, but not significantly. Let's describe the process for the two most common options - "seven" and "tens".
For Windows 7
If you have a "seven" installed on your device, follow these steps to create a connection:
- Find the network icon in the lower right corner of the display - right-click, and then open the Network and Sharing Center via the context menu.
-
The longer way is through the Start menu. Call it in the lower left corner of the window - click on the "Control Panel" in it. Find and launch the centered section.

Control Panel Expand the "Network and Sharing Center" section in the "Control Panel"
-
Click on the link that starts creating and configuring a new connection on your PC.

Network and Sharing Center In the center, click on the action "Create and configure a new connection"
-
Select the first item "Internet connection" with the mouse.

Item "Internet connection" Select "Internet Connection" and click on "Next"
-
Click on the first High Speed PPPoE item.

High speed connection Follow the link "High Speed"
-
On the next page, type in the username and password for the network (they are provided by the provider - you will find all combinations of characters in your agreement). If you wish, you can save the password so that you do not write it again every time you turn on the PC and connect to the Internet. Come up with a name for the connection yourself, or leave what the system has chosen for you. With the help of the item with the yellow-blue shield, you can allow other accounts on your PC, that is, other users, to "surf" the Internet through your connection. Click on "Connect" - a message about a successful connection should appear.

Entering data for authorization Enter the required data for authorization in the network and click on "Connect"
For "ten"
In Windows 10, the connection is also created in the network center, but in this case it will be more difficult to get to it:
-
Let's start the "Windows Settings" window: open the "Start" system menu and click on the gear icon there. Another faster way is the combination of the Win and I keys. Hold them down for a couple of seconds, and then wait until the desired window appears on the display.

Start Menu In the Start menu, click on the gear button
-
Expand the tile titled "Network and Internet".

Windows settings In "Windows Settings" open the "Network and Internet" section
-
The section with networks can be reached in another way: right-click on the network icon and select the second item in the context menu.

Launching a section through a network icon In the context menu of the network icon, select "Open" Network and Internet Settings"
-
In the first or in the second tab, find the link leading to the "Network and Sharing Center".

Wi-Fi tab In the Wi-Fi or Ethernet tab, open the "Network and Sharing Center" in the right column
- Repeat the same steps as described for the Windows 7 version in the previous section of the article.
Video: how to configure PPPoE on Windows 10
We connect via PPPoE through a router
If you connect not directly through a cable, but through a special device - a router that sends out a signal (Wi-Fi), the PPPoE connection setting will be carried out in the router's interface, in its office, which opens on the official website of its developer. Let's consider the procedure using the example of the most popular router from the manufacturer TP-Link:
-
Using any browser, open this page to log into your router's "account". Type your username and password, as a rule, this is one English word admin. The exact information can be found on the back of the dispensing device.

Authorization in the router account Enter admin as username and password and click on "Login"
-
Open the "Network" block. Here we will configure the device for the conditions of the provider company.

Network tab Switch to the third from the top "Network" tab
-
In the first dropdown menu, set the value with the PPPoE abbreviation.

Connection type Select the PPPoE value from the Connection Type menu
-
Enter the data for authorization in the network provided by the provider: once the network name and twice the password.

Entering username and password in the router interface Enter your username and password for your network in the fields that appear
- Configure the following parameters in accordance with the memo given to you by your provider. The settings will be individual in this case. If you do not have a backup link, you can leave the secondary connection deactivated.
- Select "Always active" as the connection mode if you do not want to manually connect each time. Click on "Connect" to save all settings and establish a network connection.
-
Reboot the device in the interface of its account: go to the "System Tools" block and go to the tab to restart. Click on the button there. The reboot will take a couple of minutes. When you turn on the device, the Internet will immediately appear on your PC.

Reboot the router Click on the "Restart" button in the "System Tools" section
What errors can a high-speed PPPoE connection give and how to solve them
It is not always possible to connect to a network using PPPoE on the first attempt. Sometimes difficulties arise - errors with certain codes that will help you determine the cause of the problem, as well as what solution methods to use.
Error 633 "The modem is already in use or not configured"
This problem occurs for users who use a USB modem, mainly due to a malfunction in the PC or the network device driver. First of all, you need to restart your computer. If that doesn't work, delete the PPPoE connection and recreate it using the step-by-step instructions in this article.
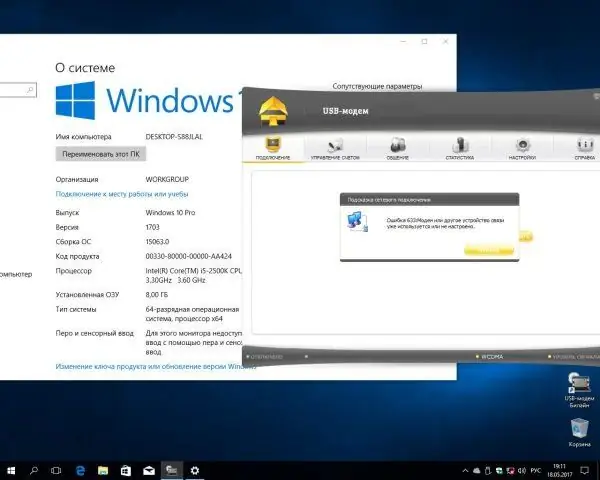
Code 633 means that the PC has crashed or is having problems with the network card driver
Error 651: equipment malfunction, incorrect settings or operation on the line
Code 651 is accompanied by the notification "The modem or other communication device reported an error." This problem can occur for the following reasons:
-
Lack of physical connection (damaged wire, connector, network card, etc.). Check all devices and cables for integrity. Reboot the router, and also reconnect all the wires (the plugs should fit snugly in the sockets).

Error 651 Error 651 can occur due to a breakdown or improper connection of equipment
- Incorrect connection settings that were changed by the user himself, a virus or after a system failure. Delete the connection and recreate it. How to do this is described in detail in this article.
- Provider-side technical work. Call your company's support team and report your problem. If repairs are actually underway on your line, the operator should advise you when they will be completed.
- No response from the provider's server. It may be overloaded with a lot of requests right now. Wait a moment and try to access the network again.
Error 720: corrupted system files or network card driver
Next to code 720, you will see a message about a failed connection attempt that occurred because PPP protocols could not be negotiated. In this case, try the following:
-
We open the "Command Line" console - through the "Start" menu or in the "Windows Search". Click in the search results on the console with the right mouse button and select "Run as administrator".

Running the console as administrator Click on "Run as administrator"
-
In the editor, paste the sfc / scannow code. Press Enter immediately.

Entering a command in the console Paste the command and press Enter to start the process of its execution
-
We are waiting for the integrity check to complete. If any components are damaged, the system will immediately replace them with new ones.

Scanning process Wait for the scanning process to complete
If this method fails, try reinstalling the network card driver. If the result is negative, roll back to the restore point, if you have one. The last resort is to reinstall the entire operating system.
Error 711: Unsuccessful attempt to start the Remote Access Manager service
The system may fail to enable the remote access service. In this case, you need to activate it yourself:
-
Right-click on the shortcut "My Computer" - make a choice in favor of the item "Management".

Item "Management" In the context menu, select the third item "Management"
-
Go to the "Services and Applications" section in the window of three panels, and then open the first "Services" block in the middle part of the window.

Computer management Open the last tab "Services and Applications", and in it just "Services"
-
We find in the list first the service corresponding to the remote access connection manager. Double click on it.

List of services In the list of services, find the "Remote Access Connection Manager"
-
In the new window, set the automatic launch type and click on "Run". Apply all the changes.

Enabling the service Set auto startup type and activate the service
- We do the same for the Telephony service - it is at the end of the list.
Error 678 and 815 "The remote computer is not responding"
The cause of this error may be damage to the cable - check it, as well as the tightness of the cable connection to the network device or PC. The provider's server may also be unavailable - you will have to wait here. Call the operator's technical support and find out what is happening on the line.
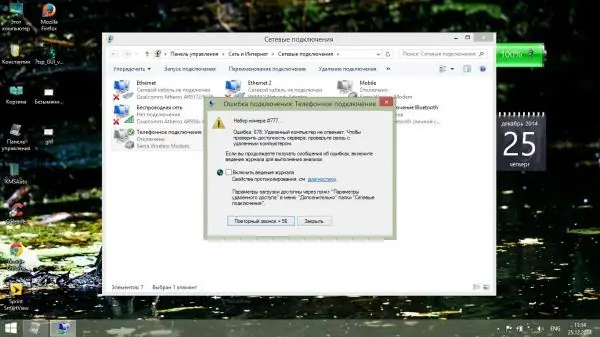
Error 678 appears due to problems on the line of the provider
Errors can occur due to the malfunctioning of the antivirus or Windows Firewall. Try to deactivate them for a while. You can disable third-party security software such as Kaspersky or Avast through the Windows tray.
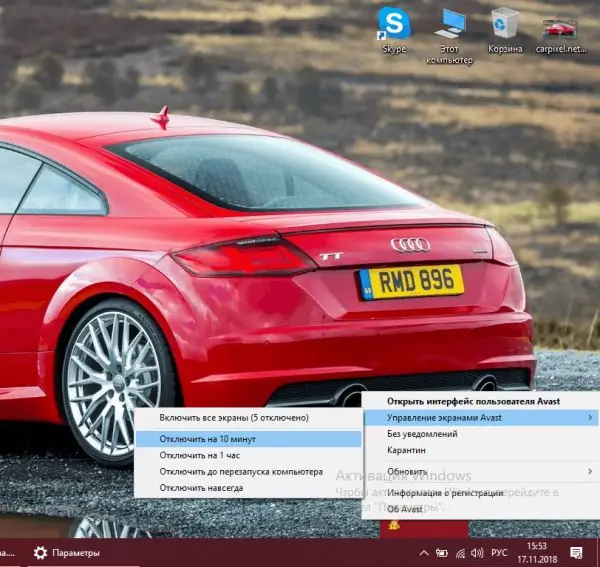
Disable third-party antivirus for a while to check network connection
If you have an active antivirus - the standard Windows Defender, you need to turn it off for a while in its settings. In the "Options" section, disable real-time protection.
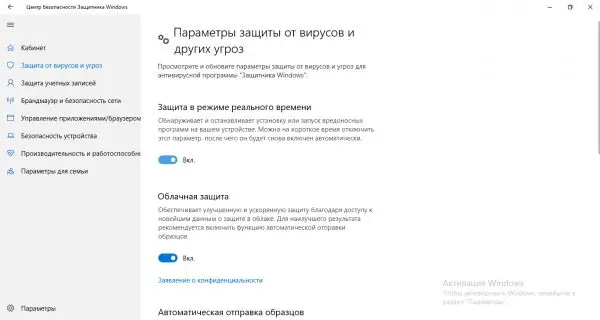
Disable real-time protection
We will tell you in detail how to deactivate the "Firewall" (the method is designed for all versions of Windows):
-
We open the "Control Panel" using the "Run" window and the control code or the "Search" panel (for "ten"). You can simply open the Start menu and find the appropriate item there. We are looking for the line with "Firewall" on the panel - follow the link.

Firewall In the "Control Panel" find the "Defender Firewall" section
-
In the left area of the window, click on the item to enable or disable the protective wall "Windows".

Turning Firewall on and off Click on the "Turn on and off" link
-
We put a round icon next to the first or second value "Disable", depending on the type of network that is currently being used - private or public. If you do not know which network you have, deactivate protection for two types at once. Click on OK.

Deactivating the "Firewall" Disable "Firewall" for one of the networks
-
In the section, green shields will immediately be replaced with red ones. We check the connection and turn on the Firewall back.

Deactivated protection After deactivation, a red shield will appear in the "Firewall" section
If it doesn't help, check if the network adapter is enabled in the "Device Manager". Open its window using the instructions described in the "In Device Manager" section of this article. In the network adapters, find the line with PPPoE, right-click on it: if the menu contains the "Enable" item, then the adapter has been disabled - just click on this item to activate it.
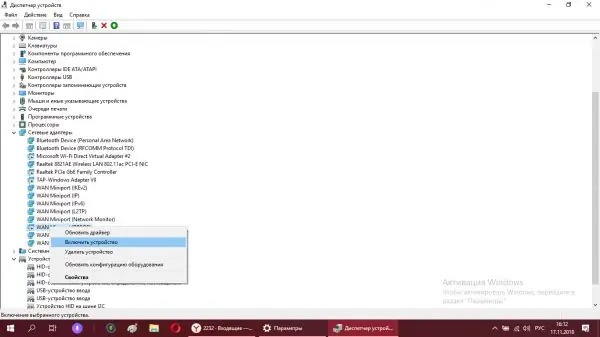
Enable the adapter in the "Device Manager" if it was previously disabled
If the device has already been activated, try reinstalling the network card drivers - download the installer from the official website. If the result is negative, you need to send the network card or PC for diagnostics to the service center - perhaps the network card is faulty or needs repair.
Error 691: incorrect data for authorization or minus on the balance
Code 691 usually contains a message stating that the username and password are not valid in this domain. The two most common reasons for this error are a minus on the account (check it using your personal account on the provider's website or by calling the support service) and incorrectly entered data for authorization.
To rule out the last reason, enter them again. When doing so, make sure the Caps Lock key is not on. The English keyboard layout on the PC must also be activated. If you enter everything correctly, but the error still pops up, call your provider.
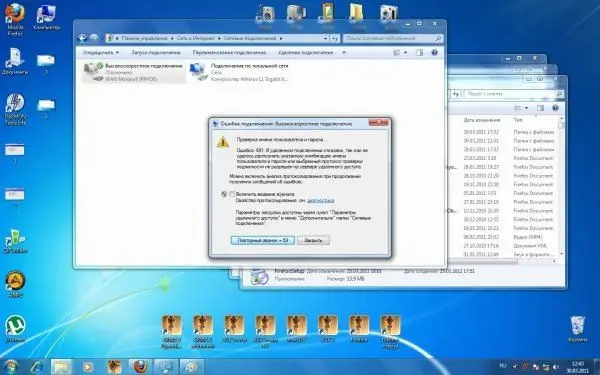
If you encounter error 691, it means that you entered your username and password incorrectly, or there is a minus on your account
Check Internet access - open any site in a browser. Perhaps authorization in the network has already been carried out, but the operating system itself has not yet notified the user.
Video: how to fix errors 651 and 691
Error 813: there is a duplicate connection
Make sure that you do not have a duplicate connection, for example, if you previously created a new connection and did not delete the old one. Delete all PPPoE matching connections in the Network Connections window, restart your PC and create a new one.
If you've only ever had one connection, the following method may help:
-
Right-click on the battery icon in the lower right corner next to the network icon, date, etc. Select the second line "Power supply" from the context menu.

Power icon context menu Right-click on the power icon and select "Power Options"
-
In the "Control Panel" window, click on the second link "Actions of the power buttons".

Power button actions Follow the link "Actions for the power buttons"
-
In the next section, uncheck the "Enable Fast Startup" item. Click on "Save Changes".

Disable Fast Startup Disable Fast Startup in the Power Buttons section
Error 797: connection failure, incorrect network settings
Most of this problem is caused by a simple failure of the created connection. The first step is to re-create the connection. There may also be a blocking by the antivirus or Windows Firewall - temporarily deactivate the protective utilities.

Error 797 may mean that a previously created connection has failed, or the network settings are incorrect.
Setting the correct network settings
If you have a network cable in your apartment or house, incorrect connection settings often become the cause of error 797. Follow these steps to rectify the situation:
-
Launch the "Network Connections" window through the Network Center, using the instructions from the "Using the" Control Panel "section of this article. Find your connection there - right-click on it to bring up a menu with options. Select the last Properties object.

Connection context menu in a window Open the window with the properties of your connection
-
In the list, find the line with IP version 4 - open the component parameters by double clicking.

Network tab with list of components Launch the window with the properties of the component "IP version 4"
-
In a new window, we put a round mark next to the value about automatically obtaining an IP address, DNS server and related components. Save the changes after this.

Setting up automatic data acquisition Deliver automatic data retrieval
Reinstalling the modem software
If you are using a 3G or 4G USB modem, reinstall its proprietary utility. You should not use the standard removal method through the Programs and Features service, as it will not remove all software data from the PC. You can remove all information (registry entries and other residual files) using a special application. Let's analyze the removal procedure using Revo Uninstaller, a convenient and free program:
-
Switch to the official page for downloading software. Click on the button in the first column of Free Download to download the free bundle.

Revo Uninstaller official website Download the free version of Revo Uninstaller from the official website
-
Install the utility on your PC, and then open its interface via "Start" or the shortcut of the executable file on the "Desktop". Find the proprietary utility in the list, select it with the left button and click on the "Delete" action at the top. Your operating system will immediately create a restore point.

List of utilities installed on the PC Find the proprietary utility, click on it and select the action "Delete"
- This will open the modem utility window to delete all basic data. Confirm the deletion and wait for it to complete.
-
Now go back to Revo Uninstaller. Select the full scan mode for remaining files on the hard disk and start scanning using the button at the bottom of the window.

Selecting a test mode Highlight full mode and click on "Scan"
-
Check the boxes next to all lines with entries in the registry and delete them. Confirm the action in the dialog box.

Removing registry entries Click on "Select All" and then on "Remove"
-
Perform the same way to clean up "junk" files and folders in the next window.

Removing residual files and folders Select all folders and files and click on "Delete"
- Restart your computer for all changes to take effect and install the firmware again. For this, a simple connection of the modem to the PC may be sufficient. Or download the installer from the official website of the provider, if the software is not installed automatically.
- After installing the software, restart your PC again and check the connection.
Error 629: The connection was closed by the remote server
An error occurs due to poor connection quality, server overload, or poor negotiation between the PC and the server. In this case, feel free to contact the technical service of the provider right away, since, most likely, the problem is on his side. Perhaps the provider's software has temporarily disabled you as an "extra" subscriber in order to quickly reduce the load on the server.
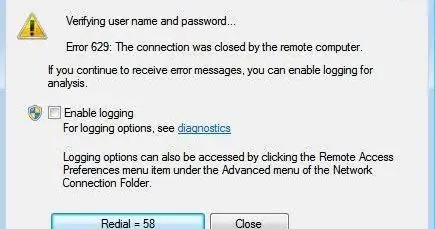
Error 629 implies failures on the provider side - call your operator
Error 628: Incorrect profile settings or initialization error
This error means that your connection attempt was rejected by your provider's software for one reason or another. This can happen due to the lack of initialization of the modem or incorrect profile settings.
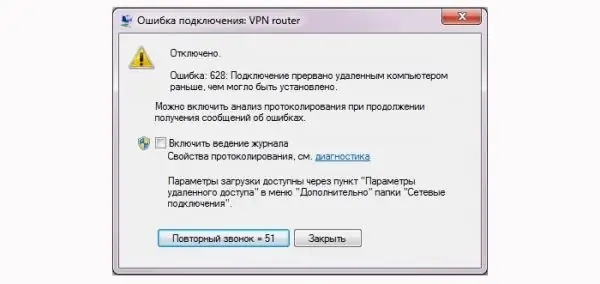
Error 628 can occur due to incorrect profile settings or due to incorrect initialization
Profile settings
If you have incorrect profile settings, manually change them in the firmware interface of your modem. Consider the process using the example of a program for a modem from Beeline:
-
First of all, disable the connection in the first section using the dedicated button.

Disable button Click on "Disable" in the first tab of the program
-
Go to the penultimate tab "Settings" and go to the last section with information about the device.

Modem information Go to the "Modem Information" section in the settings
-
Click on the "New" button to create another profile. Enter any name for it in the first field.

Creating a new profile Proceed to create a new profile
-
Write the APN address. For the clients of the Beeline provider it is home.beeline.ru or internet.beeline.ru.

Entering APN Enter home.beeline.ru as APN, if your operator is Beeline
-
Type * 99 # on the line for the access number - it is the same for all operator companies.

Access number Enter * 99 # as access number
-
Enter now your login and password. For Beeline, this is one word beeline. Some operators do not require this data to be entered.

Login and password input Enter login and password
-
Click on "Save" in the right pane of the window.

Saving changes Click on "Save"
-
Go to the "Connection" tab again and in the drop-down menu "Active profile" install the one you just created. Click on "Connect". If you are in doubt about the value to enter for APN, login and password, call your operator's support service and ask to send the data to you via SMS.

Profile selection From the menu select the profile you just created
Modem initialization
To manually initialize the modem (so that the provider's software can recognize your device), follow these simple steps:
-
Launch Device Manager on your PC. Use a simple method: hold down the combination of Win and R, and in a blank line, enter or simply paste the devmgmt.msc code - execute it by clicking OK or Enter.

Devmgmt.msc command Paste the devmgmt.msc command and click on OK
-
In the "Modems" branch, find your network device and right-click on it - click on the "Properties" option.

Modem properties Open the window with modem properties
-
In the section for additional parameters, insert the init command. For Beeline subscribers it is as follows: AT + CGDCONT = 1, "IP", "internet.beeline.ru". For other operators, the access point address will be different. Check this information again with the provider's support service.

Additional communication parameters In the "Additional communication parameters" section, insert the required command
- Click on OK and restart the modem: remove it from the slot and insert it again after 5 minutes.
If none of these methods helped, reinstall the branded software using the instructions above.
How to remove a broadband connection
Often users need to get rid of a previously created high-speed connection, for example, if it was accidentally duplicated or to reset the entered data for authorization. This can be done in three ways.
Using the "Control Panel"
The classic removal method is to use the "Network Connections" system window. How to get to it and what actions to perform in it, we will tell you in a small instruction:
-
Expand the network center through the "Control Panel" or otherwise described in the section on configuring PPPoE connection in this article. In the left column with links, click on the second to change the parameters of individual adapters.

Change adapter settings Click on the link "Change adapter settings"
-
Find the connection you created earlier - right-click on it. In the drop-down menu with options, first select "Disable" if your connection is currently activated. Wait for the system to turn off the network. Now right-click on it again - select "Delete".

Disable item If your connection is enabled, disable it before deleting
-
If the uninstall option in the menu is not clickable, select Properties. In the dialog box, already click on the "Delete" button under the list of components.

Delete button Click on the "Delete" button below the list
-
In the new small window, click on "Yes", thereby confirming your intention to get rid of the connection.

Delete confirmation Click on "Yes" to start uninstallation
Video: how to remove unnecessary connections in Windows
In the "Device Manager"
In this method, we will use another system window - "Device Manager". In it, we can remove the device driver itself, which is responsible for the high-speed connection. Follow these instructions carefully to avoid accidentally deleting an important physical device:
-
If you have Windows 10, call the dispatcher window as follows: right-click on the "Start" icon in the bottom left corner and in the list just select the desired item.

Start context menu Open "Device Manager" from the Start context menu if you have Windows 10
-
If the context menu of the "Start" button for some reason is not called up or you have a different version of Windows, for example, "seven", use the standard method. Click on the "My Computer" shortcut on your desktop, expand the "Properties" item.

Item "Properties" Open the window with the properties of your computer
-
In the window with information about the device and system, go to the corresponding manager link located in the left pane.

Link to "Device Manager" Click on the "Device Manager" section
-
In the manager, find and expand the list of "Network devices" or "Network adapters".

The list "Network adapters" Open the list of "Network adapters" in "Device Manager"
-
Click on your WAN Miniport (PPPoE) adapter with the right mouse button and click on the "Disable" or "Remove device" action.

Removing a device Select to remove or disconnect the device from the context menu of the adapter
-
Let the system know that you really want to deactivate the adapter - click on "Yes".

Device disconnection confirmation Click "Yes" to turn off the network adapter
-
If you suddenly want to return a previously deleted device, in the manager open the list of actions on the top panel of the window - select "Update configuration" - the driver will reappear in the list.

Configuration update If you need to replace the remote adapter, click on "Update configuration" in the "Action" menu
Through the "Registry Editor"
A more complex method for removing a connection is to edit the registry. It should only be used by users who own a PC at least at an intermediate level. You need to be very careful when following these instructions to avoid deleting important registry entries:
-
We open the "Registry Editor" window on the display. For all versions of "Windows" one way is suitable: click on the Win and R buttons and in a small window write the word regedit - execute this command.

Regedit command Enter the regedit command and click on OK
-
In the warning window, click on "Yes". This means that we are allowing the editor to change anything in the OS.

Permission to make changes to the system Allow "Registry Editor" to make changes on the PC
-
In the left pane of the window, double-click on the third directory HKLM, and then on SOFTWARE.

Registry editor Open the third branch HKLM, and in it SOFTWARE
-
Now we run block by block (they will be nested inside each other): Microsoft - Windows NT - CurrentVersion - NetworkList - Profiles.

Profiles folder Find the unnecessary folder in the Profiles directory
- The profiles directory will contain folders with different connections that were ever created on the device. Your goal is to find the folder that matches your connection. To do this, open folder by folder and look at the last entry in the list on the right. The name of the connection will be indicated in the "Value" column.
-
When we have found the required directory in the left area of the window, right-click on it and select the "Delete" action.

Deleting a folder Click on "Delete" in the context menu of the folder
-
In the dialog box, we allow the system to delete it.

Confirmation of deleting a folder from the registry Confirm that you want to permanently delete the folder
- Restart your computer - this is necessary for all changes to take effect.
A high-speed PPPoE connection allows you to transfer information from the client to the provider's server in an encrypted, compressed form. It is very simple to create and configure this type of connection - the main thing is to know the username and password that are issued by the operator. If you have any problems with PPPoE connection, pay attention to the error code - it will help you quickly and correctly choose a solution.
Recommended:
How To Turn On Siri On An IPhone And Use The Program, What Is Siri, The Basics Of Setting, Turning Off Voice Control And Other Information

Why do I need Siri on iPhone, iPad and iPod. How to turn it on and off. Siri voice changer. Troubleshooting: Reset iPhone Settings
How To Authorize A Computer In Itunes, How To Enter Aytyuns, Possible Errors And Their Solution With Photos And Videos
How to properly authorize and de-authorize a computer in iTunes. What to do if various problems arise. Proven solutions
Windows 10 Desktop - Setting Up And Troubleshooting, Step-by-step Instructions And Tips

Ways to customize the desktop in Windows 10. Problems in its work, causes and solutions. Step-by-step instructions, videos
How To Set Up An Internet Connection On A Computer: Setting Up A Network And Automatic Connection At System Startup
How to set up an Internet connection on a PC with Windows XP, 7, 8 and 10, as well as Linux and Ubuntu. Automatic internet connection when Windows starts
How To Fix The Error Your Connection Is Not Secure When Establishing A Connection On Mozila Firefox

Eliminate the error of establishing a secure connection in Mozilla Firefox. Verified instructions
