Table of contents:
- Author Bailey Albertson [email protected].
- Public 2023-12-17 12:53.
- Last modified 2025-01-23 12:41.
Error with the text "Windows cannot contact the device or resource (primary DNS server)": how to fix it
Often, when connecting to a network, an error occurs with the text "Windows cannot connect to a device or resource (main DNS server)". What is a DNS server and for what reasons the user's device cannot access it? How to be in this situation?
Content
- 1 DNS server: what it is and how it works
- 2 What causes the error
-
3 How to fix the error
- 3.1 Checking for viruses in the system
-
3.2 Disable antivirus
3.2.1 We temporarily deactivate the "Windows Defender" and the standard "Firewall"
- 3.3 Service restart
- 3.4 Clearing the cache and resetting DNS settings
- 3.5 Removing a network card in the "Device Manager"
-
4 What to do if the problem cannot be solved
4.1 Using Google Public DNS
DNS server: what it is and how it works
Communication between devices on the Internet is established by IP addresses (combinations of numbers separated by dots, for example, 192.65.148.209). It is very difficult to remember such page addresses, so a structure of domain names was created - the DNS (Domain Name System) system. An example of a domain name is yandex.ru.
Websites can be located on different servers, each of which has its own IP address. The computer does not store information about the IP addresses of the servers. To find out the required IP address, after entering the site address in the browser line, the user's PC automatically sends a request to the DNS server (which stores this information). Typically, this is the provider's DNS server that serves the user. This server looks for an IP address in its base - if the web server address is found, a request is immediately sent to it to receive site data. If it is approved, the site page opens in the user's browser.
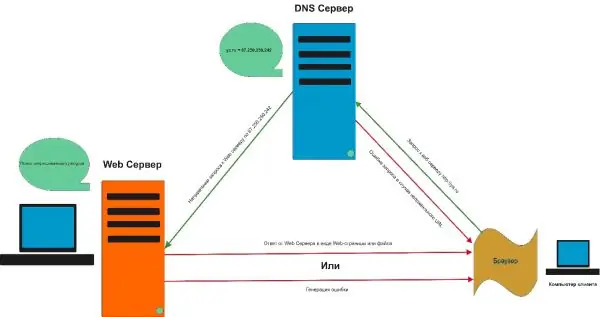
The computer sends a request to the ISP's DNS server to find out the IP address of the server on which the desired site is located
If there is no data on the local DNS server, it sends a request to servers on a higher level until it receives information. As a result, the computer, as it works on the Internet, temporarily stores data for frequently used sites so that they open faster.
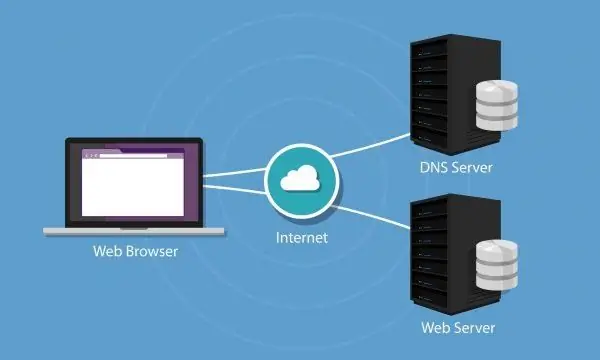
The computer gradually begins to store in the cache the IP addresses of the servers on which the sites frequently visited by the user are located
What causes the error
Until the error "Windows cannot connect to the device or resource (main DNS server)" is detected, the user is faced with a denial of access to the Internet.
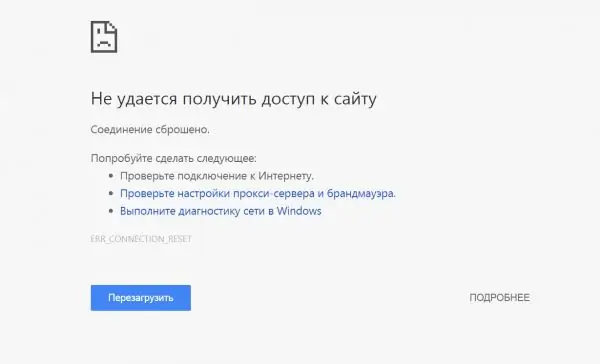
When you try to open a particular site, the message "Cannot access the site" may appear
The first thing the user does is diagnose the network with the built-in Windows tool:
-
Right-click on the network icon to the left of the language, date and time in the lower right corner of the display - select the first option "Troubleshooting".

Network icon context menu Click on "Troubleshooting" in the context menu
-
Wait while the running tool detects the problem and tries to fix it.

Detecting problems We are waiting for the diagnostic tool to identify the problem and its cause
-
In the diagnostic report, the user then sees the error "Windows cannot connect to the device or resource (main DNS server)". On the right is the value "Discovered" with an exclamation point in a yellow triangle. The tool, as a rule, cannot solve this problem on its own. There is nothing to do but click on "Close" and look for another way out of the situation.

Diagnostic report The report may say that the network problem is due to the PC not being able to contact the DNS server
Further actions of the user will depend on the reason why the provider's DNS server may be unavailable. The problem could be on the user or provider side. Among the reasons that depend on the user's PC, the following are distinguished:
- blocking access to the server by a security program or "Firewall" - the antivirus considers the server dangerous and malicious;
- failure or breakdown of the service itself - it needs to be restarted;
- incorrect DNS parameters specified in the connection settings;
- overflowing DNS cache;
- a virus on the PC - it is possible that malware sneaked into the operating system and made changes to the hosts file.
When you find any error on your computer, first of all try to remember what actions preceded it: installing a utility or game (which could be with viruses), editing the registry, cleaning the system from "garbage" and so on. This can help determine the cause of the error.
How to fix the error
It is extremely difficult to immediately tell why the error occurred, so you need to apply method after method in order to gradually eliminate the causes and ultimately find a solution that works in your situation.
Checking for viruses in the system
First, check the "operating system" with a third-party antivirus that runs on your PC, or with the standard Windows Defender. Before doing this, do not forget to make sure that the program has been updated and received an update for its databases.
It is possible that the security utilities on your device will not detect problems, or they will find viruses that are not involved in the error. In this regard, it is recommended to use an additional tool - the Dr. Web CureIt! Service, a curing utility that does not conflict with the already installed anti-virus. The developer offers a paid and a free version, consider checking the example of the latter:
-
We go to the official page to download the specified healing program. We will have to agree to the collection of statistics about us and to the license agreement, otherwise we will not be able to use the free version. If you have the option to purchase the paid version, please do so. Click on the button to start downloading.

Dr. Web official website Click on “Download Dr. Web CureIt!"
-
Open the executable file of the antivirus and click on the "Yes" button to allow the tool to change something on the device.

Permission to make changes Allow the healer to make changes to the PC
-
We set in the window a checkmark to the left of the item "I agree to take part in the software quality improvement program" and click on "Continue".

License and updates Agree to the terms of the agreement and click on "Continue"
-
We start the check using the large central button.

Running a check Click on the "Start Checkout" button
-
We are waiting for the curing utility to complete the scan. The approximate duration of the check will be indicated - we are also monitoring the progress.

Scanning process Wait for the scanning process to complete
- If viruses are found, in the "Action" column, select removal for each threat. We reboot the PC and see if there is access to the Internet.
Disable antivirus
Turning off third-party security software is pretty easy. Let's show the process using the example of Avast antivirus:
-
Click on the up arrow icon in the lower right corner of the display to open the Windows tray with icons for programs that are currently running on the PC in the background. Find the Avast icon and right-click on it.

Trey Windows Find the antivirus icon in the tray and right-click on it
- In the menu, move the cursor to the second option "Screen Management".
-
Next, click on one of the shutdown options depending on the time you need, but 10 minutes is enough. After 10 minutes, the antivirus is activated again. We check the network connection.

Controlling Avast screens Select 10 minutes shutdown from the menu
- Let's also try to separately turn off the "Firewall" of third-party antivirus. This service is responsible for filtering Internet traffic, so it is likely that it is he who blocks access to the DNS server. Open the Avast interface by clicking the left button on the tray icon.
-
Go to the "Protection" section and find the "Firewall" tile in the blue menu - turn it off and check the connection again.

Protection tab In the "Protection" tab, find the section for the firewall and disable it there
-
In other third-party utilities, the "Firewall" section can be located in the additional functions section, for example, for 360 Total Security, this is the last block with tools.

Tools tab The section for "Firewall" can be found in the block for additional functions
If your problem was solved only by a complete deactivation of a third-party antivirus, you need to replace the antivirus (for example, start using the standard Defender).
We temporarily deactivate the "Windows Defender" and the standard "Firewall"
Let's analyze the stopping of the antivirus also using the example of the built-in protective utility "Windows". Here it will be necessary to dig directly into its settings, which will take more time:
-
We launch the Defender interface through the Windows tray - its icon is in the form of a white shield. Go to the settings - for this, click on the "Parameters" item with the gear icon in the lower left corner of the panel.

Windows Defender Click on the gear in the lower left corner of the antivirus
-
Open the protection settings - the link under the item "Notifications about protection against viruses and threats".

Virus and threat protection options Click on the link "Virus and threat protection settings"
-
For the parameter "Protection in real time" set immediately the value "Off." - just click on the switch. After a while, the antivirus will turn on again. During this time, we check the connection, but we do not close the "Defender" window yet.

Disable protection Disable real-time protection
-
If it does not help, turn off the "Firewall". Let's move on to the fourth section in the list dedicated to him. We select the type of network - usually next to the type of your network there will be the word "active". In this case, this is a private network - click on the link.

Firewall and network security Open the active item in the section about "Firewall"
-
Click on the switch to stop the firewall.

Disable firewall Set to "Off" for "Windows Defender Firewall"
-
We read the message that the device is currently sensitive, check the connection and turn on the "Firewall" again.

Disabled screen An inscription will appear under the item stating that the PC is currently vulnerable
You can also deactivate the built-in firewall of the system in another way - through the "Control Panel":
-
Press R and Win to launch the Run panel - in it we type the control key and click on OK.

Control command In the "Run" window, type control and click on OK
-
We put large icons in the upper right corner to make it easier to find the desired section, and click on "Defender Firewall".

Control Panel Open "Firewall" through "Control Panel"
-
Open the page for enabling and disabling the firewall - use the fourth link from the top in the left column.

Turning the screen on and off Click on the caption on the left "Turn Firewall on or off"
-
We set the value "Disable" for the type of network that you are using, or for two at once, if in doubt. To save the parameter changes, click on OK and check if there is Internet access and access to the DNS server.

Deactivating the firewall Put the value "Disable" and click on OK
Service restart
If manipulations with the "Firewall" and antivirus did not solve your situation, it is possible that the matter is in a single failure in the operation of the service responsible for queries directed to the DNS server. To check this, follow these steps:
-
Hold R and Win for a couple of seconds, and then write the services.msc code in the window, or copy and paste if you cannot remember the key. This will launch the system window with services.

Services.msc command Paste the command services.msc and click on OK
-
There is another launch method - through the "Control Panel". Open it through the same "Run" window and the control command, or use the "Windows Search" or the "Start" menu.

Control panel in "Search" Enter in the search bar "Control Panel"
-
Find and click on the "Administration" link.

Administration Open the "Administration" section of the "Control Panel"
-
In the "Explorer" window near the end of the list there will be a shortcut to the "Services" service - double-click on it to open the window.

Services shortcut Open the Services application in the list
-
Right away you need to sort the list of services by name. Click on the heading of the first column with item names. Look at the very beginning for the string "DNS client". Select it with the left mouse button.

Service restart Restart services using a dedicated link
- Click the "Start" link if the service for the DNS server was previously disabled for some reason. If it is activated, there will be "Stop" and "Restart" links. Click on the last one and restart your device. Check if the error has been fixed.
-
It should also be taken into account that there may be no links at all. If you open the properties of the service by double-clicking, all options will be non-clickable. In some versions of Windows, for example, in the top ten, the user cannot change the parameter values for this service. In this situation, just restart your PC.

Lack of links If you don't have a Restart link, just restart your PC
Clearing the cache and resetting DNS settings
You can try to fix the error by deleting all data from the DNS cache and resetting the values of its parameters, if restarting the service and the PC does not do a positive result. You can do a quick cleanup through the Command Line console:
-
On the screen, you need to open the specified console to enter commands. To do this, press two keys Win and R at once. In the opened small window write the cmd key and click on the button to run the command.

Cmd command Run the cmd command in the window
-
You can enter this same key as a query in the Search panel and open the classic editor application in the results.

Cmd request Enter cmd query in the search bar
-
Now run the following three commands one after the other: ipconfig / release, ipconfig / flushdns, ipconfig / renew. Copy and paste the code and then just hit Enter.

Ipconfig / flushdns command Execute three commands one by one in the console
-
Almost immediately after the execution of each of the commands, a notification will appear in the editor that the operation was successful. Close the editor, restart the device and check immediately if the problem has been resolved.

Successful procedure notification When you have completed all the commands, close the editor
Removing a network card in the "Device Manager"
If all of the above methods turned out to be ineffective, try updating the hardware for the network card in the "Device Manager":
-
If you have Windows 10, right-click on the Start button (or hold down the Win + X combination) and click on the dispatcher in the context menu.

Start button context menu From the context menu of the Start button, select Device Manager
-
If you have a version of "operating system" below, right-click on the classic icon "My Computer", located right on the "Desktop", and click on "Properties". By the way, this method is also suitable for the "ten".

Context menu of the shortcut "My Computer" Select "Properties" in the context menu "My Computer"
-
On the panel with data about the PC and the operating "operating system", follow the link in the left column, which leads to the dispatcher.

Device Manager link Follow the link "Device Manager"
-
Expand the list with network adapters in the manager interface and find the adapter that is responsible for your connection. If you have "Wi-Fi", select the line with the word Wireless or Wi-Fi with the right mouse button. If you have a cable connection without using a router, click on Family Controller.

Network adapters Select your network adapter from the list
-
First, select Update Configuration from the menu. Wait for the update process to complete and check your internet access.

Configuration update In the context menu of the network adapter, update the configuration
-
If there is no connection, try removing the hardware completely. Select "Remove device" from the context menu. Confirm your action in the gray window, but at the same time make sure that there is no check mark to the left of the driver item - you cannot delete the drivers, otherwise you will have to search for them yourself and download them from the official resource of your network card.

Removing a component Remove the hardware, but leave the drivers for it on the PC
-
When the equipment disappears from the list, click on the Action menu in the upper area of the manager and select the first item to update the configuration. The adapter will reappear in the list - check your internet connection.

Action menu In the Action menu, immediately update the hardware configuration
What to do if the problem persists
If the solutions above are not helpful, the problem may be on the ISP's side. Contact the support service of your operator: call, send an e-mail, write in online chat (if there is an alternative way to connect to the Internet). It is best to call, as the letter will be considered for a long time.
If you do not know the number of your provider, find your contract with the company that you entered into when connecting to the Internet, and find the phone there.
When you talk about your problem, indicate exactly the text of the error, as well as what methods have already been adopted to fix it. To make sure that it is you who are calling, you may be asked to give your full name and contract number. Perhaps the problem is not on the side of the provider, but even in this case, you will not be left in trouble - the operator will try to tell you about other ways to solve the problem that you can apply yourself on your PC.
Using Google Public DNS
If you could not get through to the operator or you do not want to do this, you can try another solution method: change the DNS settings from the automatic detection value or the server specified in the contract to the Google Public DNS server. The process is simple, let's tell you more about it:
-
Let's start with the list with the previously created connections. To do this, open the "Run" window through a combination of Win and R, and then write the ncpa.cpl key in the line - click on OK or on Enter and wait for the command to be executed.

Ncpa.cpl command Execute ncpa.cpl code in window
-
If nothing appears on the display, go the other way: go to the "Control Panel" and in it we find the "Network Control Center" section.

Network and Sharing Center Open through the "Control Panel" "Network and Sharing Center"
-
Click on the second line in the left column to change the parameters of different adapters.

Change adapter settings Click on the link "Change adapter settings"
-
Select your connection in the window with connections with the right mouse button and click on "Properties". In this case, we have a wireless network.

Item "Properties" Open your connection properties
-
You can also double-click on the connection with the left button, and already in the dialog box select the "Properties" button with a yellow-blue shield.
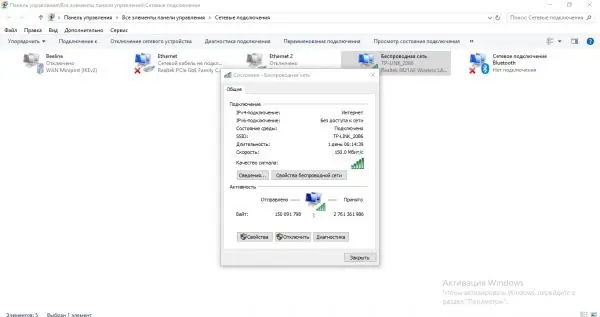
Properties button Click on the "Properties" button in the "Activity" block
-
In the network section, look for an adapter component called "IP version 4". Open it by clicking on the "Properties" button or by a simple double click.

Network tab Find the item "IP version 4"
-
In the first section with general parameters, select the second value for the DNS server with manual address entry.

Automatic DNS server detection Set manual entry of DNS server address
-
We use 8.8.8.8 for the main server, and 8.8.4.4 for the second. We save all the changes, reboot the "operating system" and check the access to the network. If the method does not work, use the Yandex DNS server 77.88.8.8.

Entering server addresses Enter the Google DNS server address
The error "Windows cannot connect to a device or resource (main DNS server)" occurs for various reasons: from incorrect operation of the antivirus and the presence of malicious code on the PC to incorrect DNS server parameters and a single failure in its operation. Scan your device for viruses. If nothing is found, temporarily deactivate antivirus and Firewall. After that, try restarting the services, and then resetting its parameters and deleting the contents of its cache. If it does not help, update the configuration of your network adapter in the "Device Manager" and set the DNS servers of Google or Yandex in the network settings. Also call the provider - it is possible that the problem is on their side.
Recommended:
What Cannot Be Cooked For The New Year And What Is The Reason

What not to prepare for 2019? Traditions and prohibitions of the eastern calendar
The Better To Feed A Kitten: Natural Food, Ready-made Dry And Wet Food, What Foods You Can And Cannot, Feeding Rules, How Many Times A Day

Kitten feeding rules. Veterinarian recommendations. Features for every age. Prohibited and permitted products, prepared feed. Feed reviews
Is It Possible To Get A Haircut During Pregnancy, Why Is It Considered That Pregnant Women Cannot Be Cut

Is it possible for pregnant women to cut their hair. What do doctors and hairdressers think about it? How to cut the hair of expectant mothers are popular. Hair Care Tips
Why A Chinese Rose Cannot Be Kept At Home: Signs And Facts About Hibiscus

Are there any objective reasons for considering hibiscus a plant dangerous to humans? Negative omens and superstitions associated with it
Why Geraniums Cannot Be Kept In The House: Signs And Rational Reasons

Why it is believed that you can not keep geraniums at home. Signs, superstitions, objective reasons
