Table of contents:
- Author Bailey Albertson [email protected].
- Public 2023-12-17 12:53.
- Last modified 2025-06-01 07:32.
The passage of the chimney through the roof of various types
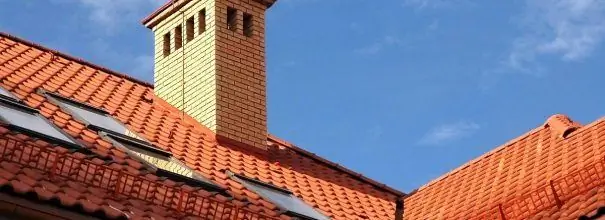
In buildings with stove heating, such as a private house, a bathhouse and others, it is required to build a chimney and organize its output to the outside. When arranging the passage of the pipe through the roof, certain standards must be observed in order to ensure safety and preserve the protective properties of the roof.
Content
-
1 Chimney passage through the roof
-
1.1 Chimney passage assembly
1.1.1 Video: features of the installation of the chimney passage
-
-
2 Features of the outlet of the chimney through different types of roofs
-
2.1 Metal roofing
- 2.1.1 Leading out a square or rectangular pipe
- 2.1.2 Laying a circular pipe
- 2.1.3 Video: Sealing the passage of a brick pipe through a metal roof
-
2.2 Roof from corrugated board
- 2.2.1 Drawing a rectangular pipe
- 2.2.2 Round pipe outlet
- 2.2.3 Video: conducting a pipe through a roof made of corrugated board
-
2.3 Roof from ondulin
1 Video: sealing the chimney on the roof of ondulin
- 2.4 How to lead a pipe through a soft roof
-
-
3 Stages of work on the outlet of the chimney through the roof
3.1 Video: do-it-yourself chimney box
Chimney passage through the roof
The chimney is designed to remove fuel combustion products (coal, gas, firewood, peat) and generate furnace draft. The way the pipe goes through the roof is determined at the design stage. The main condition for this is to ensure the fire safety of the roof, especially at its junction with the pipe, as well as to protect the junction from atmospheric moisture and condensate accumulation. The height of the pipe is assigned by the norms of SNiP and depends on the distance at which it is located from the roof ridge:
- if the distance from the center of the pipe to the ridge is not more than 1500 mm, then the height of the pipe above the ridge should be not less than 500 mm;
- with a distance between the center of the chimney and the ridge of the roof from 1500 to 3000 mm, the height of the pipe coincides with the height of the ridge;
- if the distance is more than 3000 mm, the height of the chimney must not be lower than a line drawn from the ridge at an angle of 10 °.
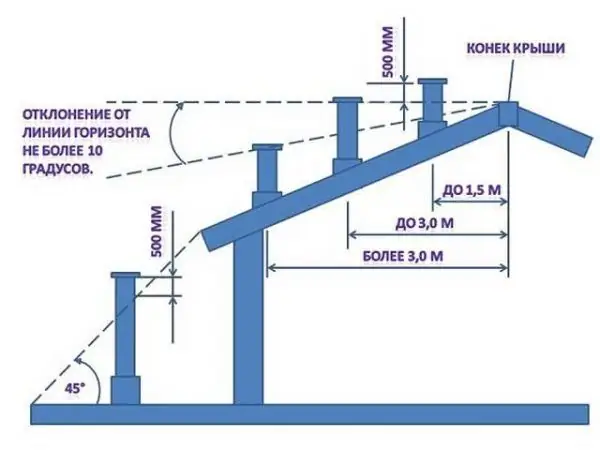
The height of the chimney is determined by SNiP norms and depends on the distance to the roof ridge
Chimney passage assembly
This element can be located in different places on the roof. One of the options preferred by roofers is the passage of the chimney directly through the ridge. This method is characterized by the easiest installation and avoids the accumulation of snow over the pipe wall. The disadvantage of this arrangement is a decrease in the strength of the rafter system, in which the ridge beam is either absent, or is sawn and fixed with two supports on the sides of the pipe outlet, which is not always possible to implement.
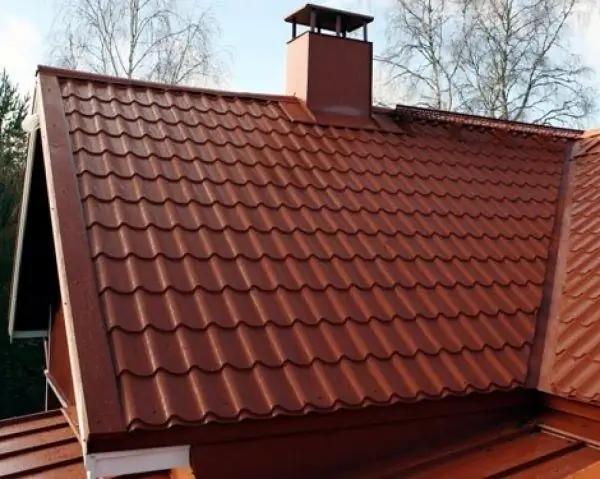
The outlet of the chimney through the ridge is simple to install, but it can violate the strength of the rafter system
Most often, the pipe is located near the ridge. So the chimney is least of all exposed to cold, and therefore, accumulation inside the condensate. The disadvantage of this arrangement is that the closer the pipe is to the ridge, the higher its height should be, which means that the construction will require additional funds.
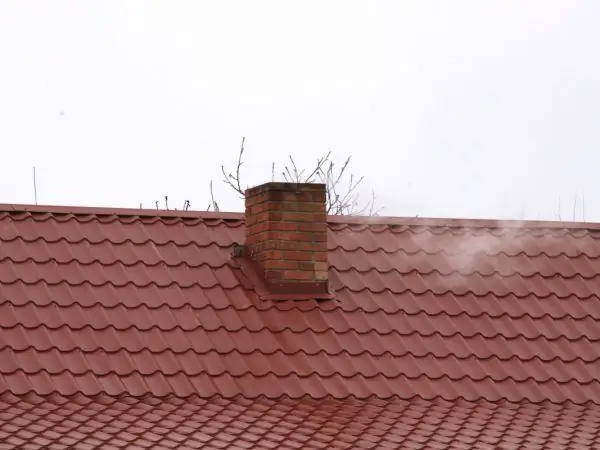
Chimney outlet at a short distance from the ridge is the most common and convenient option
It is not recommended to run the chimney through the valley, as snow can accumulate in these places, which will lead to a violation of waterproofing and the occurrence of leaks. In addition, it is difficult to organize a chimney box at the junction of the slopes. You should not place the chimney in the lower part of the slope - it can be damaged by snow coming down from the roof.
The material from which the pipe is made also affects the organization of the outlet system. Usually pipes are made of metal, asbestos cement or refractory bricks, but sometimes ceramic pipes are also found. The methods for waterproofing them will be different. In addition, each type of fuel has a certain combustion temperature, and this must also be taken into account when constructing a chimney.
Depending on the shape of the chimney, the outlet can be square, round, oval or rectangular. To protect the roof covering from high temperatures and protect it from fire, a box is arranged around the chimney. It happens as follows:
- Additional rafters are installed to the right and left of the pipe.
- Below and above, horizontal beams are laid at the same distance and similar section. The distance between the box beams and the pipe walls is determined by SNiP and is 140-250 mm.
- The inside of the box is filled with a non-combustible insulating material, for example, stone or basalt wool. In this case, the use of fiberglass is not recommended due to its easy flammability.
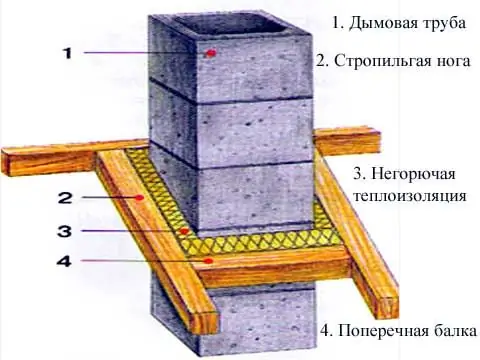
Do not fill the space of the box with fiberglass - it can ignite under the influence of high temperatures
It must be taken into account that the construction of the box can disrupt the ventilation of the under-roof space, therefore, additional ventilation systems can be installed.
Video: features of the installation of the chimney passage
Features of the chimney outlet through different types of roofs
When arranging the passage of the chimney, you need to pay attention to protection from atmospheric precipitation, which will flow down the pipe and the roof. To insulate the connection of the pipe and the roof from moisture, a protective apron is arranged around the chimney. This technology is similar for roofs with different coatings.
Metal roofing
Metal roofing is a popular roofing material that is thin steel, aluminum or copper sheets covered with a protective layer.
Output of a square or rectangular pipe
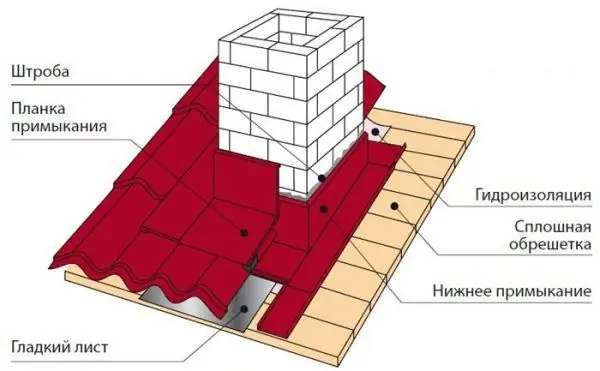
If the pipe is made of bricks and has a square or rectangle in cross-section, you can use the materials included in the coated kit to guide it through the metal roof. Since brick chimneys may have non-standard dimensions, before withdrawal, part of the covering sheets is removed or a larger hole is cut out.
For waterproofing the joint, special elastic tapes with an adhesive layer applied to one side are used. One edge of the tape is glued to the base of the pipe, the other to the roof sheathing. From above, the edge is fixed with a metal bar, which is attached with heat-resistant dowels to the pipe wall. All joints are coated with sealant.
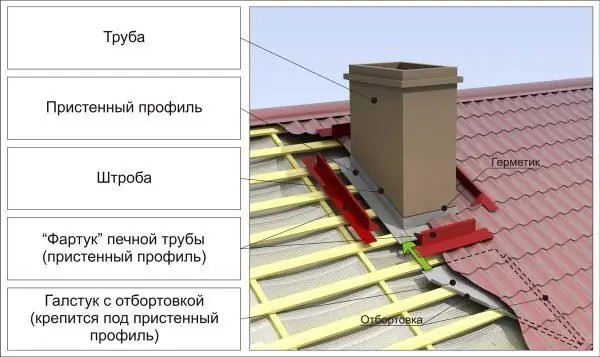
To reduce the likelihood of water flowing along the wall of the chimney, you can make a recess under the bar - a groove
An apron for a square or rectangular pipe can be made with your own hands. It is made from a smooth metal sheet of the same color as the base coat. The upper edge of the apron is tucked under the row of metal tiles located above so that the water flowing down from above does not fall under it. If the pipe is close to the ridge, the edge of the apron can be tucked in under the ridge or bent to the other side. To protect the passageway from precipitation, a tie is installed under the apron.
Conducting a circular pipe
When removing a round chimney or a sandwich pipe through a metal-tile roof, roof penetrations are most often used, connected to the hood through which the pipe is passed. A neat round hole is cut into the coating to fit the chimney, a universal glass or master flush is put on the pipe, the joints are sealed.
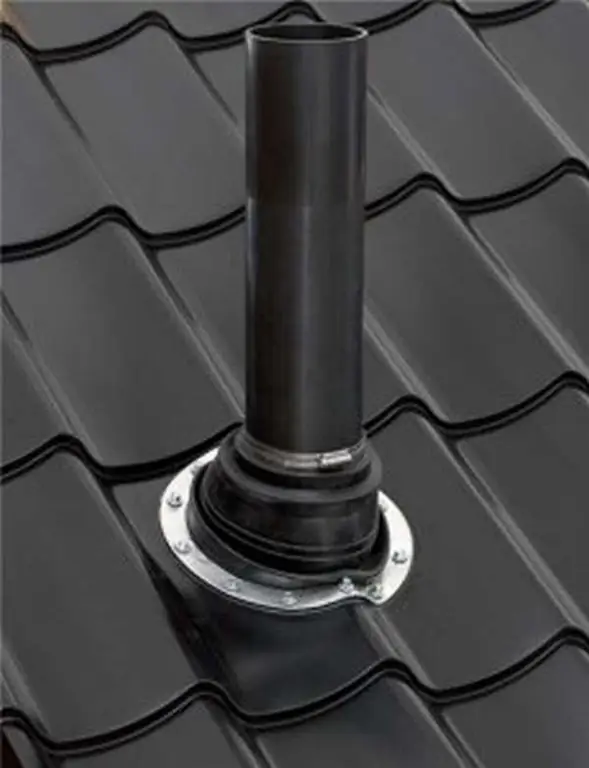
To seal the joint between the round pipe and the roof, special penetrations are used
Video: sealing the passage of a brick pipe through a metal roof
Corrugated roof
Profiled sheet is one of the most common roofing materials. But even in it a leak may occur if the chimney outlet is improperly equipped. The chimney with this type of coating is best positioned vertically. The hole in the roof is cut with a grinder, while it is necessary to ensure that the cut edge of the corrugated board is not chipped.
Conducting a rectangular pipe
If it is necessary to arrange a passage for a rectangular or square pipe, the apron can be made from galvanized sheet.
- 4 strips are cut out of metal, which will be placed in front, behind and on the sides of the pipe.
- The galvanized steel sheet is laid from the bottom edge of the chimney to the eaves. This element is called a tie and is subsequently covered with roofing material.
- The strips are tightly attached to the pipe, the lower part of them is fixed to the crate, and the upper part is inserted into the chimney.
- A pipe is made in the pipe wall, into which the bent edge of the strip is inserted. First, the lower bar is installed, then both side and upper. Sheets are folded under one another.
- Before laying the corrugated board, the place of passage of the chimney must be waterproofed. You can use a regular waterproofing film, which is cut with an “envelope” and glued to the pipe, but it is more optimal to use a self-adhesive waterproofing tape.
The upper pipe abutment bar is filled with sealant
Round pipe outlet
When removing a pipe with a circular cross-section through a covering of corrugated board, roll bituminous waterproofing or foil bitumen tape is used. A roof penetration is put on the chimney, which is glued to the crate and sealed with a heat-resistant sealant. If the passage is made of rubber, it can melt from the heating of the pipe, therefore, a clamp with a heat-resistant gasket must be fixed under it.
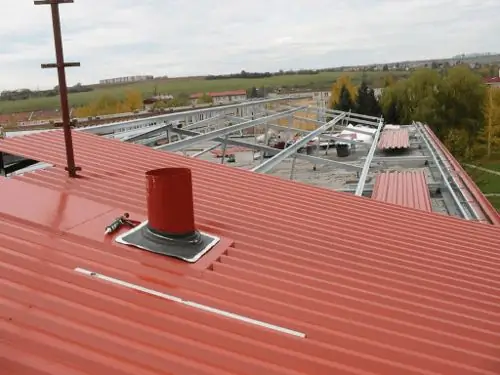
If you use a roofing passage made of heat-resistant rubber, you can avoid its melting
Video: carrying a pipe through a roof made of corrugated board
Ondulin roof
Ondulin is also called "euro slate". The peculiarity of such a coating is that it is combustible and does not have great strength. Therefore, for the passage of the chimney, you will need to make a large hole in the roof and fill it with fire-resistant material that will prevent moisture from entering.
To waterproof the joint between the chimney and the roof, a metal roof cut with an apron is installed, the edges of which are brought under the sheets of ondulin or an elastic tape "Onduflesh" is used. Such a covering requires additional ventilation.
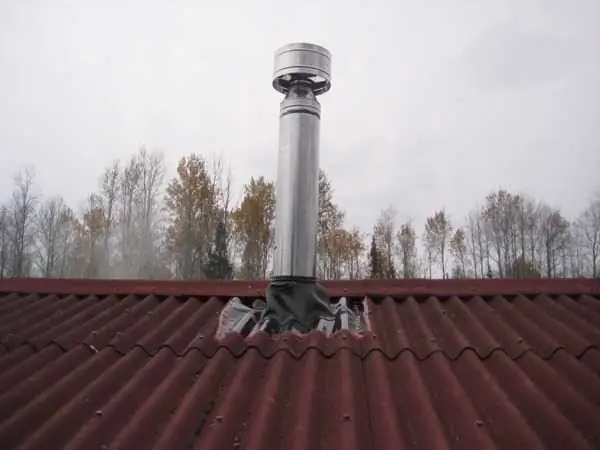
In the roof of ondulin, it will be necessary to make a hole for the output of a pipe of a larger diameter and fill it with fire-resistant material
Video: sealing the chimney on the roof of ondulin
How to lead a pipe through a soft roof
The soft roof is also a combustible material, so a gap of 13-25 mm must be left between the cover and the chimney. The waterproofing of the pipe is carried out in the same way as with other coatings, only instead of an elastic tape, an end carpet is used or the coating itself is brought onto the pipe - bituminous tiles or roofing felt.
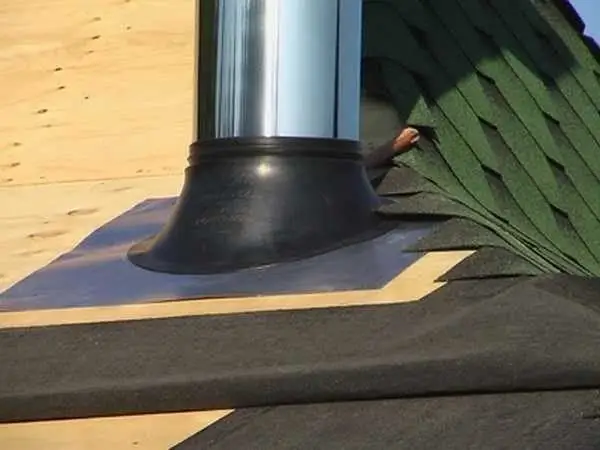
When waterproofing a joint between a pipe and a soft roof, instead of an elastic tape, the coating itself can be used
Stages of work on the output of the chimney through the roof
To lead the chimney through the finished roof, the following steps are necessary:
- The place of passage in the roof between the rafters and the crossbeam is selected.
- A box is mounted: rafters are constructed from the beams, parallel to the rafter legs, and beams. The cross-section of the beams for the box is taken equal to the cross-section of the rafter beams. The width of the sides of the box will be 0.5 m larger than the diameter of the pipe.
-
A hole is cut in the roof slope. For this, through holes are drilled in the four corners of the box from the inside, at the junction of the rafter and the beam. After that, the layers of the roofing cake are cut along the inner perimeter of the box and diagonally.

Hole in the roof slope for pipe outlet The opening for the passage of the pipe through the roof must be between the rafters and the crossbeam
-
The roofing material folds outwards and the insulation folds inwards. A pipe is inserted into the prepared hole.

Chimney installation in a box The sides of the box must be equal to the pipe diameter, increased by 0.5 m
- The pipe is fixed, a waterproofing belt is put on it from the side of the roof.
- The box is closed up and filled with heat-insulating material.
-
The joint is sealed, a cover can be installed on the flue pipe.

Pipe waterproofing After installing the flange, the desired shape can be hammered
Video: do-it-yourself chimney box
The withdrawal of the chimney through the roof is a responsible matter, in which strict adherence to the installation technology is mandatory so that there is no danger of leaks and pipe destruction. Carrying out work on the removal of the pipe includes many nuances, taking into account the roofing, material and shape of the pipe, waterproofing methods. Therefore, you should study all stages of work in advance and consult with a specialist.
Recommended:
Repair Of A Soft Roof, Including A Description Of Its Main Stages, As Well As Material And Tools For Work
Diagnostics of the condition of the soft roof. Repair types and their main features. A brief overview of roofing materials and recommendations for their selection
Flat Roof Repair, Including A Description Of Its Main Stages, As Well As Material And Tools For Work
A brief description of the types of flat roof repair. Recommendations for the selection of roofing materials. Technology for eliminating various defects on flat roofs
Roof Repair, Including Its Various Types With A Description Of The Main Stages Of Work
Features of various types of roofing pie repair. Required materials and tools. Step-by-step technology for repairing the main types of roofing
Rolled Roof Repair, Including A Description Of Its Main Stages, As Well As Material And Tools For Work
The main types of repair work. Preparation for work and general safety precautions. Step-by-step instructions for performing major and current repairs
How To Make A Mansard Roof With Your Own Hands, Including The Features Of The Main Stages Of Work
Making a mansard roof on your own. Carrying out calculations. Step-by-step guide to making an attic roof. Mansard roof repair
