Table of contents:
- Author Bailey Albertson albertson@usefultipsdiy.com.
- Public 2023-12-17 12:53.
- Last modified 2025-01-23 12:41.
Do-it-yourself drip irrigation of the garden

Hello dear friends. Glad to see you on our blog "Do it yourself with us."
So the long-awaited spring has come, and with it the troublesome care of the garden and the arrangement of the vegetable garden. Many have long missed their favorite summer cottages and are waiting for the start of the gardening season.
Today I want to talk about how I arranged my garden last year, and more specifically, I made drip irrigation with my own hands.
Until recently, we have always used an ordinary irrigation system, i.e. they made beds or rolls, into which life-giving moisture was supplied. Of course, the result was not bad, everything grew. But this method of irrigation requires some effort: you need to make beds, you need to move the watering hose, you need to puff the soil after each watering, weed out the weeds, and in our area there is another attack associated with watering - the bear. As soon as you water the whole garden bed, its "plowing" begins and many plants are destroyed.
All these troubles can be avoided if you have a drip irrigation system in your garden or summer cottage. Honestly, I felt very relieved: I just started to relax and enjoy nature in my garden.
It cannot be said that I spent a lot of effort, time and money on making a drip irrigation system with my own hands (at the end of the article, I give an approximate calculation for such a system for a 200 square meter garden). Further ease of use and maintenance far exceeded all efforts.
So let's get started. I will tell you how to make drip irrigation in your garden (two hundred parts), but the size of the garden does not really matter. Knowing the principle of arranging one watering shoulder, making others, and the size you need, is not difficult.
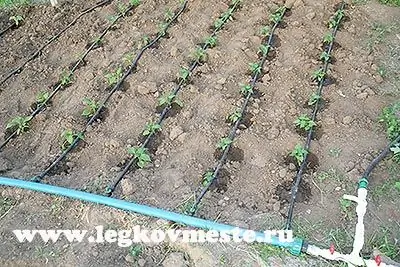
The entire drip irrigation system consists of two main elements: the main distribution pipes and a plastic drip irrigation tape attached to them with calibrated holes at a certain distance through which water is supplied to the plant root system.
I started by deciding how the main distribution pipes would be located. Initially, on my site, near the paths, two water outlets for irrigation were brought out (1) (see diagram below).

Across the site, to the right and left of the bends, I put two distribution pipes (2). I connected the distribution pipes to the water supply system with a detachable connection (3). Directly to the distribution pipes, I connected a drip irrigation tape (4), which runs along the site, through the distribution taps for polyethylene and polyvinyl chloride pipes. That's the whole construction.
Now let's look at all the elements and their manufacture in order.
- Production of distribution pipes.
- Manufacturing of a detachable connection for distribution pipes and a water supply system.
- Connection of the plumbing system, distribution pipes and drip tape.
Content
- 1 1. Manufacturing of distribution pipes.
- 2 2. Manufacturing of detachable connection of distribution pipes and water supply system.
- 3 3. Connection of plumbing system, distribution pipes and drip tape.
1. Manufacturing of distribution pipes
For the main distribution pipes, I used a 40 mm polyethylene sprinkler pipe. required length. Of course, it was possible to take a pipe with a smaller diameter, but it is most convenient to attach the dispensing taps to a pipe of this diameter or larger.
Step 1. Cut off the required length of the pipe and, at one end, put a plug.

Step 2. On the other side of the pipe, we make the transition to the water supply system through the tap. This block is described in more detail below.

Step 3. Along the entire length of the pipe, with a step equal to the distance at which you want rows of vegetables to grow, we make holes with a diameter of 13-14 mm.

I made holes with a distance of 450 mm. If you plan to spread the drip sleeves in both directions from the pipe, then on the opposite side of the pipe we also mark and drill holes.
Step 4. Insert a rubber band into the dispensing tap.

Step 5. Insert the dispensing taps into the holes obtained, orient them with the closing handle up.

The valves come with a rubber seal and do not require any tightening. Just put in a little force and insert into the hole. The rubber gasket gives a good seal.
Thanks to these taps, you can turn off or vice versa turn on the water supply to the connected drip irrigation hose (tape). This is especially useful when growing in rows with crops requiring different amounts of water and different irrigation patterns.
2. Manufacturing of detachable connection of distribution pipes and water supply system
I made the entire system for connecting distribution pipes to the water supply system from polypropylene pipes. This is due to their low price, ease of welding (I wrote in detail how to weld polypropylene pipes in the article "Welding of plastic pipes", there is also a video there) and the presence of various fittings.
Step 1. I made a divorce of the main pipes in two directions, so I had to re-solder the water supply system a little and make bends in different directions and one additional one on top for connecting the hose.

Step 2. We solder the ball valve to the branch going to the water supply system.

With it, you can turn off and turn on the sleeve completely.
Step 3. On the distribution pipe we attach the transition to the diameter of the water pipe.

Step 4. We solder a detachable connection between the water supply system, after the ball valve, and the distribution pipe.

This connection makes it possible to disconnect the entire irrigation structure from the water supply system for the winter period and store it.
This completes the entire process of preparing individual irrigation elements. It remains only to assemble the entire drip irrigation system into a single whole.
3. Connecting the plumbing system, distribution pipes and drip tape
Step 1. We connect the distribution pipe with the already fixed distribution taps to the water supply system. To do this, simply assemble the detachable connection.

Step 2. Roll out the drip irrigation tape to the required length.

Step 3. Connect one end of the drip hose to the dispensing valve of the main distribution pipe (3).

To do this, we put on a drip tape on the dispensing tap and, tightening the plastic nut, fix it.
Step 4. We muffle the other end of the drip sleeve.

There are special plugs on sale that allow you to close the end of the sleeve, but I just squeezed it and secured the clamp with a thread. Plugs also cost money, but this method is free.
If there is a need to extend the drip irrigation tape, you can put a connector (see photo below).

The same element can be used when a drip tape breaks to connect or repair it.
Everything, the system is ready for this. By opening the tap that cuts off our system from the water supply system, you can try the design for performance.
ATTENTION. To avoid system rupture, do not apply high water pressure, the plastic drip tape is designed for low pressure
As soon as the drip sleeves expand and fill with water, adjust the pressure so that the amount of water flowing out and the amount supplied to the system is the same.
In the end, as I promised, I present an approximate calculation for the manufacture of a garden irrigation system (200 square meters) using a drip irrigation system according to the above installation scheme in 2012 prices.

And one more little piece of advice. If you use root feeding of plants during the period of growth and fruiting, you can connect the drip irrigation system in parallel to a 200 liter barrel in which to breed the fertilizer. Raise the barrel above the surface of the system by 1 meter.
This will give a guaranteed hit of the bait exactly under the root of the plant, the ability to accurately dose the amount of feeding and the time of its introduction.
Friends, in conclusion I want to say: “Spend a little effort and money on the manufacture of an irrigation structure and the drip irrigation system will bring you significant relief during the entire gardening period. And the harvest, believe me, will be much better."
If someone has more progressive ideas on how to do drip irrigation with their own hands, interesting thoughts on this topic, share them in the comments with our readers. Let us introduce everything new together, make our life easier and save material resources.
All light and high yields.
Recommended:
Fly Lady System: Basic Principles Of House Cleaning, Where To Start, How To Fill Out An Audit Trail And Other Recommendations + Reviews, Photos And Videos
Fly Lady house cleaning system: principles, pros and cons, who is it for? Reviews
Installing A Boiler (water Heater) With Your Own Hands: Connection Diagram To The Water Supply System, Rules, Etc
What is a boiler, how does it work. How to independently install and connect an instantaneous and storage water heater. Safety regulations
How To Set Up An Internet Connection On A Computer: Setting Up A Network And Automatic Connection At System Startup

How to set up an Internet connection on a PC with Windows XP, 7, 8 and 10, as well as Linux and Ubuntu. Automatic internet connection when Windows starts
Roof Drip, Its Structure And Purpose, As Well As Calculation And Installation Features
What are roof drippers and how they differ from eaves. Is it obligatory to install drippers. Device and installation
Which Coffee Maker Is Better: Carob Or Drip, Geyser, Capsule, Pod, Reviews

Rozhkovy, drip, geyser, capsule and pod coffee makers. Features, working principle, pros and cons. Which one is better to choose
