Table of contents:
- Author Bailey Albertson albertson@usefultipsdiy.com.
- Public 2024-01-17 22:26.
- Last modified 2025-06-01 07:32.
How to assemble a wattle fence for a summer residence with your own hands

Even in the recent past, wicker fences were the main method of fencing private territory. The availability of consumables and its lightweight structure made it possible to build such a structure without serious financial investments. The wicker fence has not lost its relevance today. The emphasized archaism and natural material organically fit into the suburban landscape. The advantage is the ability to make a wattle fence with your own hands.
Content
- 1 Features of a wicker fence
-
2 Preparatory work
- 2.1 Selection and calculation of material
- 2.2 Photo gallery: weaving patterns for a decorative fence
-
2.3 Procurement of material
1 Video: how to properly process willow vines
- 2.4 Toolbox
-
3 How to make a wicker wooden fence from branches with your own hands
3.1 Video: how to make wattle from hazel twigs in the country
- 4 Caring for the finished tyn
Features of a wicker fence
A traditional wattle fence is a lightweight fence made of flexible branches or shoots. A characteristic feature of such a fence is a chaotic, artisanal structure, that is, the material is used in a "natural" form, and is practically not processed. Wicker fences belong to decorative structures, since they rarely exceed 1.5 in height. High wattle fence is found even now, but this solution does not justify its existence, since the dimensions do not compensate for the fragility of the material, and the slits will not allow you to hide the area from prying eyes.

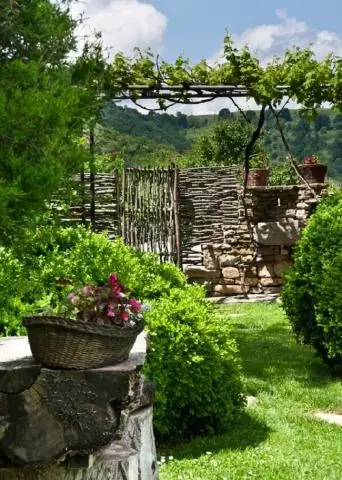
The wattle fence at the summer cottage looks very beautiful
It is customary for scourge to enclose relatively small private estates, or use them as additional fences inside and outside the site, for example, to enclose flower beds, a vegetable garden, etc. It is also ideal for delimiting an area between neighboring territory.
Preparatory work
To obtain a positive result, it is very important to prepare everything qualitatively for further work. The making of wattle fence is no exception.
Selection and calculation of material
Traditionally, willow (willow), hazel and willow are used to form wicker fences. These branches are naturally long, straight and naturally flexible with a minimum of transverse branches, ideal for such fences. This material is also characterized by symmetry, which is an undoubted advantage. In some cases, weaving from wild reeds is practiced. Smooth and long stems bend perfectly, but such a fence will be very fragile. The bamboo wattle will be more durable, but in this case the material will have to be purchased.

A vine without bark is used for weaving.
The calculation of the required amount of vines is carried out "by eye". On average, one armful of twigs is enough to form a fence with a height and length of 0.5 m. The value can deviate up or down, depending on the diameter of the rods and the density of weaving.
Large, even branches with a diameter of 4 cm or more are used as support pillars. The use of a round bar, boards or metal rods is also appropriate, since this will extend the life of the structure, but they will stand out strongly against the general background, and the wattle will lose its naturalness.
On average, the spacing between the bearing crossbars is from 0.5 to 0.3 m, based on which the required amount of material is calculated. The more often the supports are located, the denser the weaving will be, and, accordingly, the structure will be stronger. With vertical weaving, you will also need longitudinal beams, at least five for the entire height of the fence.
Photo gallery: patterns of weaving a decorative fence
-

Traditional weaving pattern - Horizontal weaving is traditional
-

Horizontal weaving patterns - There are other options for horizontal weaving.
-

Decorative weaving patterns - Decorative weaving patterns can be used if you want to decorate your site
-

Double, regular and diagonal weave patterns - The appearance of the fence depends on the weaving method
Material procurement
The harvesting of rods for wattle fence is done in early spring or autumn. During this period, the movement of sap is minimal, and the tree is not burdened with excess foliage. The most even and longest shoots are selected. If the fence will not be made immediately after harvesting, the branches must be well dried. For standard weaving, rods with a diameter of about 1 cm are selected. Branches of a larger diameter strengthen the structure, but at the same time make the structure less dense.

Harvesting of rods for wattle fence is carried out in spring or autumn
Immediately before weaving, the shoots are soaked in a container of water to make them more flexible and remove the bark. On average, this stage lasts about a week; for freshly cut branches, the period can be reduced to several days. After the material becomes flexible and the bark begins to peel off easily, you can start processing. Ideally, a pinch is used to remove the bark - a split branch of medium thickness with a limiter. Under normal conditions, you can use wire cutters or pliers. The tip of the rod is inserted between the clamps of the nippers or pinchers, pulled towards itself. If the branch is well soaked, then the bark should be removed with little or no effort.

To facilitate the weaving process, the vine can be combined into bunches
Fully cleaned rods can be coated with antiseptic and stain to increase durability or color change. This operation is appropriate only if a small fence is being erected, since each branch must be processed separately. The lower part of the support stakes is impregnated with antiseptics and moisture-proof compounds to protect them from decay.
Video: how to properly process willow vines
Tools
In addition to preparing the material, you need to take care of the availability of all the necessary tools:
- secateurs;
- hacksaws for metal;
- roulette;
- a wooden hammer;
- a large hammer or sledgehammer;
- wire;
- construction thread or fishing line;
- screwdriver.
How to make a wicker wooden fence from branches with your own hands
Horizontal weaving is traditional, as it forms a dense and durable fence. The vertical arrangement of the branches will not provide the required density. The installation of the wattle fence is carried out in the following order:
-
The markup is being carried out. A thread or fishing line is pulled along the line of the future fence. According to the established landmark, marks are placed for supports. The distance between the bearing stakes with horizontal weaving can be from 0.3 to 0.5 m. With the vertical arrangement of the branches, the posts can be driven in every meter.

Marking for wattle fence Tightening the construction thread for the support stakes will make the fence even
- Bearing supports for the fence are driven in to a depth of at least 0.5. With a horizontal arrangement of the vine at the beginning and at the end of the fence there are two racks so that the rod can be wrapped between them, thereby fixing it.
-
If a horizontal wicker is assembled, the tops of the support posts are fixed with a rail so that they are not "led" during the creation process. With the vertical arrangement of the branches, transverse crossbars are installed. You can use nails or screws to fasten them.

Wicker fence The vine can be positioned both horizontally and vertically
- Twigs are woven between the posts. Work starts from the thicker end. Weaving is carried out according to the principle of eight - the first pillar is bypassed in front, the second behind, the third again in front, etc. The lower rods are attached to the supporting stakes by means of wire. This will keep the fence from slipping to the ground.
-
Surplus is cut off. If the rod ends, for example, on the fifth pillar, then weaving continues from the fourth. This is necessary in order for the fence to be uniform. You also need to periodically direct the rods in the other direction, changing the course of weaving. The protruding ends of the branches can be fixed with wire.

Do-it-yourself braid wattle If you wish, you can weave the rods in several pieces at once
- Before installing the last row of rods, the fixing bar is removed. The top row is also tied with wire to the supporting stakes.
Vertical weaving is carried out according to a similar principle, with the difference that it is recommended to fix each rod both from above and below so that the structure does not stagger.
Video: how to make a wattle fence from hazel twigs in the country
Care for the finished tyn
On average, the service life of the wattle fence does not exceed 5-7 years. After this period, the fence begins to deteriorate. The main "enemy" of a wicker fence is dampness, which makes the supports and the lower part of the structure rot. To prolong the life of this product, it is necessary to prevent the accumulation of water under it. It is also undesirable for thick and tall grass to grow under the fence, since high humidity is created in the thickets.
Antiseptics or matt varnishes can be used for protection. They will protect the aboveground part from moisture. If you prefer varnish, then it is advisable to use matte compositions, since the gloss will look unnatural. Annual treatment with protective compounds will help to maximize the life of the wicker fence.
It is easy to make a wicker fence with your own hands, even outside the city. At the same time, financial costs will be minimal.
Recommended:
How To Make A Children's Sandbox In The Country With Your Own Hands, Photos And Videos

DIY step-by-step instructions for building a simple children's sandbox. Different sandbox models
How To Make A Children's Swing In The Country With Your Own Hands (made Of Wood Or Metal, Drawings, Photos And Videos)

Step-by-step instructions for the construction and installation of a swing at a summer cottage. Material selection, tools, model drawings
How To Make A Bar Stool With Your Own Hands From Wood, Metal And Other Materials + Drawings, Photos And Videos

Bar stools manufacturing options. Required tools, materials used. Step-by-step description of the manufacturing process with a photo
How To Install Fence Posts With Your Own Hands, Including Without Concreting, At The Correct Distance And Depth - Instructions With Photos And Videos

How to install fence posts: installation methods, use of suitable materials
How To Make A Slime At Home With Your Own Hands - Without Sodium Tetraborate And Glue, From Hand Cream, Shaving Foam And Other Ingredients, Recipes With Photos And Videos

Is it possible to make a slime at home. Types of slimes and recipes for their manufacture, depending on the desired properties. Toy care features
