Table of contents:
- Author Bailey Albertson [email protected].
- Public 2023-12-17 12:53.
- Last modified 2025-01-23 12:41.
How to install a washing machine and connect it to plumbing and sewerage systems

Hello dear readers
Gone are the days when women with basins ran to the river to wash clothes.
Now almost every house has a washing machine, and not just a machine, as they used to be, jumping and running around the room when washing and spinning, but modern machines are automatic machines. And today I want to devote an article to how to install a washing machine with your own hands. If you think this is difficult, then you are wrong. Despite the complexity of the technique, installing a washing machine with your own hands is an elementary procedure. No need to hire an installer and pay money. Read the article to the end and a brand new washing machine will work for you without problems for many, many years.
Today washing machines are the top of technology. You set the program, load the dirty laundry and just press the start button, all the rest will be done for you by smart technology. But before it starts to work correctly and smoothly, it is necessary to perform some procedures. We will now consider them.
How to install and connect a washing machine: step by step instructions
Step 1. The first thing to do after the machine arrives at its permanent location is to remove the packaging material and install the washing machine in the place where the washing will be done.
Remove packaging carefully and store for 7 days. It is during this period of time that you can change the purchased product for a new one, if there are any defects in the work, did not fit in size, or you simply do not like the design.
Step 2. From the back of the machine body, unscrew the shipping bolts and remove the plastic spacers. This is done easily: we loosen the fastening bolt by lifting up and aligning the plastic spacer with the hole, remove it from the body of the washing machine.

Step 3. In the places of the holes through which the spacers were taken out, we insert the plastic decorative plugs that come with the machine.

Step 4. Connect the water to the machine.
To do this, insert the filter in the direction of the hose with the bent end that comes with the machine. The filter is inserted with the convex side towards the outlet of the washing machine

We tighten the nut connecting the hose to the machine. We tighten it by hand, without using keys. Thanks to rubber seals, the connection is hermetically sealed

We screw the other end of the hose to the cold tap water supply, also without using keys

Please note that the washing machine is connected to cold water. Of course, by connecting to hot water, you can save some money on the saved electricity used to heat the water. But, on the other hand, having forgotten once and loaded into the machine products that are washed on a delicate mode at a temperature of 40 ° C, you can irrevocably spoil the whole batch, getting things with a large shrinkage at the exit.
Step 5. We connect the drain hose to the sewer system.

Initially, it is assumed that the water from the machine will be drained into the bath, since a special hook is included with the washing machine, into which the hose is filled and the whole structure is suspended from the bath.
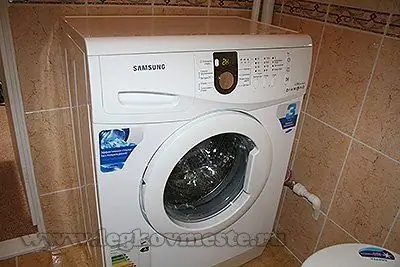
This is, of course, very inconvenient. Therefore, it is advisable to provide for a special drain or in a siphon under the sink (some siphons have a special outlet for the drain hose) or provide a drain directly into the sewer system, as in the photo above. This way of connecting to the sewer system is much more convenient. The only condition should be to create a bend in the drain hose to form a water seal and to position the upper level of the bend above 60 cm above the floor level. This will prevent unpleasant odors from the sewer from entering the machine and preventing the water from draining by gravity.
Step 6. We fill the water supply hose and the sewer hose of the machine into the recesses provided on the back of the machine. We install it close to the wall and use the twisting adjustment legs to achieve stability.

By clicking alternately on all four corners of the machine, we check its stability. If, when pressing on an angle, a swing occurs - we screw in or slightly unscrew the leg in the swing angle and select the existing gap. We are seeking a complete stable position.
Step 7. We connect the washing machine to the electrical network. To do this, simply insert the plug into the outlet.

That's it, the installation process is complete. You can supply water by opening the inlet tap and try our technique at work. If water drips in at the hose connections, tighten the fastening nuts slightly.
Of course, the installation of the washing machine will be much easier if you have thought out the places for connecting water, draining the sewer with the required final diameters, and supplying electrical energy in advance, when carrying out a major overhaul of the bathroom.
If the installation of the washing machine with your own hands is done in a place where communications have not been taken out, you will have to additionally think about where to connect the water and where to drain it when reset. You may have to put additional tees and taps on the plumbing system and make a certain branch of the sewer pipes.
I hope you will not have any difficulties in the question of how to install a washing machine with your own hands. I will be happy to answer all your questions in the comments.
Video: "Do-it-yourself washing machine installation"
If you liked the article and turned out to be interesting, please click on the social buttons below and share it with your friends.
Recommended:
How And How To Wash Blood From Clothes And Linen At Home, Ways Of Washing By Hand Or In A Washing Machine + Photos And Videos

How to effectively remove fresh or old blood stains on clothes made from different fabrics? We apply folk advice in practice, using materials at home
How To Wash Sneakers In The Washing Machine And By Hand, Including White, The Nuances Of Washing + Photos And Videos

Sneakers are shoes that are comfortable and easy to wear for a walk, nature and even a date. If they get dirty, it doesn't matter. You can always wash them
The Washing Machine Does Not Open After Washing: What To Do, How To Unlock The Lock And Open The Door, Including During An Unfinished Wash

Why is the washing machine door blocked after washing. How devices of different models open. How to open the hatch on your own. What not to do. Photo and video
How To Wash Sneakers In A Washing Machine (including An Automatic Machine) Correctly, And Then Dry Your Shoes

Tips for washing sneakers in a washing machine step by step. Nuances, features, use of special products, drying rules
How And At What Temperature To Wash Clothes For Newborns, Detergents For Washing Baby Clothes In A Washing Machine And By Hand

Basic rules for washing clothes for newborns. Requirements for the composition and effect of children's laundry detergents. How to machine wash baby clothes and by hand
