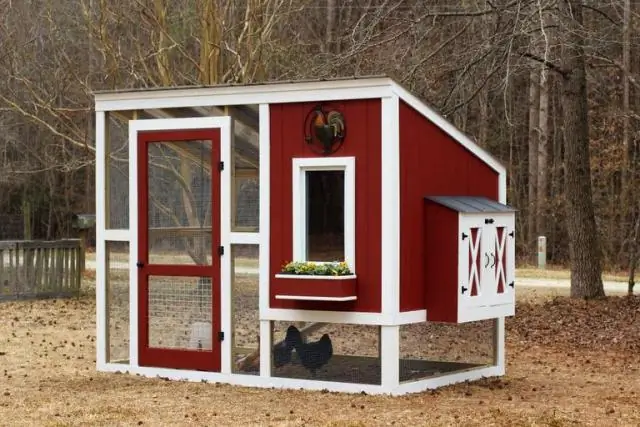
Table of contents:
- What to consider when making a chicken coop for 5 chickens with your own hands
- The general structure of the chicken coop and its types
- Drawing of a chicken coop, arrangement of perches and nests
- Selection of materials and tools
- Step-by-step instructions for making a summer chicken coop
- How to make a small chicken coop
- Photo gallery: ideas for decorating a chicken coop
- Features of winter design
- Video: self-made chicken coop
- Author Bailey Albertson albertson@usefultipsdiy.com.
- Public 2024-01-17 22:26.
- Last modified 2025-06-01 07:32.
What to consider when making a chicken coop for 5 chickens with your own hands

Many owners of country houses, after arranging the main building, setting up a vegetable garden and a garden, are thinking about breeding feathered animals. In this case, knowledgeable people advise having chickens - and fresh eggs will appear on your table every day.
Content
- 1 General structure of the chicken coop and its types
- 2 Drawing of a chicken coop, arrangement of perches and nests
- 3 Selection of materials and tools
-
4 Step-by-step instructions for making a summer chicken coop
- 4.1 Making the foundation
- 4.2 Wall and roof installation
- 4.3 Floor base
-
4.4 Ventilation and lighting of the chicken coop
- 4.4.1 Draft ventilation
- 4.4.2 Lighting
- 4.5 Installation of feeders and drinkers
- 5 How to make a small chicken coop
- 6 Photo gallery: ideas for decorating a chicken coop
- 7 Features of winter design
- 8 Video: self-made chicken coop
The general structure of the chicken coop and its types
For breeding birds in the courtyard, it is necessary to build a special structure - a chicken coop. The place for placing the chicken coop should be dry and located on a hill. Drainage is arranged around it - a small pit or groove for rainwater drainage. If there is no hill on the territory, it is created artificially (from clay and sand).
The size of the building should allow the birds to move around normally. The area of a house with perches is calculated based on sanitary standards: 2-3 chickens per 1 m 2 of free space, but the minimum area value is 3 m 2.
The entrance to the chicken coop and the walk are built on the south side, which is protected from the winds. The aviary is hidden under a roof or covered with a canopy: from the hot sun and rain.
The poultry house is of two types: summer or winter, depending on the temperature conditions of living and the size of free space on the site. A summer building in a warm climate is made light and mobile - it can be moved from one place to another, if there is such an opportunity in an open area. And in the middle latitudes, they immediately install a solid structure: on the foundation. The winter poultry house is built with additional insulation so that the temperature inside does not drop below zero during the cold period.
The chicken coop includes:
- a house for sleeping chickens;
- walking-aviary;
- roosts;
- nests;
- a pallet for collecting droppings under the house.
During movement, hens develop better and rush more, therefore, the device of a bird house implies the presence of a walk - an aviary closed on all sides with a net.

A walk is attached to the chicken coop so that the chickens can walk on the fresh grass and breathe the air without scattering throughout the suburban area
In the hen house, roosts are necessarily put: birds use them as a place to sleep. The roosts are made smooth and rounded so that the chickens are comfortable to hold on and the paws are not injured by splinters.

Roosts are long perches attached to the walls of the hen house or set on the floor on stable supports.
In addition, nests are built in the bird house: chickens will begin to lay eggs in them.

The nests are lined with a layer of soft straw or grass: the hens choose their favorite place, and sometimes it happens that everyone rushes in the same nest - one by one
Drawing of a chicken coop, arrangement of perches and nests
For 6-8 chickens, the size of the house on the foundation will be 2x2 m, and the open-air cage is about 2x7 m. The minimum height of the room is 1.8 m so that the owner can freely enter it.

To build a comfortable housing for chickens, you will need to perform the correct calculations for the chicken coop and draw up a drawing
The roost can be made from a bar, smooth knots, thick branches or other improvised means. But it's important to follow the rules:
- Comfort: for an adult bird - 25 cm perch.
- Durability: The perches should not sag under the weight of the birds.
- Safety: sharp corners are smoothed out with a plane.

The perches are made no more than 4-6 cm thick in diameter, and the cut should not be round, but closer to the oval shape
Perches are installed in the darkest and warmest place of the room: away from windows and doors. It is recommended to set the roost on:
- 50-80 cm from the floor;
- 25-40 cm from the nearest wall.
The nests are knocked out of wooden planks or made up of plastic boxes with a lattice bottom.
- size of one nest: 30x30x40 cm;
- install nests at a distance of 30-40 cm from the floor;
- put them at the far wall, in the dark;
- lay the straw soft and dry;
- 10 chickens will need about 4 nests.
A separate corner is prepared for growing chickens. It is recommended to separate adult birds and juveniles.

On the drawing, you need to indicate the location of all the necessary elements of the chicken coop, so that it is convenient to build a structure using this markup
After drawing up a detailed drawing, we proceed to the selection of materials.
Selection of materials and tools
- For pouring the base - concrete mortar. The choice of materials should be based on the type of foundation.
- For the frame - bars. For wall cladding - boards.
- For inner lining and nests - plywood sheets.
- For the roof - roofing material, slate or tin. 2 layers of roofing material are also spread on the foundation (protection against decay).
- For the aviary - mesh and iron clips.
- Screws and nails.

To make a chicken coop, you do not need to prepare any special tools - you only need standard devices, which are often used in the country.
The set of tools may vary based on the dimensions of the structure being manufactured, but a basic set is required:
- Master OK;
- plane;
- roulette;
- building level;
- ax;
- mallet.
After complete preparation, we proceed to construction.
Step-by-step instructions for making a summer chicken coop
Experienced summer residents recommend building a capital structure, so you need to start manufacturing a structure with the construction of a high-quality foundation.
Foundation making
The ideal option for a chicken coop of 2 × 2 m and a height of 1.8 m is a columnar base that can be made from old bricks or stones. First of all, you need to perform marking work:
-
Wooden pegs or metal rods are driven along the perimeter of the foundation.

Foundation marking Pegs should be driven in along the perimeter of the building and a rope should be pulled along them, measuring their horizontalness
- They are tied with a strong rope 20 cm from the ground.
- It is important to check the horizontal level of the tensioned ropes.
After the marking work is completed, you can start making the foundation:
- We remove a layer of fertile soil 17-20 cm thick.
- In the corners and perimeter, we dig 8 holes 50 cm wide and 60 cm deep (there will be pillars in them).
- We fill the bottom of each pit with sand and gravel (10 cm).
- Then we put 2 bricks and cover them on top with a cement mixture.
- Next - 2 more bricks. The curbstone is laid out to the level of the rope. The cement mixture will allow you to level the height of the cabinet.
- Finished posts should be treated with bitumen or protective mastic. And fill the cavity between the pillars with soil, leveling it with the ground.
- The construction mixture sets for about a week, then a grillage from a bar is mounted.

For a chicken coop, the foundation is built smaller in size: with three pillars on each side; install a grillage from a bar on top
The finished foundation is left for a month. Then you can start building the walls of the chicken coop.
Installation of walls and roof
It is recommended to use a frame structure of the walls. A panel frame is built and clogged with a mixture of clay and straw in layers. Before installing the walls, you need to waterproof the floor. An excellent basis for the frame walls and floor is the support frame made of beams.

For walls and floors, you need to make a support frame from beams
It will be necessary to prepare material for racks, lintels and struts, which will increase the rigidity of the structure. Long support bars can be used not only as support for the walls of the house, but also for the lower part of the run. The frame structure of the platform can be made from an iron corner. All that remains is to fix the netting on it and cover the structure with polycarbonate.
The frame, sheathed with boards, is insulated with ecowool or mineral wool
Chicken Coop Wall Installation Guide:
-
You can build walls right on the wooden floor of the chicken coop. But you can also assemble each wall separately, and then mount them ready-made.

Assembling the walls Each wall must be assembled separately using wooden beams
-
Openings are made in the walls for windows, doors and a box from which eggs can be taken.

Preparation of openings You need to make openings in the walls: fold the blanks, align them according to the markings
-
After that, all the walls must be knocked down together, excluding distortions.

Assembling the frame After preparation, they need to be knocked down into a single structure, taking into account the verticality of the racks in level to the floor
- After the frame is assembled, you can proceed to the manufacture of the roof.
To better retain heat, it is recommended to make a roof with two slopes. The frame consists of rafter legs and lathing.

The roof for the hen house is recommended to be made with a gable
It is recommended to sheathe the frame and roof of the chicken coop with materials with low thermal conductivity (OSB plates are suitable). It is desirable to cover the roof with roofing material and sheet metal, but heavy materials can also be used.

You can cover the roof with slate, metal tiles and other materials.
The gaps between the wall elements should be insulated. A vapor barrier film is laid on top of the insulation material. After that, the building is sheathed with plywood sheets.

From the outside, the structure is sheathed with OSB-plates and plywood
From the outside of the OSB-slab, you will need to cover it with glassine, and then sheathe it with clapboard.

Outside, the structure must be covered with glassine and sheathed with clapboard
To prevent decay of wooden parts, they should be treated with an antiseptic. It is important to periodically cover the walls of a wooden structure with lime to protect against pests.
Floor base
For the floor, take boards with a thickness of 50 mm, they are laid in 2 layers, laying insulation. The bars are 10x10 cm, the lower bar should be 26 mm thick. The surface is made even and cleaned with a plane.
A rectangular recess is cut into the floor base through which the hens will enter and exit along an inclined ramp. The floor is covered with a wood protection compound or lime and a dense underlay is laid. Layer thickness 5 cm (mixture of crushed peat, straw, sawdust).
Ventilation and lighting of the chicken coop
Natural light and ventilation takes place through windows and doors. But they are not always kept open (it is dangerous to arrange drafts), so you will need to equip automatic ventilation.
Airing through traction
A chimney is placed high above the perches, extending beyond the roof. The supply pipe is placed in the other corner of the chicken coop 20-30 cm from the floor. The draft runs naturally, reducing the moisture inside the coop.

Chickens do not tolerate drafts, therefore, it is imperative to do supply and exhaust ventilation
Lighting
Egg production is affected by the length of daylight hours. For chickens to rush in winter, they need to be well fed and create the effect of 14 hours of daylight. During mass moulting, the optimal daylight hours are 9 hours.
- Install lamps with a power of 50-60 watts. Place them above the feeders. The sockets are removed into a closed panel.
- The use of red and fluorescent bulbs is recommended. At each m 2 - 5 watts of illumination.

Red bulbs will not dry out the air around and will be able to heat only those places where the rays fall
Installation of feeders and drinkers
Feeding devices for birds can be made independently or purchased ready-made.

Hopper feeder: it is made from a pipe, making holes along its entire length
They use a bunker version of feeders or home-made devices for serving food, fixed at a height of 15-20 cm from the floor: the hens will not dig into the grain and scatter it. If the feeder is placed on the floor, the area underneath it may begin to get damp.
Feed structures can be made of wooden planks or plastic containers. Summer residents recommend using tanks with sides of at least 2 cm. You can also build a tank for sand or shell rock (chickens peck the mixture for better digestion of feed).
How to make a small chicken coop
A mini-chicken coop can look like a cage. The dimensions of the cage for several chickens are 1x2 m. The foundation is not needed for it, it is placed on the grass.

Mini chicken coop for 5 chickens can be made in the form of a cage
Tools and materials for manufacturing:
- timber 50x50 mm;
- nails and screws;
- Rabitz;
- wooden slats 20x30 mm;
- iron pipes;
- door hinges;
- plywood sheets;
- tile or slate;
- insulation material;
- a hammer;
- saw;
- electric drill or screwdriver.
You first need to draw up a drawing. It is important to determine which side the windows and entrance will be located on. This will allow you to select the location for the roost and nests (in the far corner).

On the drawing, you need to indicate the location of all devices, as well as the size of the poultry house
Sequence of work:
- Cut blanks from beams and plywood sheets 1 m long, 2 m wide and 0.7 m high (for the frame and walls).
- Fasten the elements together with bolts. On the left side, you need to place a small door for chickens to exit. At the front there is a large door that is necessary for cleaning and access to the nests.
- Sheathe the frame from the inside with a plywood sheet or OSB board (put on screws).
- Fix the insulation material on the walls, sheathe the frame from the outside, paint.
-
Make legs 60-70 cm high.

Installation of legs The legs should be about 60-70 cm high, attach them to spacers to stabilize the structure
- Fill the roof with transverse strips, insulate and cover with roofing material on top. Lining the roof from the inside with plywood.
- The dimensions of the walk are 2 times the size of the house. Drive in the rods, pull the mesh and secure it.
- The ends of the net should be close to the house to keep birds from getting out.
Photo gallery: ideas for decorating a chicken coop
-

Chicken coop - With a flowerbed on the roof: make high-quality waterproofing and breed cacti
-

House - Chicken coop without a run: you can build a coop with a detachable range
-

House for chickens - Walking in the form of a greenhouse, with a rounded vault: the design looks unusual
-

Wooden chicken coop - Made in the form of a teremka, where the gable roof is extended for the entire walk
-

Poultry house - A chicken coop with a square high range in the form of a summer gazebo
-

Summer chicken coop - Two-storey poultry house: the chicken house is located on the roof of the walk
-

Long Roof House - Teremok, in which one roof slope covers a square walk
-

Medieval style chicken coop - Made with a flat roof, minimalist style
Features of winter design
The winter chicken coop is made more insulated, with south-facing windows and good ventilation. If the structure is designed for more than 20 chickens, then additional electric fans are built into the walls.
The temperature inside the poultry house should be above + 12 ° C. Windows should be glazed and closed tightly. In cool weather, the chickens clump together, warming each other.
The walls of a year-round coop should be constructed of wood. The room with perches is separated from the entrance by constructing a vestibule.

The walls of the winter chicken coop are best made of wood and build a vestibule
The use of oil and infrared heaters is allowed. It is also possible to apply panels in the form of foil-coated plates. They will radiate heat using infrared radiation. The structures are mounted on the ceiling.

Heaters are recommended to be fixed on the ceiling of the chicken coop directly above the perch, since chickens spend most of their time on it in winter.
It is advisable to use such devices if the walls are made of concrete or brick. When the temperature reaches the required level, the structure will automatically shut down.
Large chicken coops can cause significant problems. It is quite difficult to heat an extensive building, the cost of thermal insulation will also be considerable. If you plan to keep birds all year round, then it is important to consider some features:
- Make the roof two-layer.
- Sheathe the walls with heat-insulating material.
- If you plan to build a chicken coop from logs, then it must be carefully dug. The floor is covered with deep bedding.
- In cold weather, additional frames should be installed on the windows.
- If the house has an attic, the floor should be covered with sawdust or straw.
- For heating, high-power lamps or a heater are often used.
Video: self-made chicken coop
Making a chicken coop with your own hands is not a difficult process. The structure can be made even from improvised means, it is only important to correctly draw up a drawing.
Recommended:
Making A Buleryan (breneran) Stove With Your Own Hands: Advantages And Disadvantages Of The Design, A Device With Drawings, Instructions With A Video, Etc
Design and principle of operation of the "Buleryan" furnace (breran). DIY recommendations with instructions and drawings. Maintenance and operation
How To Get Rid Of Rats In A Private House, Chicken Coop, Apartment And Other Premises - Using Various Methods To Get Rid Of Rodents

Reasons for the appearance of rats in the house. What methods, means to use in the fight against rats in various residential and non-residential premises. Preventive actions. Video
How To Build A Warm Chicken Coop For The Winter With Your Own Hands - Instructions With Photos And Videos
The need to insulate the chicken coop. What material can be used. How to make a winter poultry house yourself: step by step instructions. Treatment and care
Chicken Hearts: Recipes For A Delicious Dish In Sour Cream, With Onions And Carrots, In A Slow Cooker And An Oven, Instructions With Photos And Videos

How to quickly and easily cook chicken hearts. Proven recipes, recommendations of experienced chefs. Instructions with photos and videos
Correct Arrangement Of The Chicken Coop Inside With Your Own Hands, Video And Photo
Arrangement of the chicken coop from the inside: practical advice, choice of materials, arrangement of a pen and roost
