Table of contents:
- Author Bailey Albertson [email protected].
- Public 2023-12-17 12:53.
- Last modified 2025-06-01 07:32.
How to clean your computer yourself
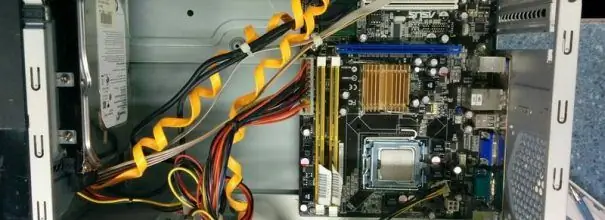
Cleaning is one of the mandatory steps in caring for a personal computer. True, many for some reason neglect it. Let's consider why cleaning is so important and how to properly and effectively carry out it at home.
Content
- 1 Where does the dust come from in the system unit?
-
2 Why dust needs to be removed
-
2.1 How to tell if it's time to clean your computer
2.1.1 Checking the temperature
-
-
3 How to clean your computer
-
3.1 Professional dust removers
3.1.1 Video: how to use the pneumatic cleaner
- 3.2 What not to use
-
-
4 How to clean your computer yourself
- 4.1 Video: how to clean the system unit from dust
- 4.2 Express cleaning
-
4.3 Cleaning the monitor screen
4.3.1 Folk remedies for the monitor
- 4.4 Cleaning the keyboard
- 5 What to do if something went wrong
- 6 Prevention
Where does dust come from in the system unit
Dust inevitably appears in any home. It is easy to see that it accumulates most of all on low-standing surfaces, and the system unit usually stands either on the floor or on a low shelf. Moreover, most often it is placed in the house so that the back panel almost rests against the wall, and cleaning (including wet) in this nook is done at best once a week. But it is in such secluded corners that dust accumulates in greatest quantities.
Now remember that the computer uses fans to cool the internal parts. The air is taken from outside the case - dusty and dirty. We can say that the turned on computer works like a mini-vacuum cleaner, collecting lumps of dust, wool and hairs inside.
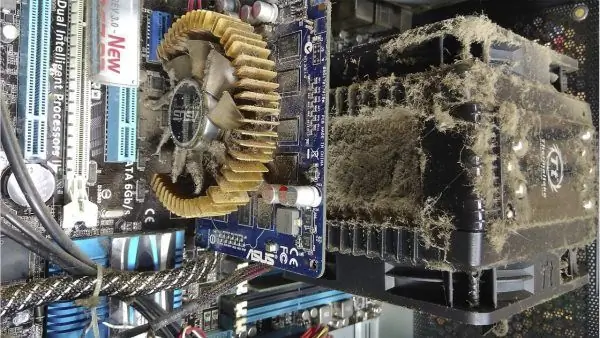
Something like this a computer might look like if you don't clean it regularly, at least once every six months.
Why dust needs to be removed
Computer parts become hot during operation. This is especially noticeable if the device is turned on and works 24/7. The accumulated dust prevents the coolers from cooling the parts and interferes with natural and artificial ventilation. This leads to overheating of the video card and / or motherboard. At best, you will notice a slowdown in processes. At worst, the part will fail from overheating. Fortunately, this happens very rarely and only in very advanced cases.
An important feature of dust is electrical conductivity. If it collects on boards in a large layer, then this can cause the risk of a short circuit, which will lead to damage to the part. This is an unlikely scenario, but it shouldn't be discounted.
How to tell if it's time to clean your computer
Ideally, you should clean your computer every few months. However, if you prefer to solve problems as they arise, then look for the following signs - they may indicate that too much dust has accumulated in the case:
- the once quiet hum of the switched on computer became much louder;
- before games and programs worked fine, but over time they began to "freeze". This is especially true for heavyweight applications that take up a lot of RAM;
- The case on the side and top heats up while the computer is running;
-
The PC may shut down spontaneously. Usually after that, it either restarts immediately (in this case, you will see a black window with a red American Megatrends logo), or it does not turn on until it cools down.

American Megatrends A similar image will appear on the screen when you turn off the computer from overheating and then turn it on.
An elevated processor temperature may also indicate a dusty interior.
Checking the temperature
You can view the internal temperature in the BIOS. To enter it, when you turn on the computer, as soon as the logo of the motherboard manufacturer appears, hold down the key or key combination indicated at the bottom of the screen. Usually this:
- F1 (Acer, Dell, HP);
- Del (Roverbook, Tiget);
- F2 (Packard Bell, HP, Gateway, Dell Presicion).
BIOS looks different for all manufacturers, but most have a tab H / W Monitor, PC Health Status or System Monitor, where you can find information about the temperature inside the case.
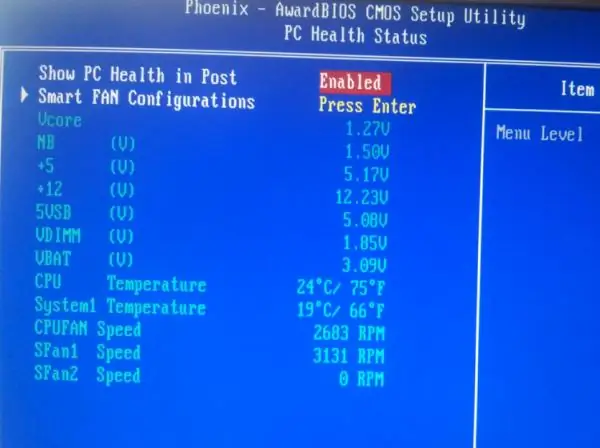
Temperatures are indicated in Celsius and Fahrenheit
This method allows you to find out the temperature only in a state of relative rest of the system, so it will not make it clear how bad or good everything is with the computer when loads appear. You can download one of the free hardware monitoring programs, for example, CPUID HWMonitor or Core Temp.
For most processors, a normal temperature looks something like this:
- during background operation, without use - 20-35 ° C;
- when launching large programs, games, while rendering video and other heavy processes - 35-60 ° C;
- 72 ° C is the maximum temperature recommended by Intel. Above there is a risk of overheating and failure of the boards.
How to clean your computer
For convenient and quick cleaning of the system, you will need tools:
- dry flannel cloth;
-
a large brush or a brush with a long handle. A narrow paint brush is best suited for this purpose. You should not take an artistic one - it is too soft and small, there will be little use from it;

Narrow paint brush Such a brush is the ideal assistant in the fight against dust in the system
- long tweezers (5-8 cm is sufficient). If you plan to use it later for cosmetic purposes, do not forget to thoroughly disinfect it after cleaning your computer;
- vacuum cleaner with a narrow nozzle.
The monitor should be cleaned with commercially available wipes, sprays, or foams. Be sure to select the correct product for your display type.
Professional dust removers
There is only one professional tool for cleaning the insides of the system unit - a compressed air cylinder (also called a pneumatic cleaner). You can buy it at any hardware store for about 300-500 rubles. The principle of operation is simple - a high-pressure air stream escapes from the cylinder nozzle and effectively blows out dust. The tool perfectly complements the arsenal of tools for cleaning your computer - it allows you to quickly blow dust out of hard-to-reach places.
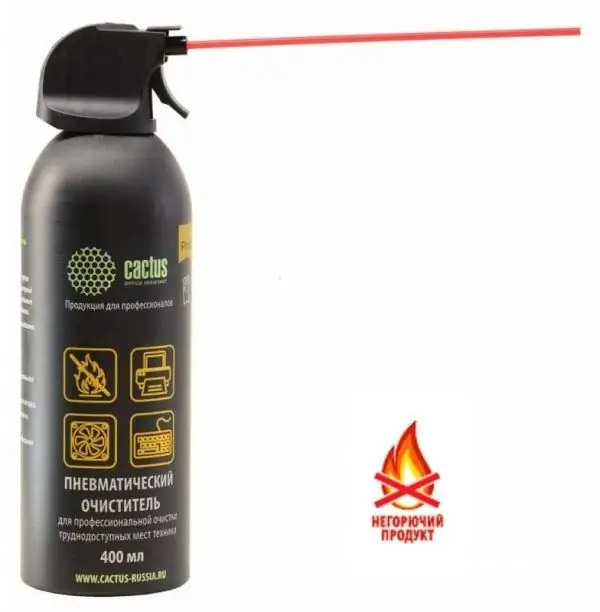
One cylinder is enough for several years of use, so the price is more than affordable
Video: how to use a pneumatic cleaner
What not to use
When cleaning your PC, eliminate damp rags and sponges from your arsenal. They are suitable for wiping the case from the outside, but not from the inside in any way - this way you risk damaging the boards.
If you do not have a vacuum cleaner, it is best to patiently collect the dust with a brush, cloth and tweezers, but do not use a household hair dryer. Firstly, it will spread all the collected dust so that even a person without allergies will sneeze for about half an hour. Secondly, it will nullify all your efforts, because all this dust will again settle on the boards and the processor after a short time.
When cleaning your computer, do not use a cotton swab. They are easily split into small fibers on contact with sharp parts. For the same reason, you should not use regular paper napkins. If you need to get to a hard-to-reach corner, it is better to wrap a flannel rag around the screwdriver.
When cleaning any part of the computer (be it a system unit, monitor or keyboard), do not use ethyl alcohol. It tends to oxidize the contacts and can easily corrode the anti-reflective coating on the monitor. The result is a rainbow-colored but not at all fun image.
Prohibited products also include washing powder, glass cleaners and other detergents, as well as products containing ammonia, acetone, toluene.
How to clean your computer yourself
So, we have prepared all the necessary tools and start:
-
First of all, turn off the running PC and disconnect it from the network.

Disconnect from power On the back you will find a switch - set it to the O position and unplug the power cord located next to
-
Remove the side cover. To do this, use a Phillips screwdriver to unscrew several bolts located on the back wall, and then slide the cover away from the front panel.

Remove the cover of the system unit If you have a fancy gaming case, then this process may be slightly different - refer to the instruction manual of your case
- Some people recommend placing the system unit on its side for convenience, but it is better to leave it upright. So the dust will be removed from top to bottom, and you do not have to go through the same places several times.
- Start by removing dust from the fan blades. Brush it off with a brush. The fans are very easy to spin, so you can get rid of all the dust in a few strokes. If you have a pneumatic cleaner, use it for this purpose.
- If you have purchased a compressed air cylinder, use it to process small parts such as memory cards. Dirt that could have accumulated in small cracks will fly out and settle down below.
- Then use a brush to remove dust from flat surfaces: boards, sound and video cards. Start at the top and work your way down. Remember to handle the undersides of horizontally mounted cards (eg video cards). As a result, all the dirt that we found will be collected on the "floor" of the case. It remains to get her out of there.
- The technique of working with a vacuum cleaner is simple - sweep the dust into one corner with a brush, and then collect the clods with a vacuum cleaner. If you don't have a vacuum cleaner, try to brush the dirt into a dry cloth like a scoop.
- When you have removed most of the dust, you can start checking the nooks and crannies. Look in all the hard-to-reach places where you can. The dust in them is usually collected in compressed lumps, which can be removed with tweezers.
- Now you can put your computer back together. Replace the side cover and bolt it. Connect the power cable and turn on the system unit.
Video: how to clean the system unit from dust
Express cleaning
If you are sure that the inside of the computer is not too clogged with dust, then you can perform a quick express cleaning with a vacuum cleaner. To do this, you don't even have to disassemble the system unit:
- Turn off your computer.
- Place the narrow brush attachment on the vacuum cleaner.
- Vacuum the entire back wall thoroughly, paying particular attention to the hole behind which the cooler is hiding.
Cleaning the monitor screen
The computer monitor cannot be wiped with a normal damp cloth. It is better to use wet wipes intended for optics in general and monitors in particular. They come in different types, and therefore, before buying, you need to read the recommendations for use. Some wipes are not suitable for LCD monitors, while others are specially designed for them. The manufacturer always indicates the type of monitors that can be handled with this napkin on the packaging.

Professional wipes are able to provide an anti-static effect to reduce dust settling on the screen
It is enough to wipe the monitor case with a dry cloth during normal cleaning.
Folk remedies for the monitor
If professional safes are not at hand, you can use the available home remedies. For example, baby soap and cotton pads:
- Pour warm water into a bowl and dilute a small amount of baby soap in it until it lathers.
- Soak a few cotton pads in the resulting solution and squeeze thoroughly. It should not drip from them.
- Wipe the display surface gently.
- Wipe the surface dry with a microfiber cloth to avoid soap streaks.
If the monitor looks clean, you can also wipe it with a regular lint-free cloth, slightly dampening it with clean (filtered or distilled) water. Keep in mind that the monitor must be turned off, and must not be turned on before the surface is completely dry.
We clean the keyboard
There is a joke that when parsing a keyboard, a gamer can find a week's supply of food. It is not far from reality - if you have a habit of eating at the computer, then under the keys you can find real deposits of food and various husks.
The best way to clean the keyboard is above the floor. After the procedure, you will have to sweep up - all the dirt that has fallen out of the device will remain on the flooring:
- Disconnect the keyboard from the computer. If you have a wireless one, turn off its power.
- Carefully remove all keys except the space bar. They are usually secured with simple snaps, and can be removed with a paper clip or small screwdriver. If you are not sure if you have a good memory of how the keys are located on your keyboard, then take a picture in advance.
- Blow out the inside of the keyboard with a hair dryer or air cleaner. Part of the dust and dirt will immediately fly out from the side of the keys.
- Flip the keyboard over and shake it. Some of the dirt will fall out in this way.
- Now take a dry flannel cloth and thoroughly wipe the panel on which the keys are attached.
- Put the keys. This is usually not difficult - just attach the part to its rightful place and press firmly with your finger. Clicking will notify you that the key is locked.
What to do if something went wrong
If removing dust did not help to overclock the computer (programs still freeze, the processor temperature did not drop, or the computer continued to shut down spontaneously), then contact a trusted computer wizard. Now there are quite a few of them, and not all of them are conscientious, so choosing the best in your city is worth according to reviews.
A specialist will be able to diagnose the system, evaluate the decrease in performance and give recommendations for improving the condition of your PC.
When choosing a master, pay special attention to the transparency of the price tags
Prevention
To help you clean your computer less often, take preventive measures. They are simple - regular regular wet cleaning. Pay special attention to the cubbyhole near the computer, carefully wipe the floor and, if necessary, the wall with a cloth, do not allow dust clouds to accumulate behind the system unit.
High-quality and regular wet cleaning will help prevent the accumulation of dust in the system unit
It is not difficult to clean the system unit at home - it is not even necessary to know the computer device. It is enough to be careful, avoid liquid products and painstakingly clean the dust from every nook and cranny.
Recommended:
What Means And How To Dry-clean The Car Interior With Your Own Hands + Photos, Videos And Reviews

You can do it yourself dry cleaning of the car interior. You just need to know which means are suitable for this
How To Clean Silver At Home From Blackness Quickly And Efficiently, Than To Properly Clean Silver Jewelry + Photos And Videos

How to quickly clean silver from blackness at home. Effective cleanser recipes. Methods for cleaning products with gilding and stones
How To Clean Gold At Home Quickly And Efficiently, How To Clean Gold Jewelry To Make It Shine + Photos And Videos

Methods for cleaning gold at home. How to quickly and effectively clean and remove dirt from different types of gold jewelry
How To Clean The Toilet At Home, How To Clean The Cistern And Lid, And Also Wash The Brush
Folk and professional remedies to clean the toilet, practical advice and prevention of various contaminants
How To Clean A Mattress From Stains, Urine, Odor Dust At Home
Ways to clean the mattress from various stains and odors at home
