Table of contents:
- Screensaver for "Desktop" on Windows 10: install, configure and disable
- How the "Desktop" screensaver differs from wallpaper
- How to enable the desktop screensaver in Windows 10
- How to set up a screensaver in Windows 10
- Where to find screensaver themes
- Is it possible to change the Windows 10 startup screen
- What errors can occur and how to fix them
- Author Bailey Albertson [email protected].
- Public 2023-12-17 12:53.
- Last modified 2025-01-23 12:41.
Screensaver for "Desktop" on Windows 10: install, configure and disable

The developers of the Windows operating system have always encouraged the expression of individuality and provided the ability to customize the "Desktop". Windows 10 is no exception. Personalization options allow even the most whimsical user to set the wallpaper or screensaver to their liking, as well as customize the criteria for their display.
How the "Desktop" screensaver differs from wallpaper
Unlike ordinary static wallpapers, a screen saver is a dynamic picture that appears after a specified period of time, provided there is no keyboard or mouse manipulation.
How to enable the desktop screensaver in Windows 10
Since the main task of screensavers has lost its relevance, in Windows 10 the screensaver is disabled by default. There are several ways to activate it.
Through the taskbar
To enable the screensaver, follow these steps:
- Click the Search button in the lower left corner of the Desktop screen.
- Search for the word "Screensaver".
-
From the search options that appear, select Turn Screen Saver On or Off.

Item "Change screensaver" in the "Start" menu Open the personalization settings window through the taskbar
- In the personalization settings window that opens, select the "Lock screen" item.
-
From the menu that appears, open Screen Saver Options.

Screensaver Options button in the Lock Screen tab You can adjust the screensaver settings in the "Lock screen" section
- In the window that appears, select the desired screensaver from the drop-down list and click "Apply".
Through the "Control Panel"
To activate the screensaver through the "Control Panel":
- Right-click the Start button in the lower left corner of the Desktop screen.
-
In the list of apps, find and open Settings.

The item "Options" in the additional menu "Start" "Control Panel" will open access to general computer settings
- In the window that opens, select "Personalization" and follow steps 4-6 from paragraph 2.1.
Video: How to enable the screensaver in Windows 10 through the Control Panel
Through the "Command Line"
To enable the screen saver using the Command Prompt:
- Bring up the Run dialog box by pressing the WindowsKey + R keyboard shortcut.
-
Enter the command control desk.cpl,, 1 and press Enter.

Command in the Run window Open "Screen Saver Options" with a dedicated command
- In the options window that opens, select the required screensaver and click "Apply".
How to set up a screensaver in Windows 10
Screensavers have a number of options that you can customize based on your personal preference. Windows 10 comes with several types of screen savers by default.
Change screensaver
To change the screensaver, do the following:
- Open the "Screen Saver Options" window using any of the above methods.
- In the drop-down list, select any screen saver you like.
- Don't forget to "Apply" the changes you made.
Changing the parameters of the screensaver
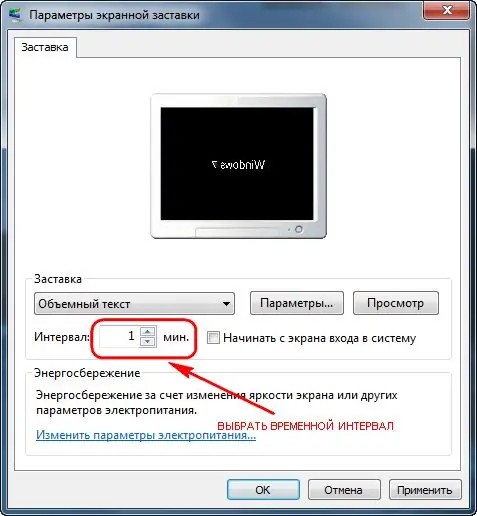
In the Screen Saver Options window, you can set the length of time after which the screen saver is displayed. To do this, you need to enter the necessary changes in the "Interval" field.

The screensaver is displayed after a set time interval
Additional parameters are provided for the "Volumetric Text" and "Photos" screensavers:
- choice of an inscription, font, size and color of the text;
- selection of the type and speed of rotation of the text;
-
selection of a surface style for displaying text;

Parameters of the "Bulky text" splash screen To save the settings for the screensaver, click "OK"
- selection of the folder from which the photos will be displayed;
-
selection of speed and order of photo display.

Screensaver Options Window To apply the selected settings for the photo screensaver, click "Save"
You can see how the screen saver will look after changing its parameters by clicking the "View" button.
Turn off the screen saver
To disable the screen saver:
- Open Screen Saver Options in any way you like.
-
In the drop-down menu of available screensavers, select "No" and click "Apply".

Screensaver item in the Screensaver settings window Disabling the screensaver is done in two clicks
Where to find screensaver themes
There are many screensavers for Windows 10 on the Internet, and each user has the opportunity to find something to their liking. As with previous versions of the OS, screen savers in Windows 10 are stored in the.scr format and are located in the C: / Windows / System32 folder. If the screensaver comes with a personal installer, it will have an.exe extension.
How to install the downloaded file
Depending on the format of the screen saver, there are two ways to install it:
- launching a personal screensaver installer;
- copying the.scr file to the System32 folder.
Thus, the next time you open the screensaver settings window, new screensavers will be displayed in the drop-down list. You can select and customize them in the same way as preinstalled screensavers.
Video: how to install the downloaded splash file in Windows 10
Is it possible to change the Windows 10 startup screen
Unlike previous versions of the OS, Windows 10 actually has two screens at startup: a lock screen and a login screen. To change the background of the lock screen, do the following:
- Open personalization options.
-
Select the "Lock Screen" section.

Lock Screen Tab in Personalization Window In the "Background" item, select an image for the lock screen
- In the "Background" item, select one of the proposed options for changing the image.
There is no option to set a separate image for the Windows 10 login screen. However, there is a function to duplicate the background of the lock screen. To activate it:
- Open personalization options.
- Select the "Lock Screen" section.
-
Find the item "Show lock screen wallpaper on login screen" and click "On".

Windows logon screen options in the Lock Screen tab For the Windows login screen, set the lock screen image
Video: How to Change Windows 10 Startup Screen Saver Using Login Changer
What errors can occur and how to fix them
As a rule, errors occur when trying to install a screensaver downloaded from the Internet. The reason for their occurrence may lie in the damage of the file, in its inappropriate extension, in the incorrect installation of the splash screen or copying to the wrong folder, etc. To fix the error, you should:
- make sure that the screen saver format meets the specified requirements;
- check the quality of the Internet connection and re-download the file;
- check the screensaver file for viruses and reinstall it;
- re-copy the screen saver file to the System32 folder.
Despite the fact that screensavers have lost their relevance, many users use them to personalize the "Desktop". The modern operating system Windows 10 has retained the ability to install and customize screen savers. All the necessary parameters are in the "Lock screen" section.
Recommended:
How To Remove And Change The Grinder Disc, What Are The Types Of Angle Grinder Cutting Wheels + Video Instructions

Types of discs for grinders. How to choose the right thickness and diameter of the circle? How to remove the old and install a new disc. Video instruction
When Kittens Change Their Teeth, At What Age Does Milk Change To Permanent Ones, How To Care For A Pet During This Period

How does a cat's teeth form and change; what is normal and what is not; when to see a doctor, how to take care of a kitten, veterinarian advice
How To Get Rid Of The Smell Of Cat Urine On The Carpet At Home, How To Remove Stains, Remove Traces Of Marks, Remove Unpleasant Odors

Why cat urine smells harsh What to do if the cat wrote on the carpet. How to find and remove old stains. Folk and commercial odor removers
What To Do If Icons Blink Or Disappear On Windows 10 - We Solve Problems In The Work Of Desktop Icons

Available settings for desktop icons / shortcuts on Windows 10. Possible problems in the operation of icons and how to solve them
Icons For Windows 10 Folders - How To Customize, Change An Icon, Install It, Remove An Arrow, Create A Shortcut, Etc

What are icons for Windows 10. How to customize or change them. Where to find icon sets. Programs for replacing icons. Instructions with images
