Table of contents:
- Author Bailey Albertson [email protected].
- Public 2023-12-17 12:53.
- Last modified 2025-06-01 07:32.
What is the key to success for the smooth operation of icons on Windows 10

The desktop for the user is not so much a welcome picture when loading the Windows operating system, but a useful tool at work. Thanks to him, you can instantly access the necessary files, installed programs or folders. Therefore, each user seeks to customize the desktop as they wish.
Content
-
1 Ways to customize desktop icons on Windows 10
-
1.1 Setting the size of icons
1.1.1 Video: Ways to Adjust the Size of Desktop Icons
- 1.2 Configuring the display of icons (adding or removing)
- 1.3 Video: Ways to Add System Icons to the Desktop
- 1.4 Individual personalization of each icon
-
-
2 Problems in the work of desktop icons
- 2.1 Blinking / flickering icons
- 2.2 Disappearing of some desktop icons
-
2.3 Disappearing all desktop shortcuts
2.3.1 Video: How to enable icon display on Windows 10
-
2.4 Moving icons on the desktop by yourself
2.4.1 Video: How to Pin Desktop Icons on Windows 10
-
2.5 Other problems
- 2.5.1 No notification area
- 2.5.2 Failed shortcut association
- 2.5.3 Unable to move shortcuts
Ways to customize desktop icons on Windows 10
All available desktop settings on Windows 10 are roughly divided into three large groups:
- customize the size of icons;
- customizing the display of icons (adding or removing);
- individual personalization of each icon.
Let's briefly consider each of the selected groups.
Adjusting the size of icons
The creators of Windows 10 have developed three types of icon sizes: large, regular, and small. To use this setting, right-click on the desktop, hover over the View option, and then scale the icons as desired. In addition to adjusting the size, the parameter adjusts the ordering and alignment of the icons.
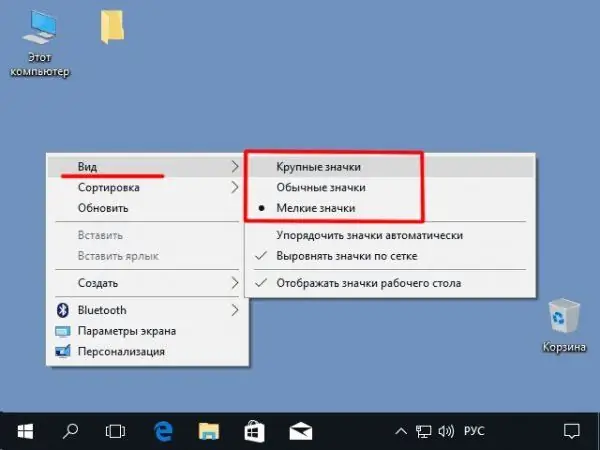
Use the View tab to adjust the size, order, and alignment of icons
Video: Ways to Adjust the Size of Desktop Icons
Customizing the display of icons (add or remove)
If desired, you can hide all standard Windows system icons (computer, trash, network) or, conversely, add and pin them to the desktop. To do this, you should use the personalization function. Right-click and go to the item of the same name.
In the "Themes" menu, click "Customize Desktop Icons" and customize the display of the required Windows system icons by checking or unchecking them. This window also changes the appearance of icons when you press the "Change icon" button.
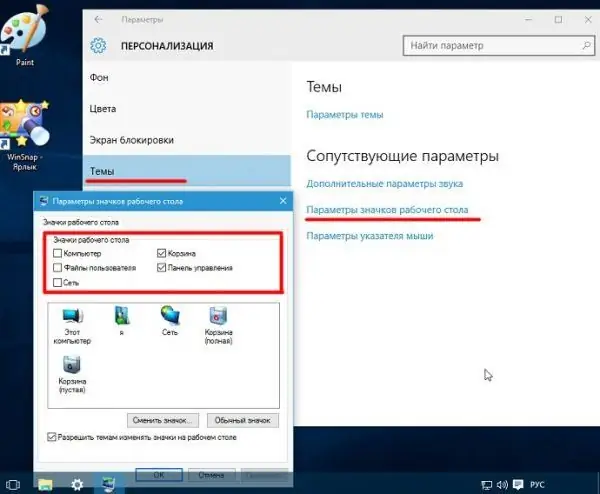
The Desktop Icon Options window allows you to customize the display of system desktop icons
Video: Ways to Add System Icons to the Desktop
Individual personalization of each icon
Another option for customizing icons is customizing (setting the appearance) of each label separately. Moreover, customization concerns both system icons and shortcuts.
-
Click on any icon with the right mouse button and go to the "Properties" options.

Icon (folder) Properties option To customize, right-click on the shortcut and find "Properties"
-
Go to the "Shortcut" tab and at the bottom of the tab click on "Change icon". You can also configure quick launch of the program (or opening a folder) by using a combination of certain keys when filling in the corresponding field "Quick call".

Change the icon in the "Shortcut" tab Press the "Change Icon" key in the "Shortcut" tab
-
In the window that appears, select the icon you like from the list. You can also create a new icon yourself by specifying the path to the.ico image when using the Explore function of the explorer.

List of available icons (appearance) on Windows 10 Choose a suitable icon from the list
Problems with desktop icons
The desktop, like other Windows system services, has errors. Most often, crashes lead to problems with the correct display of desktop icons. Let's consider the most common problems and ways to solve them.
Flashing / flickering icons
There are three reasons for the problem:
- damaged video card drivers;
- incompatibility of programs installed on the PC;
- failure of Windows system services.
In the first case, you will need to reinstall the video card drivers. To do this, do the following:
-
Next to the "Start" button, click on Search and type "Device Manager". Left-click on the Control Panel setting that appears.

Calling Windows Device Manager via Search Find Device Manager by Search
-
In the dispatcher window that opens, find the "Video adapters" category, expand it, select your video card, right-click on it and click "Update drivers".

Updating video card drivers through the "Device Manager" Windows 10 Update the drivers by selecting the appropriate function from the context menu
- After that, the automatic update of the video adapter drivers will begin. When finished, restart your computer.
In the second case, you will need to find a program that is conflicting with the Windows 10 system and uninstall it as follows:
-
Use the WIN + R key combination to invoke the command line and enter the value compmgmt.msc into it.

Launching Computer Management from the Windows Command Prompt Open the compmgmt.msc value in the command line
-
In the "Computer Management" window that appears, go to the required category at the following address: "Utilities / Event Viewer / Windows Log / System", where in the list of running programs find the information "Error". Remember the name of the application written in the "Source" field. For the convenience of identifying faulty applications, installed and running programs can be sorted by date.

Search for conflicting programs with Windows through the "Computer Management" setting Find conflicting programs in the "System" tab
-
Open This PC and select the Uninstall or change a program option.

Uninstall or change a program under This PC on Windows 10 To remove programs, use the "Uninstall or change a program" function in the "This PC" tab
-
Find the conflicting application and uninstall it.

Uninstalling programs through the "Remove or change programs" panel Remove conflicting apps from the list
- After the uninstall process, reboot.
In the third case, you will need to scan the Windows system for corrupted services.
-
Right-click on the Start menu and select the Command Prompt option from the menu that appears.

Running Command Prompt on Windows 10 The Command Prompt can be found by right-clicking on the Start Menu
-
In the system window that opens, write the sfc / scannow command, press Enter and wait for the scan to complete. When typing commands, make sure you are typing correctly to avoid launching third-party processes.

Scanning Windows services via command line Enter the sfc / scannow command in the command line
- After the check is complete, write dism / online / cleanup-image / restorehealth and press Enter again.
- Close the administrator command window and restart your computer.
Disappearing of some desktop icons
The "disappearance" of icons from the desktop happens due to problems of a critical failure in the work of "Explorer". To troubleshoot Task Manager (CTRL + ALT + DELETE), find and select File Explorer, right-click on it and click Restart, or use the Restart button in the lower right corner of the manager.
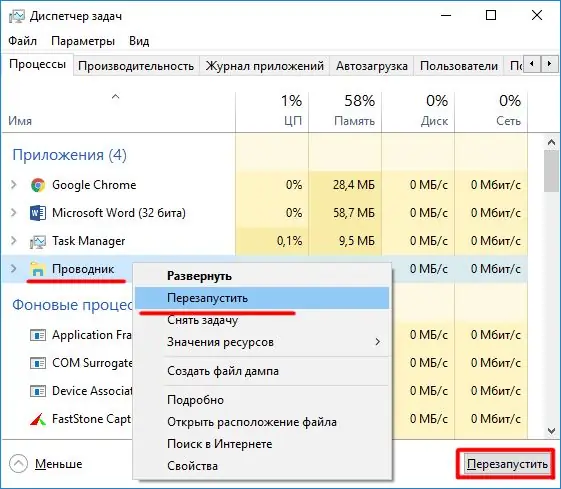
Restart "File Explorer" using the appropriate buttons in the task manager
Sometimes the disappearance of icons is associated with the enabled function Continuum (tablet mode), which is contained only in Windows 10. To disable, go to the settings in the "System" (menu "Start" - "Options").
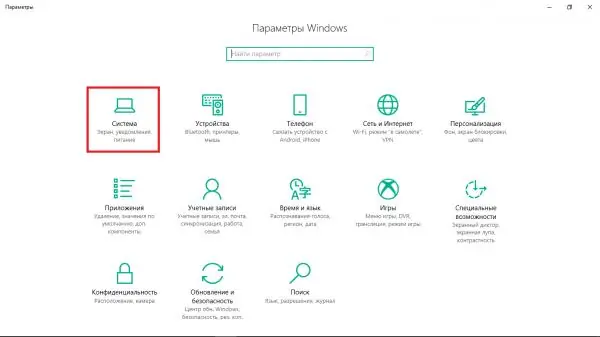
Find the "System" section in Windows settings
In the list of options that appears on the left, select "Tablet Mode" and disable the two sliders available in the settings. The function of automatically switching the device to tablet mode is also disabled in the corresponding field.
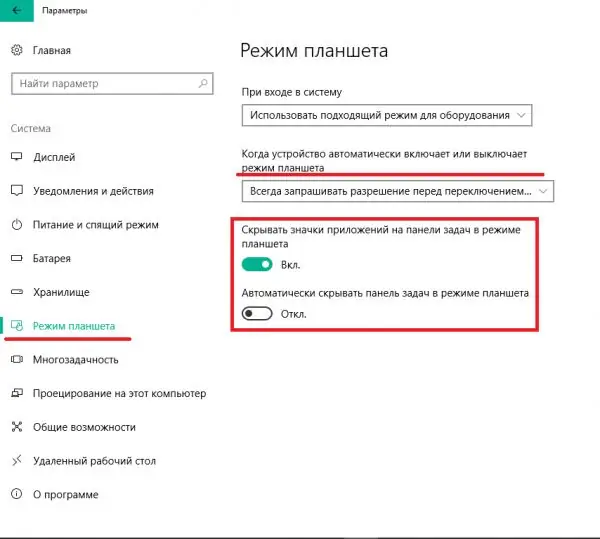
Change the settings for Tablet Mode to bring application icons back to the desktop
Disappearing all desktop shortcuts
The cause of the problem is simple - the icon display setting is disabled on the computer. The problem is solved in two clicks: first right-click on the desktop, then hover over "View" and check the box "Show desktop icons".
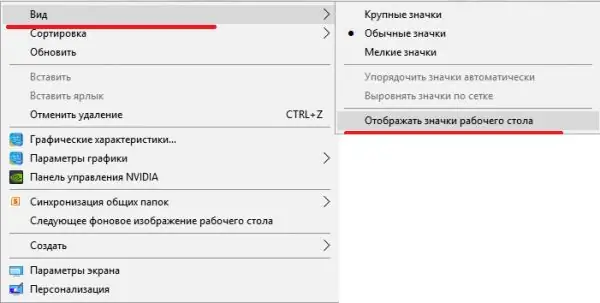
Turn on "Show Desktop Icons" in the "View" tab
Video: How to enable icon display on Windows 10
If the above method does not help in solving the problem, use an alternative option. Call the command line (WIN + R) and enter the following commands sequentially separated by commas: Rundll32 shell32.dll, Controll_RunDLL desk.cpl,, 5. When entering, carefully observe the correctness of all signs and symbols. Click OK.
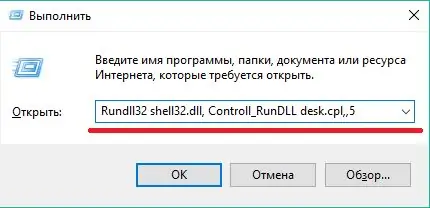
Enter commands in the command line and click "OK"
Moving icons around the desktop by yourself
The problem is as follows: after restarting the computer, the location of the icons is constantly getting lost and the shortcuts are randomly "scattered" across the screen. To fix the problem, right-click on the desktop, select "View" and check the box next to "Align icons to grid".
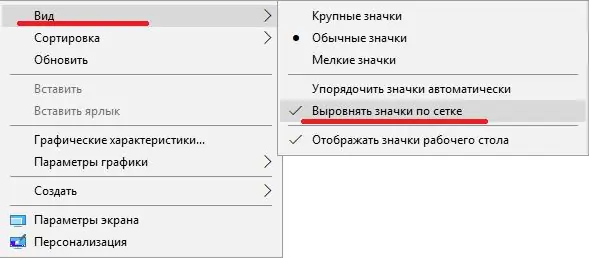
To eliminate moving icons, enable the "Align icons to grid" option in the "View" tab
After that, right-click on the desktop again and click "Refresh" to save the alignment settings.
Video: How to Pin Desktop Icons on Windows 10
Other problems
In addition to the above problems, there are other problems that you need to know about fixing.
No notification area
It so happens that the icons are displayed as needed directly on the desktop, but there is no "Notification area" on the lower taskbar (time, language layout, volume, network status, etc.).

No notification area on the lower taskbar
To solve this problem:
-
Select "Settings" from the "Start" menu and in the window that appears, click on the "Personalization" setting.

Personalization option on Windows 10 Open the "Personalization" preference in Windows settings
-
In the left pane, select the Taskbar category.

Taskbar option for customizing the display of icons Find the item "Taskbar" in the menu on the left and open it
-
In the "Notification area" section, alternately click on the items "Select the icons displayed in the taskbar" and "Turn system icons on and off."

Customizing the notification area on Windows 10 Find the section "Notification area" and open the items located in it
-
In both points, turn the scroll switches to the "on" state. on the icons that you want to display on the panel.

List of all icons available for display on the Windows 10 taskbar Turn on the required command icons
Failed shortcut association
When this type of problem occurs, launching a shortcut does not open the associated program, the application does not respond. To restore shortcut association:
-
With the WIN + R key combination, call the command line and write regedit. After launching, you will be prompted for permission to make changes to the registry, with which you must agree.

Launching Windows 10 Registry through Task Manager Enter the regedit command in the command line
- In the registry that appears, go to the path to the folder: HKEY_CURRENT_USER / Software / Microsoft / Windows / CurrentVersion / Explorer / FileExts /.lnk.
-
Then right-click on the ". Ink" directory and delete it.

Deleting the. Ink directory in the Windows 10 registry Delete the required directory
- Reboot your computer.
Unable to move shortcuts
In addition to the "chaotic scattering" of icons on the desktop, you may encounter the opposite situation - the inability to move the shortcuts. Whatever you do when you drag the shortcut, it will automatically return to its original location. There are two ways to solve the problem.
-
Right-click on the desktop, select View, and uncheck the Arrange icons automatically option.

Arrange icons automatically on Windows 10 Disable the "Arrange icons automatically" feature in the "View" tab
-
If it doesn't help, then open a command prompt (WIN + R combination), enter the value regedit, in the registry go to the route: HKEY_CLASSES_ROOT / CLSID / {42aedc87-2188-41fdb9a3-0c966feabec1} /. Then right-click on the InProcServer32 folder and select the "Permissions" option. In the "Administrators" item, check the "Full Control" box. Click OK.

Configuring the ability to move desktop icons through the registry on Windows 10 Allow full access in the Administrators tab
Desktop is a Windows system service, which is also susceptible to technical failures: incorrect display of icons, problems with shortcuts. However, the failures that occur do not carry serious system errors and are resolved in a few minutes.
Recommended:
Screensavers On The Desktop For Windows 10 - How To Install, Change Or Remove Altogether, What To Do With Emerging Problems
How to Install and Configure Screen Saver Settings for the Desktop on Windows 10: Step-by-Step Instructions. Possible errors and methods of their correction
What To Do If Google Chrome Does Not Work - Reasons And Solutions For Problems With The Browser, Including When It Does Not Start
The reasons why Google Chrome does not work: does not start, pages do not open, a gray screen is displayed, and so on. Solutions with photos and videos
Installation Of Soft Roofs, Including Preparation Of The Roof For Work, As Well As Equipment For Work
Preparatory work before installing a soft roof. Layout and methods of laying. Features of the assembly of additional elements on the roof. Required tools
The Use Of Hydrogen Peroxide To Solve Everyday Problems
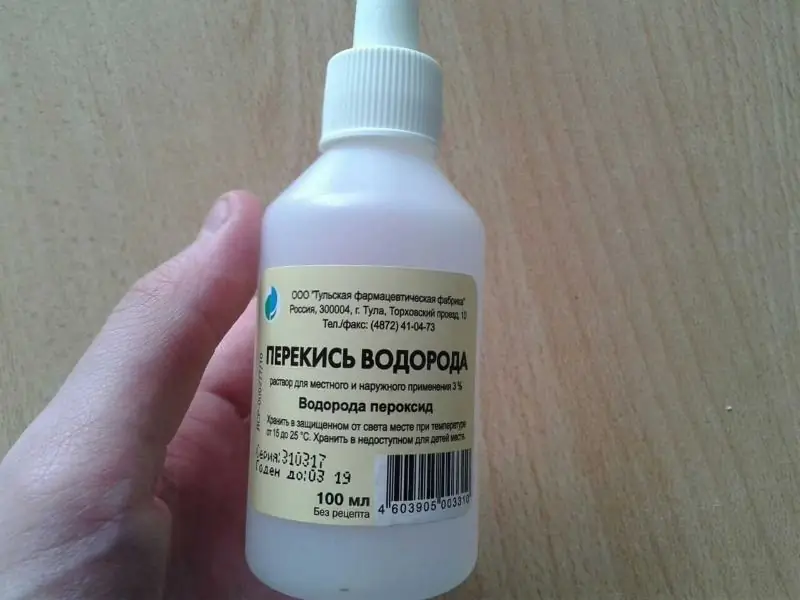
What household problems can a hydrogen peroxide solution easily deal with?
7 Problems That Cotton Pads Solve

How to solve 7 household problems with cotton pads
