Table of contents:
- Author Bailey Albertson [email protected].
- Public 2023-12-17 12:53.
- Last modified 2025-01-23 12:41.
Let's Go! How to troubleshoot Windows 10 Start menu problems

Although Windows 10 was recently released, it showed quite a few bugs in the process. One of the most common crashes is the disruption of the Start menu.
Content
- 1 Problems with the Start menu
-
2 Ways to solve problems
- 2.1 Restarting "Explorer"
- 2.2 Recovering Using Windows PowerShell Utility
- 2.3 Creating a new user
-
2.4 Changing settings in the registry
2.4.1 Video: Restoring the Start Menu by Editing Registry Settings
- 2.5 Reset cache settings
-
2.6 Updating video card drivers
2.6.1 Video: Updating Video Card Drivers via Device Manager
-
2.7 Disable Tablet Mode
2.7.1 Video: How to Disable Tablet Mode in Windows 10
-
2.8 System recovery (rollback)
2.8.1 Video: How to Reset Your PC Using the Restore Function
Start Menu Issues
The main cause of the problems is a system failure during the installation of the Windows 10 service pack. Such a failure manifests itself on a computer in completely different ways:
-
when you try to start, the "Explorer" error constantly appears;

Explorer error Choosing an action when an error occurs will not change anything
- when you click on the "Start" button, nothing happens, while launching by pressing the Win button can work;
-
when opening the menu, the tiled interface disappears;

The disappearance of the tiled interface Even if you pin the icons to the tiled interface, the problem will reappear after a reboot
-
when you try to open the menu, only an empty window appears;

Blank Start Menu Window The crash may appear intermittently
-
partial loss of text or icons;

Partial disappearance of text or icons in the Start menu The text disappeared, but the remaining icons still function
- slow response: opening and navigating through categories with a noticeable delay;
- flickering icons when opening a menu;
-
the familiar Start menu disappears and is replaced by a tile menu.

Disappearance of the familiar Start menu interface When you click on the "Start" button, a block menu appears on the whole screen
Although the main cause of problems with the Start menu is a failure to install updates, I recommend that you check your system with an antivirus for malware when there are signs of malfunction.
Troubleshooting solutions
All of these methods are universal (with the exception of isolated cases).
Restarting Explorer
"Explorer" (explorer.exe) is responsible for the stable operation of computer processes, including the "Start" menu. Here's what you need to do to restart this program:
-
Use the Ctrl + Alt + Delete key combination to open the Task Manager.

General view of the "Task Manager" Task Manager can also be launched using the search bar
-
Go to the "Processes" tab, find the "Explorer" line and click on it RMB - "Restart".

Restarting the "explorer.exe" process through the "Task Manager" After restarting "Explorer" there is no need to restart the PC
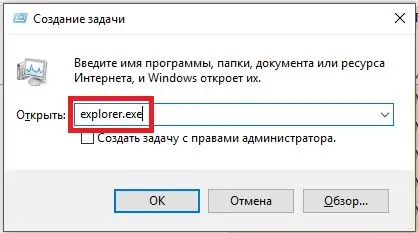
For greater efficiency, I recommend restarting Explorer not automatically, but manually. In the "Task Manager" you need to click on the "Explorer" line, select "End task", then in the "Processes" tab select "File" - "New task" and register the command "explorer.exe".

Additionally, you can check the box next to "Create a task with administrator rights"
Recovering Using Windows PowerShell Utility
PowerShell is responsible for automating Windows system processes.
- Open the command line with the Win + R key combination.
-
In the running line, write the value "PowerShell".

Calling PowerShell from the command line PowerShell is located at "Windows / System32 / WindowsPowerShell"
-
In the PowerShell that opens, enter the value: “Get-AppXPackage -AllUsers | Foreach {Add-AppxPackage -DisableDevelopmentMode -Register “$ ($ _. InstallLocation) / AppXManifest.xml”} . Press Enter to start the scan and repair process.

Invoke Process Scan in PowerShell You can insert text into a PowerShell window by right-clicking - "Paste"
-
Wait for the process to finish, then restart your computer.

Starting a Process Scan in PowerShell The duration of the process depends on the power of the computer
Create a new user
Sometimes the error is due to a failure in the user's personal settings. In this case, create a new user.
-
Start the command line with the Win + R combination, write in the value "mmc" to call the system console.

Launching the management console via the command line You can also call the command line by right-clicking on the "Start" menu
-
In the console directory on the left, select Local Users and Groups, then open the Users folder on the right.

Section "Local users and groups" in the system console After double clicking on the "Users" folder, a complete list of all previously created users will open
-
Go to the quick access panel in the menu "Action" - "New user".

Action tab menu under Local Users and Groups You can also create a new user using the console on the right by clicking "More Actions"
-
Fill in all registration fields for the new user and click "Create".

Form for filling in data for a new user If there is already a check mark at some point, it is better not to remove it
- Close the User Settings Console and restart your PC.
Changing settings in the registry
The bottom line is to create a new key (value) in the system registry.
-
Use the Win + R hotkeys to launch Command Prompt and write "regedit" to launch the "Registry Editor".

Calling the "Registry Editor" in the command line Commands are not case sensitive
-
In the left registry directory follow the chain "HKEY_CURRENT_USER / Software / Microsoft / Windows / CurrentVersion / Explorer / Advanced".

Registry settings window Be careful: sometimes names can differ by one letter
-
In the working part of the registry window, right-click on an empty space and select "New" - "DWORD parameter (32 bits)".

Creating a new parameter in the registry Even if you have Windows 10 64-bit, you need to create a 32-bit setting
-
"New parameter" will appear in the general list. Double click on it: an additional window will appear, where you need to change the name to "EnableXAMLStartMenu" and set the parameter "Value" = 0. Click OK.

Configuring the created parameter in the registry Most often, in a manually created new parameter, the "Value" item is set to "0" by default
- Close the registry window and restart your computer.
Video: Restoring the Start Menu by Editing Registry Settings
Reset cache settings
The system cache is a system for storing information and computer settings. Sometimes resetting the cache can also help.
- Click on the "Search" button (next to the "Start" button) and enter "cmd".
-
In the list found, right-click on the command line and select "Run as administrator".

Run command line as administrator It is important to run the command line exactly on behalf of the administrator
-
Then in the launched application, enter the value "Sfc / scannow", press the Enter key.

Starting the system scan process via the command line The duration of the process depends on the power of the PC
-
After the scanning process, enter another command: "DISM.exe / Online / Cleanup-image / Restorehealth".

The process of clearing the cache through the command line After successfully clearing the cache, a successful recovery message will appear
- Wait until the end of the procedure, restart your computer.
Updating video card drivers
This method will help if you have flickering icons in the Start menu.
-
Right-click on the "Start" menu and select "Device Manager".

Launching Device Manager from the Start Menu "Device Manager" can also be found through the search bar
-
Go to the "Display adapters" section, expand it and find a list of all installed video cards.

Display Adapters Tab in Device Manager If you have several video cards installed, then you need to update all drivers
-
Double-click on the name of the video card to bring up the settings window, go to the "Driver" tab and click "Update".

Video card driver information window In the window "Driver" you can also find out its version and development date
- Wait for the process to finish.
Video: Updating video card drivers through Device Manager
Disable Tablet Mode
This method is suitable if a tiled menu opens instead of the classic Start menu. Often, after updating, the system will automatically switch to tablet mode. To disable it, follow two steps:
-
Go to the "System" console settings: right-click on the "Start" menu and select "Options".

Setting "System" in parameters You can also launch the "System" console from the search bar
-
In the list of options on the left, select Tablet Mode and flip the first switch to Off.

Tablet Mode function in the System settings window You can also enable notification about the activation of this mode
Video: How to turn off Tablet Mode in Windows 10
System restore (rollback)
This is a radical solution to the problem. It is worth resorting to it if other methods did not help.
-
Open the "Control Panel" and select the "Recovery" section.

Section "Recovery" in the window "Control Panel" The "Recovery" window can also be opened using the search bar
-
In the window that opens, click on the "Start" button in the "Reset the computer to its original state" option.

Restore settings window If a previous version of Windows was previously installed, then during the recovery process you can return to it
-
Then the system will offer a choice of two options for starting the recovery. Select "Keep my files".

Recovery method selection window If you select "Delete everything", you will perform a complete rollback of the system, removing not only applications, but all data
- After the end of the process, the computer will automatically restart.
Video: How to Reset Your PC Using the Recovery Feature
youtube.com/watch?v=DyQXNqk-vfY
To prevent the recovery process from rolling Windows too far, I recommend that you manually create restore points before downloading and installing updates.
Failure to install service packs is the main cause of problems with the Start menu in Windows 10. Almost all solutions are universal, making it easier to troubleshoot problems.
Recommended:
What To Do If, After Flashing Android, The Phone Or Tablet Does Not Turn On, Does Not See The Network, Does Not Charge

Why does my smartphone or tablet not work after changing the Android version. How to troubleshoot various problems. How to properly reflash a device
Windows 7 Device Manager: Where And How To Open It, What To Do If It Won't Open, Won't Work, Or Is Empty, And If It Doesn't Have Any Ports, Printer, Drive, Monitor Or Video Card

Windows 7 Device Manager. Where to find it, why you need it. What to do if it does not open or if you encounter unexpected problems while working with it
What To Do If Google Chrome Does Not Work - Reasons And Solutions For Problems With The Browser, Including When It Does Not Start

The reasons why Google Chrome does not work: does not start, pages do not open, a gray screen is displayed, and so on. Solutions with photos and videos
Why And What To Do If The Google Chrome Browser Does Not Open The Pages - List The Main Reasons And Describe Solutions To The Problem

For some reason, Google Chrome does not open pages. Solution by clearing the cache, editing the hosts file, cleaning the registry, reinstalling the browser, etc
What To Do If Yandex Browser Does Not Open On A Computer - Why The Program Does Not Start, How To Make It Work

Why "Yandex Browser" does not open in Windows. Solution to the problem: disabling autorun, updating and reinstalling the browser, clearing the cache and registry
