Table of contents:
- Author Bailey Albertson [email protected].
- Public 2023-12-17 12:53.
- Last modified 2025-01-23 12:41.
How to get rid of the "Error while allowing Internet Connection Sharing (null)" message

Sometimes users get a null error message from the system when they try to share a W-Fi hotspot created on a PC. What is this failure and how to be in this situation.
Why users face this error
A laptop can work as a router, that is, distribute the Internet to other nearby devices. For example, a PC is connected to the Internet using a regular wire: Wi-Fi is not in this case. At the same time, a person also has other gadgets (tablet, smartphone, etc.), which are also desirable to be connected to the network. The solution to the problem can be in the form of buying a router or creating a virtual Wi-Fi on the computer, which will be used as a router that sends out a signal.
However, setting up an access point on a computer is not enough: other devices will be able to connect to it, but they will not have the Internet. In the "Properties" window of the created connection, you need to enable general access to the network.

In the "Access" tab, the user can activate the general access to the Wi-Fi point he created
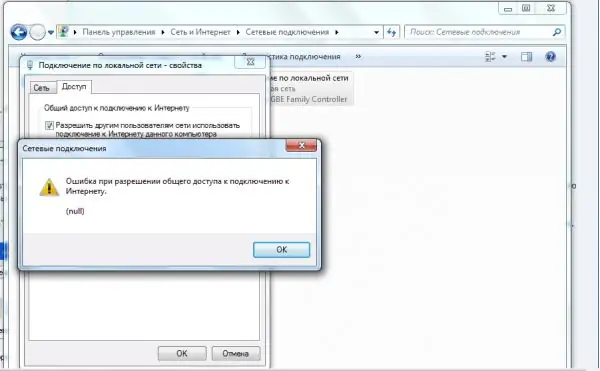
When trying to do this, some users encounter a null error. Why does the system not allow other devices to use this Internet connection?

When you try to enable sharing, a null error message may appear on the screen
The main reason is the disabled Windows Defender Firewall. In this OS, you cannot give access to the Internet if the standard program for protecting the device has been removed from services. It doesn't matter what version you have: "seven", "ten" or XP.
How to fix the error
The way out of the situation is quite simple - you need to restart the Windows Defender Firewall, which was disabled for some reason. Perhaps this was done by the user himself earlier, or there was some kind of failure in the system, since by default the defender service always runs. Once enabled, the Windows client will be able to allow access and start distributing the Internet from their PC.
Activating Windows Firewall
You can run this built-in utility in two ways: in "Services" and in the "Control Panel". They are both easy to learn, so even a beginner can handle the task.
Through the "Services"
In the "Services" system window, any PC user can enable this or that service, as well as configure its automatic start together with the OS. Windows Defender has its own service. How to find it in the list and include it, consider in the instructions:
-
The "Run" standard service will help you quickly open the "Services" window. Press two buttons on the keyboard: Win + R. In the small window that appears, insert the services.msc code. You can also just print it. Be careful not to make a mistake in the word. Click on OK right there.

Run window In the "Open" line, print or paste the previously copied services.msc code
-
On the right side of the window with a large list of services, we find "Windows Defender Firewall". Items in the list are sorted alphabetically. Scroll through objects with English names. The service you want will be almost at the top of the list.

Services window In the "Services" window, look for the item "Windows Defender Firewall"
-
Click on it with the right mouse button - in the small gray menu, select the last section "Properties".

Item "Properties" In the gray menu, click on the "Properties" item to launch an additional window
-
On top of the main window with services, an additional one will appear, in which you need to perform manipulations. In the drop-down menu "Startup type" click on "Automatic". This will allow the system to launch the protection program immediately after turning on the computer and loading the OS. Now click on the first button in the row called "Run".

Launch type Select the automatic start type and click on the "Start" button
- In order for the changes made to take effect immediately, we first click on "Apply" and then on OK.
- We are trying to give access to the Wi-Fi point again. The problem must be resolved.
Through the "Control Panel"
The built-in security software can also be activated through the Control Panel. Let's consider in detail how to get to its section:
-
There are several methods to launch this classic Windows utility. If you have a "seven", you can find it in the system "Start" menu, which opens by clicking on the window view icon located in the lower left corner of the screen.

Windows 7 Start Menu Open the "Control Panel" from the "Start" menu if you have Windows 7
-
If you have Windows 10, click on the magnifying glass icon on the Taskbar and a search bar will appear. Type the appropriate request. As you enter, the system will already begin to display results in a small window. Click on the desired item to launch the panel.

Windows Search In Windows 10, you can find the "Control Panel" through the universal window to search for sections by system
-
A universal method for launching, which is suitable for all versions of "operating systems" - the "Run" window. We call it with the Win + R key combination, and then in the "Open" field we type a simple control code. Click on OK - the "Control Panel" will appear on the screen.

Control command The control command in the "Open" window will help launch the "Control Panel"
-
In the list we find the name of the block "Windows Defender Firewall". If you have Small Icons for View, it will be second in the first column.

Control Panel Find the item "Windows Defender Firewall" in the list
-
In the left column with many blue links, click on the fourth "Enable or disable firewall …".

Enabling and disabling the firewall Click on the link "Enabling and disabling the firewall …" to open the next page
-
We put round marks next to the items on the inclusion of the defender. You need to activate the program for both private and public networks.

Configuring Settings for Each Network Type Turn on Windows Firewall for each type of network
- Click on OK, close all windows and restart the PC.
Video: Two Methods to Launch Windows Firewall
The null code problem is solved simply by activating Windows Firewall. This utility, built into the Windows system, can be enabled in one of two windows: "Control Panel" or "Services". In the latter, you can also configure the application to start automatically with every OS boot.
Recommended:
Error 651 When Connecting To The Internet: Causes And Solutions

What causes error 651 and how to fix it. PPPoE Network Recovery Instructions for Different Windows Versions
Error 691 When Connecting To The Internet: Causes And Solutions

Why can I get error 691 while connecting to the Internet. How to fix the situation: we apply effective methods
Error 633 (modem In Use Or Not Configured) On Windows 10: Causes And Solutions

For what reasons can error code 633 occur: from a simple failure to installing the Creators Update. How to quickly solve a connection problem
How To Set Up An Internet Connection On A Computer: Setting Up A Network And Automatic Connection At System Startup

How to set up an Internet connection on a PC with Windows XP, 7, 8 and 10, as well as Linux and Ubuntu. Automatic internet connection when Windows starts
How To Fix The Error Your Connection Is Not Secure When Establishing A Connection On Mozila Firefox

Eliminate the error of establishing a secure connection in Mozilla Firefox. Verified instructions
