
Table of contents:
- Author Bailey Albertson [email protected].
- Public 2023-12-17 12:53.
- Last modified 2025-01-23 12:41.
Error 691: what it means and how to fix it

While connecting to the Internet, many users encounter an error number 691. What does it mean and what should the Windows 7 and 10 client do to make it disappear?
Content
- 1 What does error 691 mean and why
-
2 How to solve the problem with error 691 on Windows 7 and Windows 10
- 2.1 Checking the correctness of the login and password
- 2.2 Checking balance
- 2.3 Reboot equipment
-
2.4 Testing Windows Firewall
2.4.1 Video: How to Disable Windows Defender
-
2.5 Temporarily disabling antivirus
2.5.1 Video: How to temporarily deactivate Avast
-
2.6 Update network card drivers
2.6.1 Video: how to update a network card on a Lenovo laptop
-
2.7 Create a new connection
2.7.1 Video: How to Easily Create a New Connection in Windows 7 and 10
- 2.8 Call the provider's support service
What does error 691 mean and why?
In the window with error number 691, its description is always given. The system explains that it refuses the user to connect to the Internet, because the specified login and password could not be recognized, or because the selected authentication protocol is not allowed on the server. Simply put, the Windows client entered incorrect data during the authorization phase. This is the most common cause of this error.
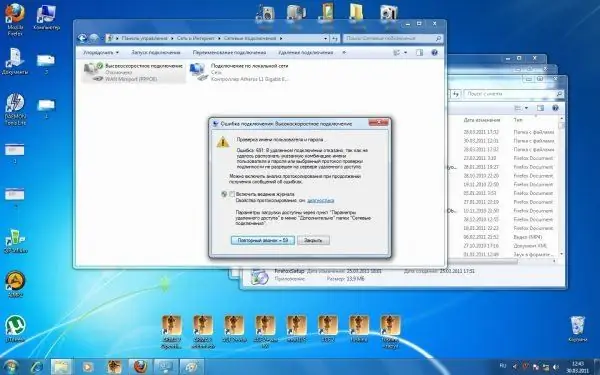
In the window with error 691, the system notifies that it cannot give access to the Internet due to incorrectly entered username and password
What other explanations are there?
- Incorrect modem or router operation.
- Invalid IP address for establishing a VPN connection.
- Connection to another network under the current account, which was performed earlier by the user.
- Problems in the network from the provider. The failure may not happen on the user's side. In this case, you need to wait until the provider solves the problem itself.
- Windows Defender Firewall is blocking the connection.
- Lack of funds on the Internet user's account. This reason is not so common, because often in this case, when a site is loaded in the browser, a message from the provider appears about the need to replenish the account for further use of its services.
How to solve the problem with error 691 on Windows 7 and Windows 10
Since there are many reasons for the appearance of error number 691, there are different methods of getting rid of it. Let's consider each of them in detail.
Checking the correctness of the login and password
Often, error 691 appears when a network client specifies incorrect data for authorization in it (incorrect username and password). It doesn't matter if you are logged into your account for the first time or not. Perhaps the data went astray for some reason. In this case, you need to re-enter them. Login and password can be found in the agreement with your provider.
When entering a password, be sure to check that the CapsLock button is disabled on the keyboard. In addition, it is necessary to monitor the case: the system distinguishes between lowercase and uppercase letters. Also, do not put a space between characters and make sure that the correct input language is set.
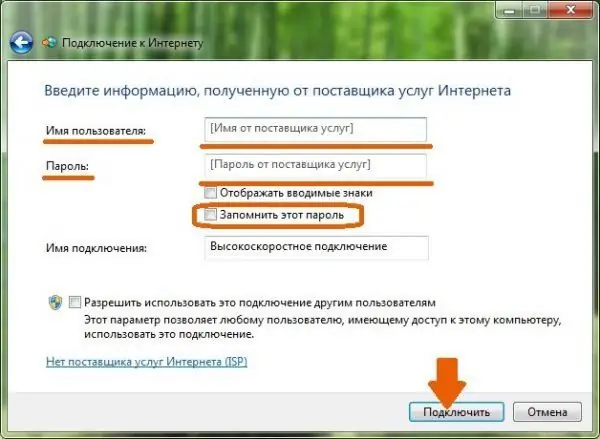
When re-entering your username and password, carefully follow the register
Any text editor, for example, "Notepad", will help you to enter everything correctly. Type the characters in it, and then just copy and paste the combinations into the corresponding two input fields. This advice is especially relevant for the clients of the provider Rostelecom, which comes up with complex passwords for users.
Balance check
Your agreement with the provider must contain the data for entering the "Personal Account" on its official website. If you don't have internet, you can still successfully open it. Log in using your username and password and check your current balance. If it is negative, we replenish it in any convenient way. After that, Internet access will resume. If you do not have the opportunity to enter your "Personal Account", you can call the provider and find out the current amount of money in the account, giving the number by which you replenish it.
Reboot equipment
Any device can malfunction from time to time. A modem or router is no exception to this rule. Try restarting it. To do this, turn it off for 30-60 seconds using the power button, which is usually on the back of the router, and then turn it back on and wait until it boots up completely. Try to connect to the network again.
Testing Windows Firewall
The standard Windows Defender Firewall application can be the culprit for error 691. In particular, a failure to connect to the Internet occurs if the specified service is suddenly disabled for one reason or another. In this case, you need to activate it back, and also configure its automatic start:
-
Call the "Run" window using the Win + R keyboard shortcut. Insert the services.msc command into the line.

Services.msc command Enter the command services.msc in the "Open" field
-
Look for the "Windows Defender Firewall" object in the list. Double click on the item to open an additional window.

Services window Find Windows Defender in the Services window
- In it, in the drop-down menu "Startup type" set "Automatic" so that it is always on. Click after that on "Apply", and then on OK, so that the window disappears from the screen.
- We reboot the computer so that all the changes we have made take effect. In this case, it is also advisable to restart the router or modem.
Error 691 can also be caused by Windows Firewall blocking the connection. To see if this is the problem, disable it temporarily:
-
In the "Control Panel", which can be found through "Windows Search" (magnifying glass icon), click on the item "Network and Sharing Center".

Control Panel Open the "Network and Sharing Center" section
-
In the lower left corner we find the link for "Windows Defender" and click on it.

Item "Windows Defender Firewall" Click on the link "Windows Defender Firewall" located in the lower left corner of the window
-
We turn our attention back to the left side of the window, where we are looking for the item "Turn Windows Defender Firewall on or off."

Enabling and disabling Click on "Turn Windows Defender Firewall on or off"
-
Depending on what type of network you are using (private or public), select the block in which you will disable the option for security.

Settings Disable Windows Defender using the option for a private or public network
- Check the box next to the disconnect item. Click on OK and try to connect to the problem network.
Video: How to disable Windows Defender
Disable antivirus temporarily
Windows Defender is not alone in blocking network connectivity. The "culprit" of error 691 can also be antivirus that tries to protect your computer from malware. It can consider the files responsible for connecting to the network to be viral and put them in the so-called quarantine, that is, isolate them from all other documents. If this is the reason, you must also disable the antivirus for a while and try to access the network. The 691 error window may no longer appear. After that, do not forget to re-enable the anti-virus software and add to the exception the processes associated with connecting to the World Wide Web.
Let's consider a shutdown using the Avast program as an example:
-
On the "Taskbar", in particular on its right end, there is a "Notification area" with a clock, date and other icons. Its "popular" name is the Windows tray. It is through him that we will deactivate the antivirus. Click on the down arrow icon.

Trey Windows Find Avast in the Windows tray
- In the small menu, look for the Avast antivirus icon.
- We click on it with the right mouse button and in the list we make a choice in favor of the second item "Manage Avast screens".
-
In the next menu, select "Disable for 10 minutes." After a specified period of time, the utility will start working again, but during this time you can check if it interferes with establishing an Internet connection.

Avast context menu Select "Disconnect for 10 minutes" from the Avast context menu
Video: how to temporarily deactivate Avast
Network card drivers update
Error 691 can be caused not only by an incorrect username or password, but also by outdated network card drivers. They need to be updated. If you have a stationary computer, you need to download the update on the official website of your motherboard. If you have a laptop, go to the resource of its manufacturer.
Let's analyze the download and installation of the update of the network card drivers using the example of a laptop from Asus:
-
We will download drivers on this official website. Go to it and enter your laptop model.

Asus Download Center Write the model name of your laptop
-
Find the model you need in the list and left-click on the "Support" link.

Model List Select your model in the list and click on "Support"
-
Now go to the first tab "Drivers and Utilities".

Drivers and Utilities Tab In the "Drivers and Utilities" tab, select your OS
- In the drop-down menu, select your "operating system".
-
Find LAN in the list of available drivers. This is the desired network card driver. Click on "Download".

LAN driver Find the LAN driver
-
Run the downloaded archive and double-click the file called setup.exe.

Downloaded archive Open the setup file in the downloaded archive
-
In the InstallShiled Wizard window, select the second option "Fix" to reinstall all program components. Click on "Next".

Item "Fix" Check the box "Fix" and click on "Next"
-
Wait for the installation wizard to fix any problems.

Troubleshooting Wait for the problems to be fixed
- After that, the installation of new components will be made.
-
As a result, a message about the completion of the operation appears in the window. Here we click on the "Finish" button.

Completed operation Click on "Finish" to close the window
- We reboot the computer for all changes to take effect and try to reconnect to our network.
An easier way to install the update is through a standard Windows window called "Device Manager". How to open it and what to do in it?
- We find the "Device Manager" service through "Search" - a panel that is launched through the "magnifying glass" icon to the right of the "Start" button.
-
Enter the appropriate query and open the window with one click on the item in the search results.

Windows Search Search through the "Windows Search" service "Device Manager"
- In a large list, we are looking for the "Network adapters" object. We open it by double-clicking the left mouse button.
-
Select one of the drivers with the right key and click on "Update driver". You can skip downloading the update for the Bluetooth item, as well as Wireless, if you use not Wi-Fi, but cable Internet.

Driver update Click on "Update driver"
-
In the new window, click on "Automatic search for updated drivers" or "Search for drivers on this computer" if you have already downloaded the required update for the network card using the previous method. After that, you will be prompted to specify the path to the update file. Then the installation will start.

Automatic driver search Select one of the links provided
- If you chose the first link, wait while the system searches the network for available updates.
-
If the update is not found, the system will notify you that new drivers are installed on the computer.

A message stating that the driver does not need to be updated The system will inform if the driver does not need updates
- If there are updates, the OS will download and install them itself.
- Repeat the procedure for any remaining drivers listed under Network Adapters.
Video: how to update a network card on a Lenovo laptop
Create a new connection
If all of the previous methods don't work, try creating a new connection. Use the following instructions for this:
-
First, launch the "Control Panel". To do this, hold down the Win + R combination on the keyboard and type the control code in the window. We execute the command using the OK button or the Enter key.

Control command Write the command control and click on OK
-
Go to the "Network and Internet" section.

Section "Network and Internet" Open the "Network and Internet" section in the "Control Panel"
-
We launch the first block "Network and Sharing Center".

Network and Sharing Center Click on "Network and Sharing Center"
-
On the next page, click on the link "Create and configure a new connection".

Creating and configuring a new connection Click on the link "Create and configure a new connection"
-
In a new window, opened on top of the "Control Panel", select the item "Internet Connection".

Choosing a connection option Select "Internet Connection" and click on "Next"
-
You can call the same window in a different way: open the Run window again and paste the rasphone.exe command into the only field.

Rasphone.exe command Enter the command rasphone.exe in the "Open" field
-
We choose the type of connection depending on whether you are using a modem or cable.

Choosing a connection type Select High Speed or Dial-up depending on the device you are connecting
-
We print the password and login from the network, which are indicated in your agreement with the provider. If you want to see the characters that you enter in the "Password" field, check the box to the left of "Show entered characters". You can also activate saving the password.

Entering data for authorization in the network Enter data (username and password) for authorization on the network
- Also check the box next to the item below if you want to allow other users of this PC to use your connection.
- Click on "Connect". We check if there is Internet access.
Video: how to easily create a new connection in Windows 7 and 10
We call the provider's support service
If none of these methods solve the problem or you are unable to use them, call your provider's support team and explain what problem you are facing. Be sure to report the error number to the operator. If the problem is on the provider's side, you will be notified immediately. You also have the right to know during what period the problems will be eliminated. If this is not the provider's fault, the specialist will explain to you in an accessible way how to fix the situation and get access to the Internet again.
Error 691 most often occurs due to the fact that the Windows client entered incorrect information to log on to the network (login or username and password). It is necessary to re-write them, but more carefully: you need to monitor the register, as well as the input language and the CapsLock key. You can also solve the problem by temporarily disabling Windows Defender and the antivirus installed on your PC. If that doesn't work, update the network card drivers and create a new connection.
Recommended:
There Was An Error Connecting To The Apple ID Server, Failed Verification, Creation, And Other Apple ID Errors

How to fix Apple server connection error. What to do if you fail to create or verify your Apple ID. Detailed step-by-step instructions
The Network Cable Is Not Connected: Possible Causes Of The Error And How To Solve It
Checking the network cable, the main causes of connection problems and their solution: hardware problems, driver and settings of the network card
Error While Allowing Internet Connection Sharing (null): Causes And Solutions

Because of which, "Error while allowing Internet Connection Sharing (null)" may occur. How to solve the problem: Turn on Windows Firewall
Error 651 When Connecting To The Internet: Causes And Solutions
What causes error 651 and how to fix it. PPPoE Network Recovery Instructions for Different Windows Versions
Error 633 (modem In Use Or Not Configured) On Windows 10: Causes And Solutions
For what reasons can error code 633 occur: from a simple failure to installing the Creators Update. How to quickly solve a connection problem
