Table of contents:
- Author Bailey Albertson [email protected].
- Public 2023-12-17 12:53.
- Last modified 2025-01-23 12:41.
How to create a Wi-Fi hotspot on a Windows 10 desktop or laptop: using the built-in command line tool
Not all novice PC users know that it is not necessary to install a router in the house in order to get a wireless Wi-Fi network that can be used through any device, including mobile devices and tablets. The function of the router can be performed by the PC itself (stationary computer or laptop) if it has a built-in Wi-Fi adapter. If you have a USB-modem with paid internet or an Ethernet cable that connects to your PC, make an access point on your computer. You can perform the task both with the help of third-party utilities, and through the built-in standard Windows console "Command Line".
Content
-
1 We use a laptop or a regular PC as a router thanks to the "Command line"
- 1.1 Allow Sharing
- 1.2 The process of creating your own "Wai-Fai"
- 1.3 Connecting other devices to the network
-
2 What can be the problems with the connection
- 2.1 If the point is visible, but there is no Internet
- 2.2 The message in the console "Failed to start the hosted network" and the absence of a point in the list of available
We use a laptop or a regular PC as a router thanks to the "Command Line"
The organization of the distribution of a Wi-Fi signal from a PC consists of three stages. We will look at each of them in detail.
Sharing permission
First, let's give permission to other devices nearby to use the Internet on a PC. This can be done through the "Network Connections" system panel:
-
We can open the window rather quickly through the Run panel: hold down Windows and R (it is not necessary to rearrange the layout to English - in any language the combination should work). Insert or manually type the code ncpa.cpl - click on OK or "Enter" on the keyboard to start its execution.

Ncpa.cpl command Paste the ncpa.cpl command and click on OK
-
In case this method does not work for you, we will give you an alternative way to launch the "Network Connections" window: right-click on the network icon on the "Taskbar" in the right corner, which is usually located to the left of the sound icon. We select the second line to launch a window with Internet parameters.

Network icon menu In the additional menu of the network icon, open the parameters
-
In the first tab about the connection status, scroll down the page and click on the penultimate link for the network control center.

Center launch Open through the "Settings" "Network and Sharing Center"
-
When we find ourselves in the center, follow the second link on the left to change the parameters of different adapters.

Control center Change adapter parameters
-
We find the connection of the wireless network - we click on the tile once with the right button and in the menu we click on the line leading to the connection properties.

Item "Properties" Open the properties of the wireless connection
-
In the second block "Access" we put a checkmark to the left of all the items - to save the changes, click on OK. If a system window appears, in which the "operating system" requires confirmation, click on "Yes".

Opening access Check all the boxes and save the changes
The process of creating your own "Wai-Fai"
When access is open, we proceed to creating the Wi-Fi point itself using the Command Line console:
-
It is necessary to run this editor with a black background as an administrator. To do this, open the "Search" panel through the magnifying glass icon next to the "Start" button and type a query corresponding to the name of the console, or the short code cmd.

Search "Windows" In "Search" enter the command cmd
-
Right-click on the line with the desired classic utility and click on the option with the mention of the administrator.

Run as administrator Run the console as administrator
-
If you cannot open the search panel, hold down R and Windows and write the same cmd formula in the "Open" line. To launch the console as administrator, you must press three keys at once: Enter + Shift + Ctrl.

Run window In the Run window write cmd
-
Another launch method is through the Start panel. We are looking for the console in the list of applications, right-click on it, select the second menu "Advanced", and in it there is already opening with administrator rights.

Launching the console through "Start" You can open the editor with administrator rights from the start menu
-
In the built-in utility window, insert the first netsh wlan show drivers formula and press "Enter".

Netsh wlan show drivers command Paste and run netsh wlan show drivers command
-
Pay attention to the line "Hosted network support" - the word "yes" must be present. Only in this case can we proceed to the next steps. If the answer is “no,” use the solution described in the section below about Wi-Fi point problems in this article.

Netsh wlan show drivers command result If the line about support is "yes", follow these steps
-
Now we insert or type on our own (only very carefully) a formula like: netsh wlan set hostednetwork mode = allow ssid = "katherine" key = "3456789jh". Instead of katherine, you can put any other word consisting of Latin characters and numbers - this is the name of your future point. Instead of 3456789jh, put your password - it is the password that other users will enter on their devices to access the network through your Wi-Fi. We execute the command with Enter.

Command to create a point In the command to create a point, you need to specify the point name and password to it
-
The editor should display the message "Network mode allowed …". Only then do we move on to other steps.

Successful command execution If the mode is enabled, run point
-
Now it remains to give the command to the created point to work. Insert the formula netsh wlan start hostednetwork.

Point launch Using the netsh wlan start hostednetwork formula, start point
-
If you need to make the point inaccessible for some reason, we stop it using the netsh wlan stop hostednetwork formula, executed in the same console.

Stop point With the code netsh wlan stop hostednetwork, you can stop the point
-
When the point works, go to the already familiar panel with a list of network connections, using the detailed instructions from the previous section of this article. Click on the created point with the right mouse button, go to the connection properties and put all the checkmarks in the access tab again - save the changes.

Access tab Check again all the items in the "Access" tab
Please note that when you restart your PC with an activated Wi-Fi point, distribution is automatically deactivated. To start the virtual router again, you need to enter the formula netsh wlan start hostednetwork in the console again - you do not need to re-create the network.
Connecting other devices to the network
When the network is already active, take another device, for example, the same "laptop" and do the following:
-
Open the network panel, if you have Windows on another device, through the "Notification area" on the "Taskbar". Find the previously created point.

Network Panel Find the point on the network panel
-
Open the connection and click on "Connect".

Connect button Click on "Connect" on the panel
-
Enter the password that you previously set through the Command Prompt console and click on Next. Check the connection.

Entering the security key Write the security key and click on "Next"
What can be the connection problems
After creating a wireless access point or already during its use, various problems may arise. Let's consider the most common ones.
If the point is visible, but there is no Internet
If the user of another device connected to the visible point, but did not get access to the Internet, then the connection is blocked by antivirus or "Firewall" installed on the PC. To check this, you need to temporarily deactivate the security utilities. If after that the Internet appeared on the devices, add this connection to the list of exclusions. In the case of a utility from ESET, you can work with exceptions as follows:
-
Open advanced settings.

Extra options Open additional options via the context menu
- Expand the "Network" tab and go to the "Personal firewall" section.
-
In the "Filter Mode" field, select "Interactive". Now, when you try to establish a connection that does not match the rules, you will receive an access request.

Interactive mode Turn on interactive mode in filtering
The message in the console "Failed to start the hosted network" and the absence of a point in the list of available
If in the line "Network support" you had the value "no", you need to run a couple more commands in the black editor and make sure that the virtual network adapter from Microsoft is not turned off in the "Device Manager".
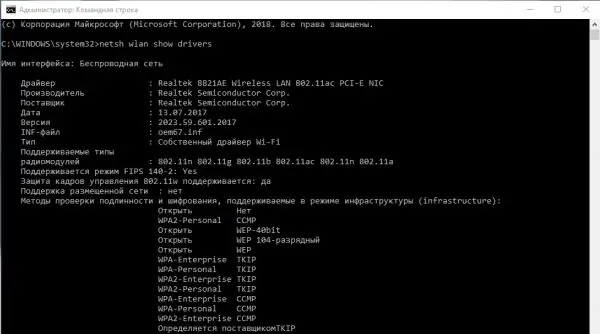
The line "Support for hosted network" may contain values "no"
The same actions and plus the driver update of the same network adapter in the manager must be performed when the message "Failed to start the hosted network" appears when trying to activate the "Wi-Fi" point.
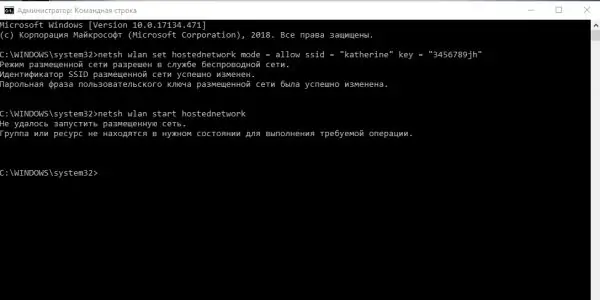
If the error "Failed to start" occurs, then the network adapter is disabled in the manager
The course of action in the beginning will be as follows:
-
In a black editor running with PC administrator rights, we type or paste using the V + Ctrl combination two formulas netsh wlan set hostednetwork mode = disallow and netsh wlan set hostednetwork mode = allow. We execute them in turn, that is, after entering each, click on "Enter".

Executing two commands Restart hosted mode with two commands
-
Now we open the system panel "Device Manager" on the display. In the top ten, you can simply right-click on the Start icon and click on the desired item in the list. The same menu is opened by the hot combination X + Windows.

Start Menu In the context menu "Start" select "Device Manager"
-
If the context menu does not appear on the display, click on the computer icon on the "Desktop", and then click on its properties.

Shortcut menu From the shortcut menu "This PC" select "Properties"
-
On the system panel with general information about the device, we find the link for the dispatcher on the left and follow it.

System Information Window In the system information window, open the manager
-
In the window with the list of device types, open the list of network adapters and look for a line with the words Microsoft and Virtual. If this equipment is turned off, a small arrow pointing down will be located on its icon to the left.

Network adapters Find Microsoft Virtual Network Adapter
-
Right-click on this item and select the "Enable" function - wait for the dispatcher to activate the adapter. After that, open the console again, re-create the "Wi-Fi" point and launch it.

Turning on the device Turn on the adapter device via the context menu
If the described method did not help, try updating the driver of the previously specified network adapter:
- Expand the manager interface, find the network adapter, right-click on it and select the update option.
-
In the update wizard, select automatic search.

Automatic search Run automatic update search
-
Wait while the system tries to find the upgrade on the network.

Driver search Wait for the system to find drivers
-
As a result, if there are updates on the network on the official resources, the wizard will download and install them himself. If there is no update, you will be notified about the relevance of the current drivers.

Current drivers If there are no updates on the network, the system will inform you that the latest drivers are installed
The upgrade and activation of the network adapter must also be performed if it later turned out that the created and activated access point is not visible on other devices.
The Windows 10 system allows you to create a Wi-Fi access point without using third-party utilities - simply by executing certain formulas in the Command Line console. In order for users of other devices nearby to be able to access this point, you must first open it in the settings - through the "Network Connections" window. If there is any problem, try restarting the hosted network mode, enable and update the firewood of the Microsoft Virtual network adapter.
Recommended:
How To Connect The Music Center To A TV, Computer, Laptop And Other Devices + Video
How to connect the music center to a computer, laptop, TV. What are the cables and connectors, how to connect the wires correctly
How To Distribute Internet Wifi (Wi-Fi) From An Iphone And Turn On The Modem Mode On An IPhone, What To Do If This Function Is Gone

How to enable tethering on iPhone, iPad, or iPod touch. How to use it via Wi-Fi, USB and Bluetooth. Possible problems and their elimination
How To Connect Laptop To TV Via WiFi

What gives a wireless connection of a laptop to a TV. How to connect: DLNA system, Miracast, adapters and third-party software
How To Distribute The Internet From Computer To Phone Via USB

How to distribute the Internet from a computer or laptop to an Android and iOS phone or tablet via a USB cable, Wi-Fi or Bluetooth network. Device as an access point
How To Connect A TV To A Computer Via WIFI: Connect And Broadcast Video With Images

How to connect a TV to a computer via Wi-Fi: connecting a TV with a smart TV function or a regular one. Instructions with illustrations and videos
