Table of contents:
- Author Bailey Albertson albertson@usefultipsdiy.com.
- Public 2023-12-17 12:53.
- Last modified 2025-01-23 12:41.
How to install a roof window: instructions, tips, tricks

The attic space, equipped as a living area, significantly expands the usable area of the building. The cost of remodeling an attic always pays off, since the main elements of the room - walls, roof and floor - are already ready. It remains only to insulate them, carry out finishing and provide light. The most economical solution to the last point is natural lighting, which is achieved by installing roof windows. In parallel, the task of ventilation is carried out, which is also important for an enclosed space.
Content
- 1 Stages of installation of roof windows
-
2 Do-it-yourself roof window installation
-
2.1 Preparation of the window opening
2.1.1 Video: Velux roof windows with servo drive
- 2.2 Installing the frame
- 2.3 Installing the drainage gutter
- 2.4 Installation of window flashing
- 2.5 Installation of a glass unit in a frame
- 2.6 Video: installing a roof window
- 2.7 Finishing the window
-
-
3 Features of installing skylights in a finished roof
-
3.1 Installation of a roof window into a soft roof
3.1.1 Video: installation of a roof window on a soft roof
-
3.2 Installation of a roof window in a metal tile
3.2.1 Video: installation of a Fakro window on metal tiles
- 3.3 Other types of roofing
-
Stages of installation of roof windows
Before considering the sequence of installing windows in the attic, it should be noted that they are divided into two types:
- frontal;
- pitched.
Frontal windows are mounted using classical technology and are located vertically in the plane of the wall. The pitched ones cut into the sloping roof elements and bear the entire load of protecting the interior from atmospheric phenomena. Therefore, higher requirements are imposed on them. This applies, first of all, to the quality of the materials from which the glass unit is made. Plastic should be UV resistant, glass tempered or shockproof (triplex). The seals are made of high-quality rubber, the outer protective linings are made of high-strength polyethylene.
Since it is impossible to hang an ordinary curtain on such a window, blinds built into the glass unit or external roller shutters are often used
When selecting a window, you must also consider:
- sizes;
- mechanism for opening (and closing) the window;
- the location of the pivot axis;
- frame fastening mechanism depending on the type of roof covering available;
- additional ventilation mechanisms (for example, a supply valve, mosquito net, etc.).

Roof windows may differ in the way they are opened
After selecting the window, you can proceed directly to the installation, which consists of a number of sequential operations:
-
Roof hole preparation.

Opening under the window The hole is cut according to a pre-defined contour, taking into account technological tolerances
-
Installation of the window frame (without glass unit).

Frame installation Before installing the frame, you must remove the glass unit from the window
-
Waterproofing and thermal insulation of the frame.

Window waterproofing The tape helps to securely adhere the waterproofing to the window frame
- Installation of a drainage gutter in the upper part of the window opening.
-
Installation of window flashing.

Window flashing Window flashing seals the waterproofing apron and protects the window from mechanical damage
- Installation of a double-glazed window into the frame.
-
Finishing of the attic around the window - insulation, installation of slopes, etc.

Installation of slopes There are installation differences in the windows of different manufacturers
There are installation differences in windows from different manufacturers. But the general order remains unchanged.
Before self-installation, you must carefully read the instruction manual attached to the purchased window
DIY roof window installation
For those who intend to mount windows in the attic on their own, it will be useful to learn about the installation features in more detail. This will require the following tools:
- level, ruler;
- plumb line, tape measure;
- mount;
- metal hammer and mallet;
- saw or electric jigsaw;
- screwdriver.

Different tools are required to install the roof window.
Additionally, various types of fasteners are needed, as well as edged boards equal in thickness to the rafters.
Preparation of a window opening
First of all, you need to choose the correct location for the window. At this stage, their number and size are determined. You need to proceed from the proportion of 1m 2 of glazing to 10m 2 of the floor. With this ratio, natural light will be sufficient in order not to use electric lamps during the day.

The height of the installation is chosen so that it is convenient to open (and close) the windows, i.e. from 0.9 to 1.7 m. from the floor
The installation height is chosen so that it is convenient to open (and close) the windows, i.e. from 0.9 to 1.7 m from the floor. Some manufacturers produce remote controlled insulating glass units. Such windows can be installed higher than 1.7m, but it should be borne in mind that an electrical cable is required to them.
Video: Velux roof windows with servo drive
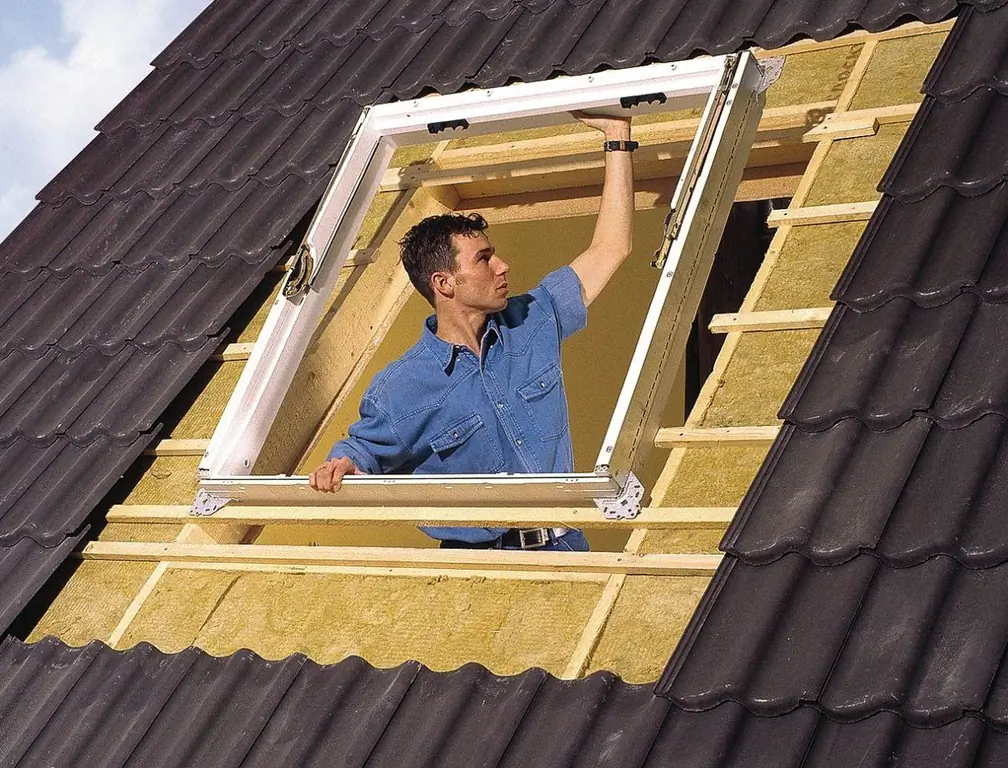
If the installation is carried out during the construction phase, i.e. before the roofing material is laid on the roof, markings are made for the installation of the window frame. At the same time, it is undesirable to cut the load-bearing roof rafters; it is better to move the window itself. A gap of 3-4 cm is left on the sides. On the upper and lower sides of the frame, the size of the technological gap is recommended from 5 to 10 cm. This is necessary for the subsequent adjustment of the position of the window and the fastening of waterproofing with insulation. The outline is drawn from the inside on the roof covering. If there is a need to insert a window on a supporting beam, then after cutting it is strengthened with auxiliary slats.
The frame is fastened with special brackets included in the window kit. They fix the frame to the rafters or additional wooden beams. The position of the upper and lower bars is set horizontally, strictly according to the level.

Brackets are located at the corners of the base frame and are attached to the support beams
The roofing waterproofing is cut diagonally (with an envelope) and folded outward during the installation work. After installing the frame, the waterproofing material is wrapped over the window, leaving 20 cm on each side. Thus, the maximum tightness of the window opening is achieved.

Waterproofing material must be supplied with the window
Frame installation
Before attaching the window frame to the prepared opening, it is necessary to disassemble the glass unit. The inner movable part is removable. Dismantling must be done in accordance with the manufacturer's instructions, which describe the entire process in detail:
- The lower part is fixed on the brackets, the upper part is fixed in advance without tightening the screws.
- Using a hydraulic level or laser level, the position of the frame is verified. The top and bottom edges are set strictly horizontally. The side faces are placed symmetrically inside the opening, leaving equal gaps on both sides.
- After preliminary fixing of the brackets, insert the movable part of the window into the frame and check the serviceability of the shutter mechanism. With the correct position of the frame, the glass unit adheres evenly around the entire perimeter to the rubber seals, the lock is triggered without effort. If these conditions are met, the glass is removed again and the installation of the frame is continued. If not, the position needs to be finally adjusted by placing plastic or wooden supports. Then the brackets are fully tightened. In this case, you need to ensure that the gaps between the frame and the moving part remain the same everywhere.
- The next step is to put the cut waterproofing on the frame, cut off the extra flaps, and fasten the insulation along the sides with a stapler.

The procedure for installing the elements of the skylight on the roof slope consists of several stages
Installation of a drainage gutter
Rain streams and melt water coming from the upper part of the roof are discharged from the glass by a special gutter, which is mounted above the window. It is attached under the tiles (slate, ondulin, roofing sheet, etc.) to the wooden base of the roof. It is best to use a ready-made prefabricated gutter made of metal. But if there is none, you can use a homemade option, cut from a piece of roll waterproofing. Cut it out to size with the upper strip of the window frame and mount it so that the flowing water goes to one side. The angle of inclination of the gutter relative to the axis of the frame is set at least 3-5 degrees, this allows water to drain freely without falling on the glass.

There is an option for installing a roof window, which does not require a drainage gutter
Installation of window flashing
It is important to carefully and carefully install the insulating flashing outside the window. It is he who serves to seal the entire structure. First, the lower corrugated apron is mounted, then its side parts. Further, they are overlapped by the upper strip and thus isolate the window from water flows. The flashing is installed after the roof is covered with tiles or other covering. Lastly, plastic overlays are attached over the apron.

The flashing is installed after the installation of the frame is completed.
Installation of a glass unit in a frame
At this point, you need to refer to the user manual from the window manufacturer. Various models of roof windows have their own nuances when assembling. Therefore, you should carefully read the instructions and carry out the installation, adhering to the manufacturer's recommendations. In addition to installing the window in the frame, they describe in detail how to adjust the position of the glass unit. With the help of special screws, you can achieve the desired clamping of the glass to the frame, set summer or winter ventilation modes.
Video: installing a roof window
Finishing the window
After the roof window is installed and the exterior work is completed, slopes need to be made. The main requirement is that the lower slope is in a strictly vertical plane, and the upper one in a horizontal plane. Accordingly, the side planes of the slopes will have a triangular or trapezoidal surface. This shape is the best way to circulate warm air, and this prevents condensation from forming on the pivot glass. Most often, the slopes are made of plasterboard, lining or other panel materials. Some manufacturers complete their products with ready-made plastic slopes, which are easy to install and very unpretentious in operation.
Features of installing skylights in a finished roof
When installing windows in the slopes of the finished roof, you will have to face some difficulties. The best situation looks when insulation in the attic has not yet been installed. In this case, you do not have to make an opening in a multi-layer "pie" of insulation, vapor barrier, etc. It will be enough to cut the roofing in the selected place.
Installation of a roof window into a soft roof
The soft roof consists of a synthetic waterproof coating that is easy to handle and cut. With the help of a sharp knife and saw, you can cope with all operations for arranging a window opening. Installation of support rails is carried out using a conventional screwdriver and self-tapping screws. Therefore, it is believed that high qualifications are not required to install a dormer window on a soft roof. All that is needed is accuracy and precision in the execution of the instructions described in the technical data sheet of the product.

Since each "petal" of the soft roof is glued to the cladding of the slope, you need to stock up on glue to work on the installation of the roof window
Since a solid base is always laid under a soft roof, the hole must be cut very accurately. Technological gaps are kept to a minimum - 3-5 cm. If necessary, the structure is supplemented with support rails made of wood.
Video: installation of a roof window on a soft roof
As practice has shown, when self-installing a window, most often mistakes are made in laying insulation and installing waterproofing. As a result, you have to completely disassemble the entire structure and eliminate flaws. After all, "punctures" are detected only when the window begins to accumulate condensate or leak.
Installation of a roof window in a metal tile
A roof made of metal or metal sheet (corrugated board) is not much different from a soft roof. The structural elements of the roof are similar. Therefore, the installation of windows is the same. The only difference is that you have to cut the outer cover with metal scissors or an electric jigsaw. All window companies supply their products with detailed instructions and complete everything necessary, including ready-made internal slopes.
Video: installation of a Fakro window for metal tiles
Other types of roofing
When installing windows on roofs with other materials, in particular ceramic tiles or slate, it is better to contact a specialist. This is due to the fact that in these cases it is necessary to dismantle the outer coating. And these works require knowledge of the basics of roofing, relevant skills and equipment.
Having familiarized themselves with the main stages of work when installing skylights, everyone can independently decide for themselves the question: do the installation with their own hands or invite specialized craftsmen. In addition, the time value during construction must also be taken into account. If the installation of the window is delayed for several days (or even weeks), unexpected rainfall may occur and the house may be flooded with water. Efficiency in the installation of windows plays an important role.
Recommended:
The Roof For The Hangar, How To Do It Right, Including With Your Own Hands, As Well As The Features Of Its Design And Installation

How the hangar roof shape depends on its function. The better to insulate the hangar roof. DIY hangar roof assembly instructions
How To Make A Roof For A Bathhouse, Including With Your Own Hands, As Well As The Features Of Its Design And Installation

Types of roofs in baths and features of their design. The choice of materials for this design. Roof construction for a bath. Bath roofing repair
Shed Roof For A Garage, How To Do It Right, Including With Your Own Hands, As Well As The Features Of Its Device And Installation

Existing types of pitched roofs. Features of creating and maintaining such a structure in their own hands. What tools and materials you need to have
Shingles For The Roof, Including With Your Own Hands, As Well As The Maintenance Features Of Such A Roof

The advantages of shingles as a roofing material. Methods for making shingles. Features of laying shingles on the roof: step by step instructions. Care rules
Installation Of The Drainage System, Including With Your Own Hands, As Well As How To Install It Correctly If The Roof Is Already Covered

Do-it-yourself installation of the drainage system. Features of the installation of internal and external gutters. Possible installation errors and their consequences
