Table of contents:
- Author Bailey Albertson albertson@usefultipsdiy.com.
- Public 2023-12-17 12:53.
- Last modified 2025-01-23 12:41.
How to build and repair a roof for a bath with your own hands

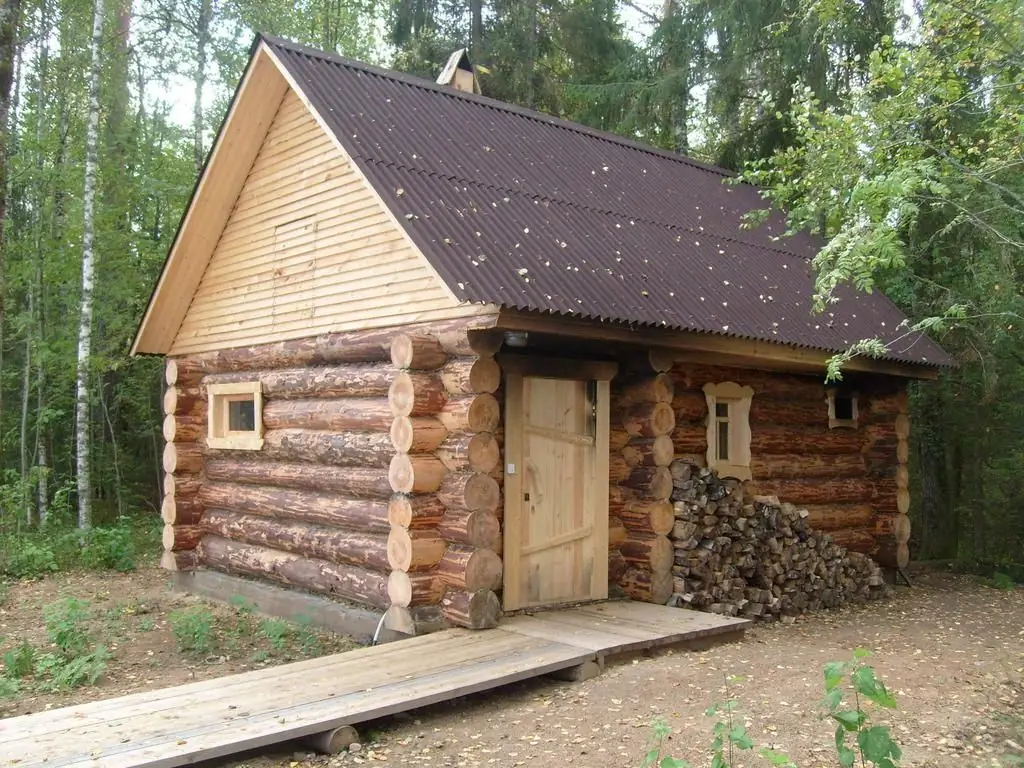
The design of the roof of the bathhouse outwardly differs little from the roof frames of other buildings. Considering that the inner surface of the bath is exposed to hot steam, high humidity and temperature extremes, special materials are selected for its decoration. This is especially important, since, unlike conventional buildings, such roofs are subject to aggressive influences both from the outside and from the inside.
Content
-
1 Types of roofs in baths and features of their design
-
1.1 Shed roof for a bath
1.1.1 Video: building a pitched roof
-
1.2 Gable roof
1.2.1 Video: gable roof for metal tiles
-
1.3 Cold roof for a bath
- 1.3.1 Insulation of the ceiling of a bath with a cold roof
- 1.3.2 Plain way to insulate the ceiling of a bath
- 1.3.3 Method of hemmed bath ceiling insulation
- 1.3.4 Ceiling insulation with multilayer panels
- 1.3.5 Video: warming the ceiling of the bath
- 1.4 Insulated sauna roof
-
-
2 How to make a roof for a bath with your own hands
-
2.1 What material to choose for insulating the roof of a bath
- 2.1.1 Mineral wool
- 2.1.2 Expanded clay
- 2.1.3 Styrofoam
- 2.1.4 Ecowool
- 2.1.5 Cement with sawdust
- 2.2 Selection of roofing material
-
2.3 Installation of the roof in the bath
2.3.1 Video: how to make a reliable roof on the bath
-
- 3 Roof repair in the bath
Types of roofs in baths and features of their design
When designing a roof frame for a bathhouse, they are guided by the main criterion - the simpler the structure of this structure, the better its performance. To comply with this, it is necessary to observe the following nuances at the design stage:
- choose the number of roof slopes;
- choose a roof covering;
- determine the need for an attic space.
For the roof of the bath, a shed or gable structure is most often used. The use of frames for the roof of a bathhouse with a large number of kinks is impractical, since this will require more roofing material, rafters and financial investments. In addition, the manufacture of multi-slope roof structures for a bath will require complex engineering solutions, for which there is not always enough experience for a person who wants to build them without outside help.

The height of the roof slope for the bath and the number of slopes increase the price of materials
Shed roof for a bath
These structures are most often used in the case of a bath adjoining the main building or with a limited budget for such a building. Flat roofs are most suitable for small saunas. The main advantage of such structures is that they do not require serious calculations, the installation of a complex rafter system and a lot of time.

The single-pitched roof has a simple structure, the construction of which requires less funds and materials than for other types
Opposite walls serve as a base for a pitched roof, with one of them having a higher or lower height. To evenly distribute the roofing and install a flat surface, a Mauerlat is used. Mauerlat is a wooden block with a section of at least 200x200 mm, which is placed along the surface of the bearing walls. To keep this element of the frame system in place, it is fixed to metal anchors (studs).

Mauerlat is placed on pre-installed studs
Mauerlat is not used in the case of installing a pitched roof on the walls of a bathhouse built from a log house.
If the length of the roof slope for the bath exceeds 600 cm, then as additional fastenings of the truss structure, beds, racks, rafter legs and girders are used.

If the length of the roof slope is more than 6 m, additional fasteners are added to the rafter frame
Video: construction of a shed roof
Gable roof
This design is common in the construction of baths made from a log house. Certain angles of inclination of the roof in the presence of floor beams allow organizing a useful space under the roof, which can be used as a living room, attic or a utility compartment.

The gable roof structure of the bath makes it possible to use the interior space for household and domestic purposes
The height of the ridge beam location, the steepness of the roof slope are selected in accordance with the climatic features of the region. For the northern regions of our country, where there is a large amount of precipitation, it is more advisable to use a gable roof with an angle of inclination above 45 degrees.

The usable space of the gable roof of the bathhouse increases depending on the angle of inclination and the height of the ridge bar
When erecting roofs of this type, it is necessary to take into account the wind load, since the steeper the angle of inclination of the roof, the less resistant the structure to such an effect.
Video: gable roof for metal tiles
Cold roof for a bath
The cold roof is a layer of waterproofing installed on the rafters with lathing, covered with roofing material. There must be a gap between the waterproofing layer and the roof covering, allowing air masses rising from the room to circulate freely.

There must be a gap under the roof covering to drain off evaporated moisture.
In the absence of such gaps, moisture will settle on the surface of the rafter system, creating a favorable atmosphere for wood rotting, as well as the development of fungi and mold.
Thermal insulation of the ceiling of a bath with a cold roof
The ceiling in the bath room must be a reliable barrier to maintain a constant temperature, as well as evaporating moisture. According to physical laws, hot air is directed upward together with steam. Having met with the elements of the rafter system and roofing, wet fumes settle on their surface. As a result, water droplets are formed that will fall on the heads of the vacationers. In addition, heat will leave the bathhouse. A large amount of fuel will be required to maintain a constant temperature.
Such circumstances will bring many inconveniences and additional costs for fuel materials. To avoid this, the ceiling of a bath with a cold roof must be insulated.
The design of the ceiling cake includes interior and exterior trim, vapor barrier layers, insulation and a waterproofing layer. Various materials can be used as insulation. The thickness and number of vapor barrier and waterproofing membranes are selected individually.

Mineral wool or other material can be used as insulation for the ceiling of the bath.
Ceiling insulation can be done in several ways:
- By laying thick boards on the upper end of the walls. In this case, a solid layer is made of wood. This method is called flat.
- By attaching the boards to the ceiling beams from the side of the bathhouse. This method is called hemming.
- Using special multi-layer panels.
To understand how each method works, you need to deal with each of them separately.
A flat way to insulate the ceiling of a bath
This method of ceiling insulation is used for baths with a small area. For this, cuts are made in the upper crowns of wooden walls to a depth of 5 to 10 centimeters, into which thick boards are installed. The thickness of these elements must be at least 60 mm. Boards are installed end-to-end. To improve the thermal insulation and waterproofing qualities of the ceiling, they are placed across the bathhouse. In this case, the boards play the role of load-bearing beams and ceiling surface.

When insulating the ceiling of a bath in a flat way, one more row of boards can be filled at the joints
The finished ceiling from the inside is treated with antiseptic agents. After that, the wood is allowed to dry. Then the outer surface of the ceiling is covered with a vapor barrier membrane, which is fixed with a construction stapler and staples. The joints of the material are closed with metallized tape.
On the back of the boards (attic), a waterproofing layer is fixed, which is capable of letting in steam. On top of it, layers of insulation are laid, which can be a mixture of clay and sand with sawdust, expanded clay granules, slag, as well as materials based on mineral compounds and synthetic fibers.
If mineral wool or bulk material in the form of expanded clay granules is used as a heater, guide bars with a step of at least 50 cm must be installed in the place of their laying. For this, wooden boards with a section of 30x150 mm are used. It should be noted that the distance between such bars should be equal to the width of the slab thermal insulation.
The insulation is covered with a waterproofing layer, attaching it to the upper ends of the guide bars.
The method of hemming the ceiling of the bath
The peculiarity of this method is that the ceiling slabs are fixed on the inside and outside of the beams. N erekrytie this type can be used for ceilings baths of different sizes. The gaps between the supporting beams are set by the insulation material.

The thickness of the thermal insulation material for the ceiling of the bath should be slightly less than the height of the beams
To insulate the ceiling in a bath with a hemming method, you must:
-
Make a rough ceiling. For this, boards with a thickness of at least 30 mm are nailed to the floor beams from the inside of the room. A metallized vapor barrier material is fixed to the rough ceiling. The joints are closed or fixed with tape. A final ceiling is installed on the vapor barrier, the material of which is lining.

Treatment of insulation joints with metallized tape Metallized tape completely isolates the joints from moisture penetration
-
Since wood is not resistant to decay, it must be carefully treated with antiseptic agents. In this case, the lining must be covered with a special varnish.

Preparation of lining for a bath Wood finishing materials are treated with antiseptics and varnished
- As in the previous method, mineral wool slabs are laid between the beams or expanded clay is covered. The insulation is covered with a waterproofing film, a finished floor is installed on top. It is best to use thick, moisture-resistant plywood for this.
Insulation of the ceiling with multilayer panels
Multi-layer panels are easy to make yourself. For this, two identical bars are located at a distance of 50 cm from each other. A wooden shield or boards are superimposed on top. After that, the structure must be turned over, and heat-insulating material must be laid inside. Fill the slats on top. Before installing such panels, it is necessary to reinforce the beams with sealing material. It is convenient to use jute for this.

Insulation in the panel for the ceiling of the bath is selected individually
Video: warming the ceiling of the bath
Insulated sauna roof
The roofing cake of an insulated roof for a bath differs from the non-insulated version in the number of insulating layers and the selection of materials by type.

The thickness of the insulation of the roofing cake for the roof of the bathhouse should not be less than 10 cm
A warm roof for a bath consists of the following elements, which are installed on the rafter structure:
-
Membranes allowing steam to pass through. Such a barrier will protect the insulation boards from moisture penetration. The absence of a vapor barrier membrane will lead to the fact that, for example, mineral wool will lose its thermal insulation qualities. In past decades, glassine was used for this purpose. Currently, modern materials are used, such as polyethylene and polypropylene films. To increase their strength, they are reinforced with a special mesh.

Vapor barrier membrane Vapor barrier furniture in the ceiling of the bath will exclude the penetration of moisture into the insulation
-
Thermal insulation. This layer reliably keeps temperature differences inside and outside. Materials of various thicknesses are used as it. As a rule, this parameter is less than 10 cm. The durability and functionality of thermal insulation layers is directly related to their insulation from moisture, the order of installation and the quality of installation.

Insulation for the ceiling of the bath For thermal insulation, you can use mineral wool in rolls or slabs
-
Vibration insulation layer, which is a variety of seals, the main task of which is to minimize the sounds from falling rain and hail. Most often, vibration isolation is used when using metal tiles, metal-profile sheets and folded roofs as a roofing covering.

Bath roof seals An adhesive layer is applied to one side of the sealing material
-
Lathing and counter-lathing elements. The counter grating forms a ventilation gap between the roof covering and the waterproofing. This distance facilitates the removal of evaporated moisture outside. The lathing serves as the basis for installing the roof covering.

Installation scheme for battens and counter battens The presence of a counter lattice will create a ventilation gap in the roofing cake.
-
Roofing material, which is selected taking into account the strength of the rafter system.

Types of roofing materials for a bath The choice of materials for the roof of the bath must be done taking into account the strength of the rafter system
Correct selection and installation of elements of the roofing roof pie for the bath will allow you to maintain a favorable microclimate not only inside the steam room, but also in the attic floor of the bath.
How to make a roof for a bath with your own hands
Making and installing a roofing cake for a bath is not difficult. Today, in the vastness of the Internet, you can find a lot of articles and diagrams with the correct sequence of installing the layers of the roofing pie. A number of materials are used as insulation, which have proven themselves well over the decades.
What material to choose for insulating the roof of a bath
There are many effective materials for insulating the roof of a bathhouse, which include:
- Mineral wool.
- Expanded clay.
- Styrofoam.
- Ecowool.
- Cement mixed with sawdust.
Mineral wool
This type of insulation is most often used in the manufacture of roofing cake for the roofs of baths and private households. Mineral wool is a fibrous material. This insulation has gained wide popularity due to its low thermal conductivity. Minvata is not a favorable environment for the development and life of mold, fungi, insects and rodents.
Mineral wool goes on sale in the form of identical rectangular slabs or in rolls. The low weight of the material allows for installation without assistance.

Installation of mineral wool can be carried out alone due to its low weight
The weak point of this material is that without high-quality waterproofing, it loses its thermal insulation qualities.
Expanded clay
Expanded clay is an insulating bulk material obtained as a result of firing a clay mixture. In its finished form, it has an irregular round shape of various sizes, with an internal porous structure.

Expanded clay can be of various sizes
The material has a long service life and low weight. Due to its low price, this insulation is often used in construction. Expanded clay practically does not absorb moisture, does not burn, does not emit substances harmful to humans. Mold and fungi do not survive in it.
Styrofoam
More than 70% of buyers choose polystyrene as insulation for household, utility and residential buildings. This insulation looks like small, interconnected white granules. It is produced in the form of rectangular slabs of various lengths, widths and thicknesses. However, this material is highly flammable, releasing hazardous substances into the air.
Even when exposed to high non-critical temperatures, the material poses a health hazard. In this regard, it is impractical to use polystyrene as a heater for the ceiling of a bath, but for an element of a roofing pie, it is quite acceptable.

Polyfoam is made in the form of plates of various shapes and thicknesses
Ecowool
Ecowool is a natural material with a fibrous structure, made from cellulose compounds with the addition of special additives that make it resistant to open flames. Thanks to this, ecowool does not flare up and does not emit harmful substances into the air. Such insulation is not a favorable place for the development of mold, fungi and other living organisms. However, without good waterproofing, ecowool absorbs moisture. Wet application of this material will require the use of special equipment and protective clothing.

When insulating with ecowool, good waterproofing is needed
Sawdust cement
This method of insulation was actively used in construction even before the invention of foam and mineral wool. An alternative with similar characteristics is clay mixed with straw. If sawdust is to be used, it must be perfectly dry. It will take 6 to 12 months to dry thoroughly. This simplest insulation is very effective if the proportions of the mixture are observed.
To make an insulating material, you need to mix ten parts of wood sawdust with one part of a cement mixture and one part of lime. Add two parts of water to this mixture. The result is a viscous solution with a homogeneous mass.

A slab of cement with sawdust is a budget, but effective insulation material
The choice of roofing material
Various materials are used for the roofing of the bath. Their choice depends on the design of the roof, rafter system, financial capabilities.
-
Ondulin, soft tiles, roll roofing. These materials are lightweight, easy to install, and have a variety of colors. They do not need a complex rafter system, have good sound insulation, resistance to temperature extremes and mechanical damage. The disadvantages are their increased fire hazard and high cost. In addition, the slope of the roof must be at least 45 ° to avoid snow accumulation.

Ondulin Ondulin is characterized by ease of installation, but increased fire hazard
-
Decking. The material is characterized by low cost, good performance and easy installation. The disadvantage is poor sound insulation.

Corrugated board The corrugated board is suitable for roofs with any slope
-
Metal tiles. Such a coating has a more aesthetic appearance than corrugated board, but a higher price. The material is resistant to corrosion, noise, long service life. But, unlike corrugated board, it is not suitable for use on roofs with a slope of less than 14 °.

Bath roof made of metal Metal tiles are one of the most common materials for covering a bath
-
Slate. Differs in low cost, good fire resistance. But it is not very attractive in appearance, it has a lot of weight, so a more massive rafter system will be required, it does not differ in the duration of service.

Slate The slate is heavy and needs a massive rafter system
-
Roofing material. Easy to install, has a low price. Disadvantages - low fire resistance, fragility.

Bath roof with roofing felt Roofing material is applied using hot mastic
Roof installation in the bath
The gable or gable roof of the bath, having a simple geometric shape, requires preliminary calculations, drawing up drawings and diagrams. This is due to the fact that the roof truss system for the bath has many elements and docking areas.
All construction work on the construction of the roof of the bath can be roughly divided into the following stages:
- First, you need to make measurements and make calculations of materials.
-
If the bath is built of bricks, foam blocks or concrete, then a waterproofing material is laid on the upper ends of the walls. For this, a double layer of roofing material is used. A Mauerlat is installed on top of it, fixed to metal anchors. For a bath from a bar, a Mauerlat is not needed.

Installation of waterproofing for Mauerlat In order for the waterproofing layer to have a better bond, a layer of bituminous mastic must be applied to the upper end of the wall.
-
The required number of rafter legs (trusses) is made. It is more convenient to do this on the ground, and to raise the finished fragments of the rafter frame one by one upward.

Manufacturing of individual elements of the rafter system The trusses for the gable roof of the bathhouse are collected on the ground, and then raised
-
First of all, it is necessary to install side trusses, which will be the gables of the roof structure. In order for each gable truss to be kept in an installed state, it is necessary to nail vertical boards to the wall. The structure can be additionally strengthened with struts and stops.

Truss system diagram The rafter system can be hanging and layered
-
In order for subsequent trusses to be perfectly aligned with the installed gables, special marks need to be made. To do this, in the ridge part between the two gable trusses, it is necessary to pull the cord.

Installation of frame trusses The cord on the rafter frame will serve as a guide mark
-
In a similar way, the cord is pulled on both sides of the structure between the ends of the rafter legs. The cord creates a perfectly straight line, guided by which the elements of the rafter system will be installed with great accuracy. The distance between the trusses should be from 100 to 120 cm. It is convenient to use metal plates and corners to attach the trusses to each other, as well as to the Mauerlat.

Fasteners for joining wooden structures The choice of fasteners is carried out in accordance with the dimensions of the rafter system
-
When the rafter system is installed in its place, you can start installing the layers of the roofing cake. First you need to fix the waterproofing material. The film is applied to the outer surface of the rafter legs. It is more convenient to attach waterproofing with a stapler. Make an overlap of at least 10-15 cm at the joints of the material.

Installation of waterproofing on the roof of the bath Installation of the waterproofing layer on the roof of the bath must begin from the lower edge of the rafter legs
- Then, parallel to the rafter legs, the slats of the counter-lattice are nailed. Thanks to them, an air gap is formed in the roofing cake. For counter-lattice, bars with a section of 30x20 mm are used.
-
A crate is mounted on top of the counter-lattice. To do this, use edged boards or bars with a section of 20x80 mm. It is imperative that all boards are level, as they are the basis for the location of the roofing material. The lathing is mounted perpendicular to the previous frame elements, in increments of 40 to 80 cm.

Installation of battens and counter battens for the bath roof When installing battens and counter battens, self-tapping screws must be used.
-
A roof covering is installed on top of the lathing.

Installation of roofing Tiles are used as roofing
-
On the inside of the roof, a heater is laid between the rafter legs. It is important that there are no gaps and creases at the joints of the plates of the thermal insulation material. The slots form cold bridges inside the cake.

Installation of insulation There should be no gaps between the insulation plates
-
A vapor barrier membrane is attached on top of the insulation using a stapler.

Installation of a vapor barrier membrane It is more convenient to attach the vapor barrier membrane with a stapler
-
On the vapor barrier, perpendicular to the rafter legs, slats with a section of 20x20 mm are stuffed. This is necessary to create a ventilation duct for the roof. Then the same slats are stuffed on top of the previous ones, which will serve as an internal lathing for installing the finishing material.

Installation of internal lathing Internal lathing is the basis for the installation of cladding material
-
Install interior trim.

Internal finishing of the roof and ceiling of the bath Grooved boards are used for interior decoration
- The ceiling is insulated with a flat, hemmed method or using multi-layer panels.
Video: how to make a reliable roof on the bath
youtube.com/watch?v=uwnV-9bLgVM
Bath roof repair
Despite the fact that during the construction of the roof of the bath, moisture-resistant materials are selected, and the wooden elements of the rafter frame are pre-treated with antiseptics, all parts of the roof are subject to deterioration. This is especially true for the bathhouse, since this building, both inside and outside, is exposed to temperature extremes and moisture.

Continuous exposure to moisture can cause the continuous sheathing to rot
Repair work on the roof of the bath should be preceded by a thorough visual inspection of the external and internal surfaces. Particular attention should be paid to those areas of the roof that are most exposed to wind, rain and temperature extremes.
Since the basis for the entire roof of the bath is the wooden frame of the truss system, it must be checked first. It is necessary to carefully examine the joints of the wooden frame elements. In case of the slightest damage, fix it. This is necessary, since the entire roof is held on the frame. As a rule, traces of wood decay appear most quickly at the ends of the rafter legs.

It is better not to repair a rotten rafter system, but to completely replace it with a new one
If it becomes necessary to replace the rafter leg or part of it, you need to strengthen this structural element, and only then proceed with the repair.

The rafter system is first strengthened, and then the rotted parts are replaced
If part of the Mauerlat, on which the rafter truss rests, is subject to rotting, it must be fixed. The damaged area of the Mauerlat is cut out, and a new fragment of a similar shape is installed in its place. If the truss is not secured, the roof will sag. After establishing their integrity, the joints of wood are covered with a layer of sealant.
If soaked, crumpled or sagging thermal insulation material is found, it must be replaced. Deformed, for example, mineral wool becomes thinner, losing its original thermal insulation characteristics.

The damaged part of the waterproofing is cut out and replaced
Inspection of the bath roof must be carried out once a year, and preferably after the autumn-winter periods.
Taking into account the operational features of the bath, the construction of a roof for it requires special attention, planning and calculations. Therefore, you need to have experience not only in designing a roof for residential buildings, but also the skills of building it for baths, saunas and greenhouses.
Recommended:
The Roof For The Hangar, How To Do It Right, Including With Your Own Hands, As Well As The Features Of Its Design And Installation
How the hangar roof shape depends on its function. The better to insulate the hangar roof. DIY hangar roof assembly instructions
Shed Roof For A Garage, How To Do It Right, Including With Your Own Hands, As Well As The Features Of Its Device And Installation
Existing types of pitched roofs. Features of creating and maintaining such a structure in their own hands. What tools and materials you need to have
How To Make A Roof For A Summer Residence, Including With Your Own Hands, As Well As The Features Of Its Design And Installation
Types of roofs for summer cottages. Calculation and selection of materials. DIY installation and insulation, Dacha roof repair with replacement of materials
Waterproofing The Roof Of The Garage, How To Do It Right, Including With Your Own Hands, As Well As The Features Of Its Device And Installation
Materials that protect the garage roof from moisture. Waterproofing tools. Laying material on different types of roofs. Replacing the waterproofer
Installation Of Roof Windows, Including With Your Own Hands, As Well As Installation Features In An Already Finished Roof
Step by step instructions for installing a roof window. Features of technology and nuances of installation in various types of roofing
