Table of contents:
- Author Bailey Albertson [email protected].
- Public 2024-01-17 22:26.
- Last modified 2025-06-01 07:32.
Roof for summer cottages: its construction, installation and repair

Country houses can be designed for summer or year-round living, therefore they are built and insulated in different ways. But the strength of country roofs, in any case, should be calculated for the weight of the snow cover typical for a particular area. We will consider the types of roofs that are popular in summer cottage construction, how to insulate them, the choice of material and the stages of DIY installation. It is also worth touching on the calculation of the amount of building materials, as well as the assessment of the wear of the roofing pie and the procedure for carrying out repair work.
Content
-
1 Types of roofs for summer cottages and features of their construction
-
1.1 Cold roof for summer cottages
1.1.1 Insulation of the ceiling of a summer cottage with a cold roof
- 1.2 Insulated roof
-
1.3 Mansard roof
1.3.1 Video: roofs of houses - attic or with a cold attic
-
1.4 Multi-gable and half-gable roof structure in suburban construction
1.4.1 Photo gallery: multi-gable and semi-gable roofs of country houses
-
-
2 How to make a roof for a summer residence with your own hands
-
2.1 What material to choose for a country roof
- 2.1.1 Truss lumber
- 2.1.2 Waterproofing, vapor barrier and insulation materials
- 2.1.3 Roof coverings and accessories
- 2.1.4 Video: which roof to choose
- 2.1.5 Gutter system
-
2.2 How to calculate the amount of material for the roof in the country
2.2.1 Table: number of boards or timber in m3
- 2.3 Installation of the country roof
- 2.4 Installation of roof elements
- 2.5 Video: building a roof for a country house
-
-
3 Roof repair in the country
3.1 Roof replacement
Types of roofs for summer cottages and features of their construction
Most summer residents try to choose practical and inexpensive types of roofs for their homes. Complex multi-level solutions are more suitable for country houses with year-round residence and are designed to demonstrate the wealth of the owner, and not the ascetic expediency of a seasonal structure. For a country house, roofs are chosen that provide maximum living space with a relatively low cost of their construction. Such structures are distinguished by a simple rafter system and the presence of an attic floor; they usually use inexpensive insulation in combination with durable roofing material. Most often, horticultural associations build houses with several types of roofs.
-
Gable. It is the most durable and easy-to-manufacture roof, which is often equipped with a residential under-roof space.

Gable roof The gable roof is an excellent choice for a country house, combines strength, simplicity and practicality of the structure and withstands wind and snow loads well
-
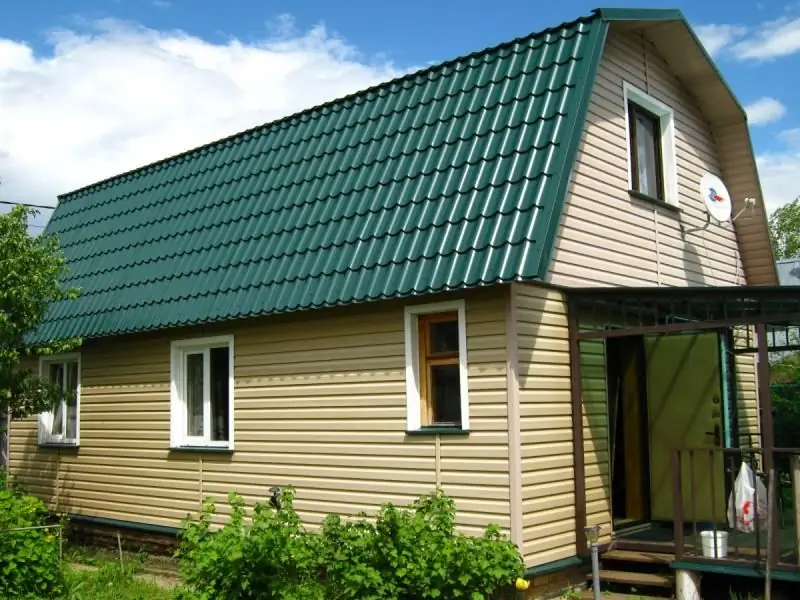
Gable broken line. Such a solution makes it possible to obtain the largest volume of the attic space and is very much in demand in summer cottage construction.

Sloping mansard roof The sloping gable roof provides the maximum possible volume of the residential under-roof space due to the slopes located at different angles and a complex two-level rafter structure
-
Multi-pliers. It consists of two gable roofs connected at right angles. This design provides the best natural light and an expansion of living space.

Multi-gable roof The multi-gable roof allows you to increase the volume of the attic with low costs for building materials, and a large angle of inclination contributes to the rapid melting of snow in winter
-
Half-hip. This is a complicated version of a gable roof with pediments that are a continuation of the walls of the building. The choice of such a house design leads to an increase in the consumption of building materials.

Half hip roof A semi-hip roof is an effective, but quite costly solution for the construction of a country house
Shed and flat roofs are sometimes used in suburban construction, but they are not widely used. Their big disadvantage is the increased requirements for waterproofing the joints of the roofing material and the need to strengthen the structure of the floors due to the high snow load. In addition, roofs of this type exclude the presence of an attic room.
Cold roof for summer cottages
Non-residential under-roof space does not require insulation of roof slopes, which allows you to significantly save on materials. The advantage of a cold roof is the absence of heating of the roof from heat leaks from residential premises, therefore, melting of snow and the formation of ice and icicles is completely excluded here. It is only necessary to ensure good ventilation of the attic space through vents in the cornice lining, dormer windows and holes in the ridge roofing elements. In this case, the temperature of the attic will be close to the temperature of the outer part of the roof, and this thermal regime will eliminate the formation of ice on the slopes and eaves.

Cold roof ventilation ensures an even temperature inside and outside the attic space, eliminating the formation of ice and unnecessary stress on the roofing system
Between the rafters and the roofing, it is necessary to lay a waterproofing membrane to drain condensate in case of temperature changes and ensure the flow of air between its surface and the back of the roof through the ventilation gaps
Insulation of the ceiling of a summer house with a cold roof
A summer cottage with a cold roof needs insulation of the ceiling of the living quarters in order to avoid heat leaks and ensure a comfortable existence in winter. It should be borne in mind that even a dense padding of insulation between the floor beams does not exclude the formation of cold bridges, therefore, it is better to make insulation in two layers in the perpendicular direction.

Insulation of the ceiling of a dwelling must be done in two layers with careful overlap of the joints of the lower layer with the upper
Ceiling insulation is carried out in the following sequence.
- A vapor barrier membrane is attached to the floor beams from below.
- A finishing ceiling board or lining is sewn onto the ceilings and the membrane.
-
Mineral wool with a thickness of at least 150 mm is tightly placed between the floor beams.

Laying mineral wool If the mineral wool is laid in several layers, then it is necessary to ensure that the joints of the lower row are overlapped with the upper plates
- The lathing is mounted perpendicularly on the beams from above.
- A layer of insulation 50 mm thick is placed between the battens of the crate. If necessary, it is fixed with bars or a string.
It is important to pay special attention to the joints of the ceiling with Mauerlat beams, slopes and gables to ensure a good fit and fixation of the insulation
Insulated roof
A living space under a roof needs insulation, which protects the attic space from temperature changes and creates comfortable living conditions in it. For this, an insulating cake is created, which serves as a barrier to cold and heat and is partially in contact with the pitched roof. A waterproofing film is laid on top of the rafters to drain condensate, then the counter-lattice and lathing are mounted, and then the roofing material is attached. This creates a ventilated gap between the cornice and the ridge along the entire plane of the roof, and this structure protects the rafters and insulation material from moisture.

Air circulation through the ventilation gap protects the rafter system and insulation material from condensation
Air inflow into such a ventilation duct is carried out through the holes in the cornice lining, and ridge strips with aerators or grilles are used to release the air mass from the ventilation gap. Thus, the roofing cake of an insulated roof for a summer residence consists of the following elements:
- roofing material;
- lathing and counter-lathing;
- waterproofing membrane;
- insulation with a thickness of 15 to 20 cm;
- vapor barrier film;
- internal lathing;
- finishing material.
Mansard roof
The definition of the attic space, like the attic roof, has undergone some changes over time. In country house construction, this concept means a gable and sloping roof, under which a living space is located for summer or year-round living. To save building materials, the gables of such buildings are made in the form of an insulated frame made of timber with window openings, as well as external and internal finishing. According to SNiP 2.08.01-89, the concept of an attic is defined as follows.
The mansard roof for the summer cottage is being erected over additional rooms located above the main building and has a lower height and volume than the lower floor.

The angle of inclination of the slopes and the roof structure determine the volume of the attic room of the country house
The desire to fit the living space into the under-roof space leads to the need to increase the angle of inclination of the roof slopes and to significantly complicate the rafter system. To maintain the strength of the truss, additional stands, bevels, headstocks and tightenings are used. The racks serve as walls, and the puffs serve as the ceiling of the attic room, along which the living space is insulated.

Insulation of the attic and the ceiling of the lower floor avoids the formation of cold bridges and icing of the roofing part of the eaves
When insulating a mansard roof, it is necessary to pay special attention to the places where the roof adjoins to the living space, the ceilings of the lower floor and the attic, as well as ensuring air circulation between the roofing and the insulation. This will get rid of heat leaks and melting of the snow cover, which leads to icing of the roof covering and an increase in the load on the eaves and drainage system.
Video: roofs of houses - attic or with a cold attic
Multi-gable and half-gable roof structure in suburban construction
Multi-gable and hip roofs are not very popular with summer residents, since they are quite expensive and time consuming to perform. The gables of the attic of such buildings, as a rule, are a continuation of the walls of the first floor of the house and are built from the same material.
Photo gallery: multi-gable and semi-gable roofs of country houses
-

Multi-gable roof for summer cottages - Tongs on the pitched roof expand the under-roof space and serve for natural lighting of the attic
-

Semi-hinged roof for summer cottages - Semi-hipped roofs often have significant eaves and gable overhangs that protect the foundation and walls from rain and snow
-

Gable roof - The roof with a transverse gable successfully combines the canopy over the entrance and standard windows for the attic room
Such houses are erected for year-round use, and the under-roof space is insulated at the points where the roof adjoins to the residential part of the premises and joints with the walls of the building. Roofs of this type are characterized by large eaves and gable overhangs, which reliably protect the walls of the building and the blind area from precipitation and often make it possible to do without installing a drainage system.
How to make a roof for a summer residence with your own hands
The zealous owners often decide on the independent installation of the roof in the country, because this allows you to save significant money on paying for a professional team of builders. Before starting construction, a choice must be made between a cold attic and a habitable under-roof space. For a non-residential attic, it is enough to build a gable roof with a slope angle of 30 to 45 o. This design is easy to implement and has high strength and resistance to wind loads.
For a habitable attic, the most acceptable choice is a gable sloping roof, which provides the largest volume of living space at a relatively low cost. This design implies the assembly of trusses with symmetrical ramps having different angles of inclination. In some nodes of the rafter group, five elements are joined, so you need to equip the place for assembly and make the trusses according to the same pattern in order to avoid mistakes and rejects.
Before starting the construction of a country roof and calculating the amount of building material, several strategic decisions must be made.
- Select the type of roof and the structure of the rafter system.
- Determine the type of attic: cold or heated, insulated.
- Make a choice of materials for rafters, insulation and roofing.
- Draw up a drawing and calculate the required amount of materials.
- Determine the stages of installation of the roof and drainage system.
After that, you need to equip a place for receiving and storing materials, equip a slipway for cutting and preliminary assembly of trusses, and also ensure the safety of installation work at a height.
What material to choose for a country roof
For a country roof, you should choose an inexpensive and durable material. Manufacturers offer various coating options that, at a relatively low price, provide a long service life with proper care. The following building materials are used in the roof structure:
- softwood lumber;
- waterproofing membrane, insulation and vapor barrier film;
- roofing materials and roof finishing elements;
- drainage system.
Let us consider these materials in more detail and briefly touch on the methods of their installation when erecting cold and insulated country roofs.
Truss lumber
The traditional and affordable material for the rafter group of the country roof is coniferous wood, which is easily processed and joined. When choosing a material for rafters, battens and other auxiliary elements, it is necessary to pay attention to the absence of numerous knots, chips, cracks, as well as the degree of drying. In the construction of roofs, air-dry lumber with a moisture content of 13 to 18% is used without traces of rot and mold. Before installation, the workpieces are treated with fire retardant and antiseptic compounds and dried in the open air. Most often, lumber is used with a length of 6 m of the following section:
- Mauerlat - timber 150X150 mm;
- rafters, racks and tightening - timber 50X150 mm;
- struts of girders, crossbars and headstock - sawn timber with a section of 50X100 mm;
- counter-lattice - bar 40X50 mm;
- sheathing - board 25X150 mm or plywood 12 mm thick.

The main power elements of a rafter truss of a sloping roof (rafter beams, racks and puffs) are usually made of 50x150 mm timber, and additional struts are made of 50x100 mm timber
Waterproofing, vapor barrier and insulation materials
Waterproofing and vapor barrier membranes prevent moisture from wood and thermal insulation materials, extending the life of these materials. The waterproofing layer serves as a protection against condensation, which occurs as a result of temperature differences on the inner surface of the roofing material, and the vapor barrier does not allow the insulation to be moistened from the side of the dwelling. Membranes are usually sold in rolls up to 1.6 m wide, 6 to 10 m long and can be used in the temperature range from -60 to +80 o C. The canvases are laid with an overlap of 10 cm, attached with a construction stapler to the rafters, and the joints are connected with a reinforced tape.
Insulation materials are produced in the form of rolls or mats and are placed between the rafters or horizontal floor beams. The layer of mineral wool insulation should be 150 mm or more. If a material with a thickness of 50 mm is used, it is laid in rows with the obligatory displacement of the joints of each row. The sizes of insulation materials may differ from different manufacturers, they must be specified in catalogs. For example, standard mineral wool boards have a size of 50X610X1250 mm, and roll insulation - 50X1220X9000 mm. Mineral wool is characterized by a low price, easy installation and long service life in a wide temperature range.
Roof coverings and accessories
Roofing materials for a country roof can be divided into soft and hard, because they differ in the type of lathing on which they are mounted.
-
Soft roofing materials are laid on a continuous crate plywood of 12 mm thickness on ramps with a slope of less than 45 of. These include roofing material and soft tiles, produced in rolls of 15 m 2 and 8 m 2, respectively. They are laid with an overlap of at least 10 cm on the prepared surface. The service life of roofing material is 5 years, and of soft tiles - up to 25 years. These coatings are painted in different colors with polymer paints, which improves their consumer properties.

Soft tiles Soft tiles serve for about 25 years, are easy to install and give a presentable look to a country roof at low cost
-
Inexpensive solid roofing materials include slate and ondulin, which are painted in different colors in a modern design. They are laid on a crate, the step of which depends on the angle of inclination of the slopes and ranges from 20 to 60 cm. The materials have good sound-absorbing properties and serve up to 50 years. The effective area of the ondulin sheet, taking into account overlaps, is 1.6 m 2 with a size of 950X2000 mm, the weight is 6.5 kg. The slate is available in different modifications and its dimensions must be checked with the suppliers.

Ondulin or Euroslate Ondulin, like colored slate, is a modern and practical roofing material and is guaranteed to serve for a long time
-
Of metal roofing materials, the most popular are corrugated board and metal tiles, which are painted with resistant polymer paint, serve for a long time and are quite simple to install. The effective width of the corrugated board, taking into account the overlap, is 1 m, and the metal tile is 1.1 m. It should be noted that the length of the sheet material can be different - from 750 to 6000 mm, its selection depends on the length of the slopes and delivery options.

Metal roof The metal tile has excellent consumer properties and a long service life, but has a low noise absorption
In addition to roofing materials for finishing, auxiliary additional elements are used that close the joints of sheets, pediment and cornice overhangs, ridge and places where the roof is adjacent to the chimneys. These parts are made of metal sheet, painted in the main colors of the roofing and have a length that is a multiple of 1 m, in increments of 20 cm. The overlap between the parts of the extensions should be at least 5 cm, and the trim points should be painted over to avoid corrosion.

Auxiliary elements of various profiles are intended for the final finishing of the roof and are matched to the color of the main coating
Video: which roof to choose
Gutter system
One of the most important elements of a country roof is a drainage system, which allows condensate and precipitation to be removed from the roof surface. Manufacturers produce gutter system kits made of polypropylene or painted metal with the same set of elements, which are easily mounted on the frontal board and walls of the building using brackets.

The drainage system of a country house is mounted on brackets and assembled from components into a single system
Country houses usually have a small catchment area, so the smallest diameter gutters and downpipes should be used. On slopes less than 10 m long, one funnel is sufficient, and the gutters must be installed with a slope of 3 to 5 o.
The selection of materials must be treated with great responsibility and purchased high-quality, certified products, since inappropriate savings can lead to a significant reduction in the life of the roof
How to calculate the amount of material for the roof in the country
The amount of lumber can be calculated according to the available dimensions of the house and the rafter group, while it should be borne in mind that the standard length of a beam available on a wide sale is 6 m. The calculation also takes into account cutting and inevitable losses for defective material, therefore, an overrun of 15 is usually laid down %. For simplicity of calculations, let's assume that the size of the house is 6X6 m.
- Calculation of the amount of timber 150X150 mm for the Mauerlat. Such beams are installed along the entire perimeter of the building and are attached to the walls, being the support of the entire roof. Therefore, their total length will be equal to 6 ∙ 4 = 24 m. Taking into account a reserve of 15%, 24 * 1.15 = 27.6 running meters will be required.
-
Calculation of the rafter group. Let's carry it out on the example of a gable roof with an angle of inclination of 45 o. If the step between the rafters is 1 m, then you will need 7 rafter trusses in the form of isosceles triangles. The base of each triangle is a bar with a length of B = 6 + 2 ∙ 0.5 m = 7 m (taking into account eaves overhangs of 50 cm). The length of the rafters is calculated from the triangle formed by the height from the ridge to the base, the rafter log and half the base: L = B / (2 ∙ cos 45 o) = 7 / (2 ∙ 0.707) = 4.95 m. Thus, for one truss you will need 7 + 2 ∙ 4.95 = 16.9 m of timber 50x150 mm. For the whole roof it needs 16.9 ∙ 7 ∙ 1.15 = 136 running meters. The amount of lumber in running meters sometimes needs to be converted into volume (cubic meters) for which you can use a special table at the end of this section.

Configuration of different types of country roofs The amount of building materials can be calculated from the drawn up drawing using geometric formulas
- The amount of roofing material and waterproofing membrane is calculated based on the total area of the slopes. In our case, it is equal to 7 ∙ 4.95 ∙ 2 = 69.3 m 2. When calculating, overlap must be taken into account. For example, if the roll is 1 m wide and 10 m long, then its useful area will be (1 - 0.1) ∙ 10 = 9 m 2 (we take into account an overlap of 10 cm). This means we need 69.3 / 9 = 7.7 ≈ 8 rolls.
- The need for insulation and vapor barrier is calculated by the area of the space to be insulated. For this, the formula S = a ∙ b is used, where S is the area, a is the length, b is the width of the insulation area.
- The number of additional components and gutters is calculated according to the dimensions of the slopes and the dimensions of the building. For example, the footage of the gutters is determined by the total length of two cornices: L w = 2 ∙ 7 = 14 m, and the size of the wind bar will be equal to the quadruple length of the rafter log (it is placed on the ends of the slopes on each side): L in = 4 ∙ 7 = 28 m. When determining the working length of each element, an overlap of 5-10 cm must be taken into account.
Table: the number of boards or timber in m 3
| Lumber size |
The number of timber and boards with a length of 6 m in 1 m 3 lumber |
The volume of a board or timber with a length of 6 m in m 3 |
| 25X150 | 44.4 | 0.022 |
| 25X200 | 33.3 | 0.03 |
| 40X100 | 62.5 | 0.024 |
| 50X50 | 67 | 0.015 |
| 50X100 | 33.3 | 0.03 |
| 50X150 | 22.2 | 0.045 |
| 50X200 | 16.6 | 0.06 |
Country roof installation
The installation of the roof truss structure begins with the preparation of the scaffolding, stairs and ensuring a safe working environment. Then, according to the drawings, the first truss is assembled, which serves as a template for the rest of the rafter group. Initially, two pediment trusses are exposed, and then cords are pulled between them, along which the correct installation of the remaining structures is checked. Installation is carried out in the following sequence.
-
A Mauerlat is attached to the walls, to which the lower part of the rafters is mounted. Then the rafters are installed, and their upper parts are fixed to each other and pulled together with a crossbar.

Installation of the rafter group The rafters are fastened to the Mauerlat using various metal corners, depending on the type of rafter system and the material of the house
- Racks, cuttings and headstock are installed on the farm. The second pediment truss is assembled and fixed with slopes. After that, guide cords are pulled between the installed trusses.
-
The rest of the rafter legs and auxiliary elements are mounted along the cords.

Installing the cord for the installation of trusses Cords are pulled between the outer trusses to align all other structural elements
- All trusses are fastened with girders, if necessary, auxiliary racks and struts are installed to give the structure the required strength.
-
For a sloping roof, a complex rafter structure is characteristic, therefore, the lower, layered, rafters are first mounted to the Mauerlat and the racks, and then the installed elements are fastened with the upper beam.

Sloping roof installation A broken rafter group is assembled at the bottom, fastened with purlins, and then hanging rafters are mounted
- The lower part of the roof is reinforced with girders and the upper ridge rafter legs are assembled.
In some cases, headstocks are installed between the ridge and the screed, which give the structure more rigidity.
Installation of roof elements
Before installing the roof, it is necessary to carry out preparatory work for fastening the frontal board to vertically cut rafters on the eaves overhang of the roof. The further sequence of installation of roof elements is as follows.
-
The brackets of the drainage system are installed on the frontal board and the drip, the ventilation tape and the wind bar are attached.

Arrangement of eaves Before installing the sheathing and roofing, it is necessary to mount brackets, drips and a wind bar
- Waterproofing is glued to the drip, a counter-lattice is mounted on the rafters, and the crate is attached to it.
-
Starting from the eaves and gable overhangs, sheets of roofing material, ridge and wind strips and other additional elements are attached.

Roofing scheme The roof covering is mounted with an overlap from the bottom up from the gable overhang and is attached to the sheathing with self-tapping screws
- From the side of the attic, insulation is attached, then a vapor barrier is mounted on the rafters and a crate is placed for interior decoration.
Video: building a roof for a country house
Roof repair in the country
The suburban roof is subject to wind and snow loads and requires periodic inspection and maintenance. In the event of normal wear and tear or extreme weather conditions, complete or partial destruction of the roofing cake may occur, requiring major repairs. In such a situation, it is necessary to conduct a thorough examination of the rafter group and the condition of the insulation and roofing materials.

To determine the damage caused by the elements, a thorough inspection of the roof is necessary to determine the sequence and scope of work
Repair of the roof in an emergency should be carried out as soon as possible, but without loss of quality.
Roof replacement
The scope of the roof repair can only be determined after dismantling the damaged roofing material and completely cleaning the roof. To find out the condition of the insulation, vapor barrier and rafter legs, it is necessary to open the crate. Even partially damaged elements must be completely replaced and should not be reused. Repairs must be carried out in the following sequence.
-
Dismantle the roofing material and clean the roof.

Dismantling the roof Roof repair work begins with the dismantling of the roof covering
- Partially open the crate and determine the condition of the rafter system and insulation.
- Dismantle and repair damaged wood and other elements.
-
Restore the waterproofing membrane, insulation, counter battens and lathing.

Restoration of elements of the roofing cake After opening the crate, the damaged elements of the roofing cake are restored
- Install new roofing material and accessories.
It is important to remember about the need for fire retardant and antiseptic processing of the rafter group, counter-battens, battens, ridge girders and other wooden roof elements
We have considered various types of country roofs, methods of insulating cold and habitable under-roofing premises, as well as the principles of selection and calculation of materials. By building a country roof with your own hands, you can significantly save on hired labor and at the same time have complete confidence in the quality of the work performed.
Recommended:
The Roof For The Hangar, How To Do It Right, Including With Your Own Hands, As Well As The Features Of Its Design And Installation
How the hangar roof shape depends on its function. The better to insulate the hangar roof. DIY hangar roof assembly instructions
How To Make A Roof For A Bathhouse, Including With Your Own Hands, As Well As The Features Of Its Design And Installation
Types of roofs in baths and features of their design. The choice of materials for this design. Roof construction for a bath. Bath roofing repair
Shed Roof For A Garage, How To Do It Right, Including With Your Own Hands, As Well As The Features Of Its Device And Installation
Existing types of pitched roofs. Features of creating and maintaining such a structure in their own hands. What tools and materials you need to have
Waterproofing The Roof Of The Garage, How To Do It Right, Including With Your Own Hands, As Well As The Features Of Its Device And Installation
Materials that protect the garage roof from moisture. Waterproofing tools. Laying material on different types of roofs. Replacing the waterproofer
Installation Of Roof Windows, Including With Your Own Hands, As Well As Installation Features In An Already Finished Roof
Step by step instructions for installing a roof window. Features of technology and nuances of installation in various types of roofing
