Table of contents:
- Author Bailey Albertson albertson@usefultipsdiy.com.
- Public 2024-01-17 22:26.
- Last modified 2025-01-23 12:41.
How to make a carousel for kids with your own hands

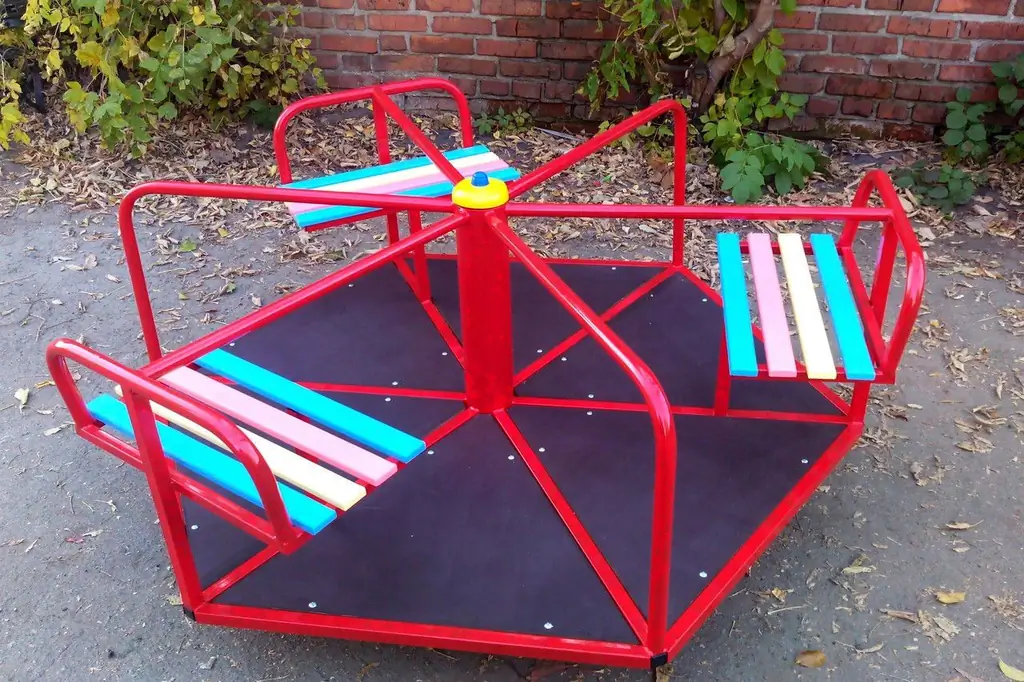
So that children do not get bored in a country house, you can independently make and install a carousel on the site. Not so much materials and efforts are required, and children and their friends will be happy.
Content
-
1 Types of carousels for playgrounds
- 1.1 Classification of carousels by drive type
-
1.2 Types of carousels depending on the design
- 1.2.1 Photo Gallery: Carousel Views
- 1.2.2 Video: a rotating swing carousel with do-it-yourself seats
-
2 Choosing the type of future carousel, tips and calculations
-
2.1 Step by step instructions
2.1.1 Photo Gallery: Number of Handrails
- 2.2 Finishing the finished carousel
-
- 3 Nuances of care
- 4 Video: do-it-yourself rotating carousel with two handrails
- 5 Video: original carousel for children
Types of carousels for playgrounds
Small, simple mechanical carousels have been loved by all generations. All Soviet playgrounds were equipped with them. It is practically a safe and fun ride. As a rule, they are also present in modern municipal playgrounds - in parks and between houses - and in kindergartens.
Carousel classification by drive type
-
Electric carousels are mainly used in amusement parks. They are powerful, designed for many seats, but require serious installation and maintenance costs and consume a lot of electricity.

Park carousel Large and heavy electric driven chain carousel installed in amusement parks
-
Mechanical carousels, driven by the muscular efforts of the riders, can be installed anywhere. Their main advantage is safety.

The simplest mechanical carousel Gravel is used as the base for the carousel
Types of carousels depending on the design
Interestingly, the types of carousels are clearly ranked by GOST under the name "Equipment for children's playgrounds". All these carousels use a metal axle on which one or more bearings are located for smooth and silent rotation of the mechanism.
-
"Swivel chairs" (VC) or radial carousel. It does not have a solid platform, but is equipped with seats (or handrails) rigidly connected to a support structure located on the central axis. Dignity - material savings; disadvantage - metal fatigue accumulates much more and the carousel itself is much heavier.

Carousel Drawing "Swivel Chairs" According to the drawing, you can determine the territory required to build a carousel
-
"Revolving platform" (VP) or disc carousel. The classic VP consists of a solid platform on which the seats are located closer to the perimeter or to the axis.

Carousel Drawing "Revolving Platform" Classic VP equipped with seats
-
Simplified VP - only with handrails.

VP drawing with handrails Simplified version without seats is easy to make yourself
-
Combined VP - with handrails and seats. The advantage is the simplicity of the design. Disadvantage - wooden parts, with insufficient processing, are prone to rotting and frequent replacement.

Combined VP The wooden parts of the carousel need careful treatment against rotting and vermin
-
"Rotating mushroom": this attraction is equipped with handrails in the form of a ring, which are rigidly fixed at the bottom of the rotating structure, or hanging hand grips. Dignity - the carousel perfectly develops a child's strength, agility, and grasp. The disadvantage is that it is quite traumatic.

"Rotating mushroom" with hand grips A carousel equipped with only hand grips is not entirely safe
-
"Gliding in the air" (chained): the seats are suspended on flexible elements (often chains) from the bottom of the rotating structure. The advantage is great pleasure while riding. The disadvantage is that it is the most traumatic structure, besides, it requires the largest platform due to the spread of the seats when rotating.

"Gliding in the air" Planning in the air carousel can also be made by hand, but it will require a large area
-
"Driving on a circular track": children drive themselves along a circular track. Bicycle drive is used. Dignity - an excellent carousel for the little ones. The disadvantage is the complexity of implementation.

"Driving on a circular track" This modern Japanese device will be difficult to build on your own.
-
Large rotating disc: The axis is tilted, the large platform rotates due to gravity as children crawl over it. Dignity - develops strength, agility, grasp. Disadvantage - in addition to bearings, it needs a strong spring with a large diameter, which is extremely difficult to find in home construction of a carousel.

"Large spinning disc" The principle of operation of such a carousel lies in the torque of the structural elements fixed on the axis
Photo gallery: types of carousels
-

Vintage carousel - Probably all carousels once started with a simple old design
-

"Swivel chairs", or a beam carousel - Simple carousel with swivel chairs - an extremely economical solution for a playground
-

"Revolving platform" with handrails - The carousel can be installed both in the courtyard of a multi-storey residential building, and in a private one, as well as in the country
-

"Revolving platform" with one seat - Single seat "revolving platform" is easy to assemble and install
-

Classic "Revolving platform" - The main advantage of the carousel is a strong and reliable metal frame
-

"Revolving platform" - The creator of the carousel clearly had ready-made circles made of metal pipes.
-

Chain carousel - This type of chain carousel needs an electric drive
-

Chain carousel without electric drive - Simple, non-powered chain carousel can be installed in the playground
The carousel trains the child's balance and coordination. Children actively throw out their energy, strengthening physical health, stimulating the imagination. Therefore, it is necessary to have a carousel in the yard of your own house. And it is quite possible to do it yourself.
Video: rotating swing carousel with do-it-yourself seats
Choosing the type of the future carousel, tips and calculations
We chose for the manufacture the simplest mechanical carousel with a platform and handrails, no seats; took into account the ergonomics and the load on all elements.

The main structural elements of the carousel - the axis and the turntable
Tools:
- garden drill;
- capacity for diluting cement;
- drill with the option of tightening screws;
- welding machine;
- files, sandpaper.
The following details and source materials will be needed (we give approximate characteristics, options are possible):
- two bearings 80110 (bore diameter of the inner ring - 50 mm, outer ring - 80 mm, bearing width - 16 mm);
- pipe 12X18H10T;
- three pieces 25x6 (outer diameter - 25 mm, wall thickness - 6 mm) 1555 mm long;
- one piece 50x7 1150 mm long;
- one piece 90x7 109 mm long;
- six segments of a rectangular pipe with section 80x40x4 560 mm long;
- one cotter pin 4x63 (diameter - 4 mm, length - 63 mm);
- three sheets of moisture-resistant plywood 20x604x1083 mm (wood, plastic, chipboard, and fiberboard can be used, but the density of the coating must be high);
- one steel strip 4x100 (thickness - 4 mm, width - 100 mm) 3952 mm long;
- plywood impregnation - antiseptic, insecticidal or water-repellent;
- primer - acrylic, alkyd, epoxy or shellac.
Step-by-step instruction
-
Having decided on the place, they mark the central point of the future structure. The cleared, tamped or paved place should be two and a half times the diameter of the future carousel.

Drawing of the territory markup for the carousel The ratio of the circumference of the carousel to the space for it should be approximately 1: 2.5
-
We dig a hole 1 m deep with a diameter exceeding the diameter of the axis by 15-20 mm. It is better to do this with a garden hand drill.

Hand garden drill A simple hand drill will save a lot of effort
- We dilute the cement mortar: one part of cement into two parts of sand.
- The axis, using a plumb line or level, is placed strictly vertically in the hole and strengthened; most often it is done with cobblestones.
- Fill the well with a solution.
- We are waiting for about three days. The cement sets. There is no need to rush into installation, since the strength of the entire mechanism under load will only be provided by a frozen filling.
- We assemble the axis from five parts.

The carousel axis consists of five parts: 1 - axis (tube 50 x 7); 2 - lower bearing; 3 - central bushing; 4 - upper bearing; 5 - locking sleeve; 6 - cotter pin
Here are the dimensions.

When assembling the axle, you must observe the dimensions
Consider a drawing of the bearing housing with applied dimensions.

We use bearing units in the design
The rotation unit consists of three parts.

The base of the carousel platform is assembled from the following parts: 1 - bearing housing (tube 90 x 7); 2 - rectangular pipe 80x40x4; 3 - handle (pipe 25 x 6)
All parts are welded according to the drawing. The durability and safety of the carousel will directly depend on the quality of the welds. Parts must be well welded, without protruding burrs that can injure children. When assembling and welding, rectangular pipes should protrude from the upper edge of the bearing housing by 10 millimeters. If you (quite possibly) do not have a welding machine and do not know how to weld metal, you can hire a welder. The work is quite small.
The turntable platform also consists of five parts.

The platform consists of parts: 1 - rotation unit; 2 - handle (pipe 25 x 6); 3 - floor covering sector (moisture resistant plywood 20 x 604 x 1083); 4 - strip 4 x 100; 5 - cover
The figure shows the dimensions of the turntable.

All dimensions must also be taken into account when assembling the turntable
We put on the axle and fasten the lower bearing and the central bushing. We attach the rotation unit to the lower bearing, the upper bearing to the axle. We try to center the rotation unit on the bearing. We fix the resulting locking sleeve with a hole, where we insert the cotter pin. Gently unbend his antennae.
Photo gallery: number of handrails
-

Carousel with two handrails - Making a carousel with two handrails is easy
-

Carousel with three handrails - A carousel with three handrails will generate more interest for children
-

Carousel with six handrails - Six handrails - very convenient for a large company
Finishing the finished carousel
- We drill holes. With self-tapping screws for metal (or in another way) we fix the floor covering with handrails already mounted on it on the rotation unit.
- Cover the end of the coating with a steel strip. We fix it with self-tapping screws with a press washer (or in another way).
- In the center of the coating there is a hole with a bearing unit in it. We close it with a circle of plywood and fix it.
-
We will prepare the handrails and the floor covering for painting: we will clean and treat the coating with a wood preservative, prime the handrails, the axle and the coating with a primer for wood and metal, respectively, in order to increase the adhesion of the finish paint. We will paint in cheerful colors that are so loved by both kids and their parents.

Complete carousel with handrails and seats The base of the structure is best concreted for stability.
The nuances of care
In order for the carousel to always rotate easily, its rotation mechanism (bearings) must be constantly lubricated, for this it is better to use viscous antifreezes and nigrols. Other parts need to be painted on time. It is advisable to pack it in foil for the winter. This will not protect against moisture in the air, but will protect against snow and rain.
Video: do-it-yourself rotating carousel with two handrails
Video: original carousel for children
With very little effort, you can please your children with a bright and comfortable carousel. And if you follow the simple rules of care, the attraction will give you a holiday for a long time.
Recommended:
How To Make A Bar Stool With Your Own Hands From Wood, Metal And Other Materials + Drawings, Photos And Videos
Bar stools manufacturing options. Required tools, materials used. Step-by-step description of the manufacturing process with a photo
How To Make A Kite With Your Own Hands At Home: Options With Drawings And Sizes + Photos And Videos
DIY kite: the necessary materials, diagrams, drawings, manufacturing steps. How to make a kite of different shapes. Secrets of a Successful Launch
How To Make A Potbelly Stove From A Gas Cylinder With Your Own Hands: Photos And Drawings, Videos And Secrets

Making furnaces of vertical and horizontal types from a gas cylinder with your own hands. Recommendations for the operation and repair of such stoves
How To Make A Shelf In A Bathhouse With Your Own Hands - A Step-by-step Guide On Making A Bench And Other Furniture With Photos, Videos And Drawings
How to make a shelf for a bath with your own hands: the choice of material and instructions with drawings. A step-by-step guide to assembling a bench and other furniture
How To Make A Birdhouse Out Of Wood With Your Own Hands: Options With Drawings And Diagrams + Photos And Videos
How to make a wooden birdhouse with your own hands. The right tree, the necessary materials and tools, drawings, step-by-step manufacturing instructions. Video
