Table of contents:
- Author Bailey Albertson albertson@usefultipsdiy.com.
- Public 2024-01-31 13:26.
- Last modified 2025-01-23 12:41.
Grouting the joints between tiles - the final touch

Hello dear readers
I devote today's post, in my opinion, to an absolutely wonderful activity - grouting tiles! And why are you laughing, this monotonous monotonous work has a relaxing, calming and, I would say, relaxing effect on a person. Anyway, on me.
I agree that this is individual for each person, for example, one friend of mine loves to peel small potatoes, it calms her down, but it annoys me terribly! But my husband always entrusted me with such jewelry repairs as grouting tiles.
Women, as a rule, are more pedantic, more corrosive or something, and are able to give out equally good results of the work done for a long time. And this is exactly what you need for a high-quality grout. Plus, women have an almost innate vision of beauty. This quality also plays into the hands in this matter. Why? You will understand this further.
Any work, and this one is no exception, should start with positive thoughts in your head and set your mind to a positive result only. But at the same time, do not forget that difficulties can arise at any time and you need to be ready to cope with them.
So, all work will consist of several stages:
1. Preparation of materials and tools for grouting.
2. Prepare tiles for grouting
>
3. Preparation of grout from dry mix
4. How to grout tiles
>
1. Materials and tools for grouting
1. A brush with soft bristles.
2. A screwdriver or any other object with a sharp and rigid tip so that it can be used to clean out any hardened adhesive or solution.
3. Soft sponge or cloth.
4. Rubber spatula.
5. Stirring whisk or attachment (for mixing large volumes).
6. Dry mix (grout).
7. Water 5-20 ˚С.
8. Capacity for kneading.

As for the question of which grout to choose, I, for example, use Ceresit grout in my work, because today it is considered one of the most environmentally friendly building mixtures.

Here are its characteristics:

It is also important to correctly calculate the amount of grout that will be required for work. To do this, use the formula, with its help you can quite accurately determine how many kilograms of grout you need to buy.
The formula for calculating the need for grouting:
(A + B) / (AxB) x C xD x1.6 = kg / m2
A - tile length, B - tile width, C - tile thickness, D - joint width, dimensions in mm.
2. Prepare tiles for grouting
Use a brush to clean the remaining debris and tile adhesive. Somewhere you have to resort to something hard and sharp to remove dried particles of glue or mortar. For example, for these purposes I used an ordinary flat screwdriver. Just be careful not to chip off the edges of the tiles.
Do not forget that the main remnants of the tile adhesive are removed from the joints after laying the tiles after 30 minutes, until it has hardened strongly. If this is not done in time, then it will be very difficult.
Wipe the seams with a damp cloth or sponge, especially the unglazed tile ends. This will ensure a more even distribution of the grout and better adhesion to the tiles.
Actually, this is where the preparation ends, and we smoothly move on.
3. Preparation of grout from dry mix
A very important stage in all work. How correctly you do this will determine the ease of applying grout to the tiles. Therefore, follow the manufacturer's instructions strictly.

Add the required amount of dry mixture to the required amount of water at a temperature of 5-20˚С, and stir properly. It is in the water that you add the dry mixture, and not vice versa.
When stirring, it is convenient for me to use a regular whisk for whisking, its shape is like that of a mixing attachment for a blender. Of course, this method is fine if you are mixing a small amount of the mixture for working alone.
If the batch is half a bucket, for several people, a room of twenty square meters will have to be rubbed. meters, you won't get off with a whisk. In this case, it is better to use a special nozzle, we used it to knead the mixture when carrying out work on leveling the floor with a self-leveling mixture.
After stirring well, breaking all the lumps, leave for 5 minutes. After this time, stir again and proceed. The consistency of the grout should be like that of thick sour cream, it should not flow out of the seams, but it should not roll and crumble from the density.
If this happens, do not waste your nerves and spoil your mood, it is better to immediately correct the mixture, add a little water or vice versa dry powder.
It is better to use a round or oval form for diluting grout, such as a plastic paint bucket. Everything in it mixes well and does not clog dry powder in the corners, as it could happen in a square container.
If this is your first time doing this, do not dilute the entire grout at once. Start with 0.5kg or less. At this level, you will have about 30 minutes to practice before the mixture starts to dry.
Right to left or left to right?
It doesn't matter which side you start on horizontally, right to left or left to right. But vertically, it's better to start from the top. It’s just more convenient, tested on our own experience, if something drips from the spatula onto the wall, it will not spoil the already finished seam.
In order not to get confused in the entire volume of empty seams that need to be wiped off: visually define blocks for yourself, for example 4 by 4 tiles, and work with them one after another.

4. How to grout tiles
We take a little grout on a rubber spatula and carefully begin to apply it to the seams between the tiles by pressing movements.

Periodically remove the excess mixture that has fallen on the tiles around the seam, while placing the spatula perpendicular to the seam. Thus, not only the excess is removed, but also the top layer of grout is leveled flush with the tile surface.
In principle, the story of how to grind the seams on the tiles need not continue. When the mixture dries (after 30 minutes), wipe the tile with a wet cloth to remove the dried grout from the tile itself and that's it.
But, in my opinion, everything will look much nicer if the seams between the tiles are made in the form of a groove. This will give the wall a bump and make each tile stand out. It is very easy to do this, after you have applied the grout flush with the tiles, take a rubber spatula and walk along the seam with a corner, cleaning out excess mixture.

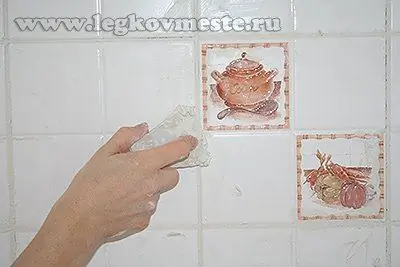
After this operation, the seams between the tiles look a little messy and even rough somewhere. To fix this, I took a regular foam rubber sponge, moistened it a little in water and, with a slightly pressing motion, passed it along the seam. This can be seen in the photo. After that, the seam becomes even and smooth.

When the seams are dry, you can take a not very wet sponge or cloth and wash the tile itself with gentle movements.
Having done this work in three bathrooms and two kitchens, I think I can share my experience with you.
By the way, the photographs in the article " Bathroom repair and how much it costs to do it yourself" are the results of my work on grouting the joints between the tiles.
Now on the market there are grouting from various manufacturers, and most importantly, different colors. Therefore, it will not be difficult to choose it to match the tile.
And you can also experiment and make a contrasting version where the tiles are white and the grout, for example, burgundy. Of course, this solution should be in harmony with the overall design of the room and furniture. This is to the question of the vision of beauty mentioned above.
In any case, I wish you success in your work and an excellent result, which you will be satisfied with!
I hope this article on how to grout tiles was helpful.
In conclusion, I suggest watching a small video clip "How to grout tiles with your own hands":
Best regards, Evgeniya Ponomareva.
Recommended:
How And How To Seal The Seams Between Drywall Sheets With Your Own Hands

How to properly putty the seams at the joints of drywall sheets. Materials and tools used. Step by step description of the process
How To Choose The Color Of Grouting Tiles + Video

The rules for choosing a grout for ceramic tiles according to color. Practical and aesthetic selection criteria
How To Soften Shoes (made Of Leather, Suede And Other Materials), Including Softening The Backing So That It Does Not Rub + Photos And Videos

What to do if your shoes rub your feet. Proven ways to soften shoes made from different materials. Using professional products and folk recipes
How To Stretch Shoes That Squeeze And Rub - Made Of Natural, Artificial Leather And Other Materials, Ways To Spread At Home

Are you still suffering from tight new shoes? Then we go to you! With our advice, you can stretch and distribute shoes that are tight and chafing
Why Do Flies Rub Their Paws And Rub Their Heads

Why do flies wash. Are erogenous zones located on the paws of insects? Interesting facts about flies
