Table of contents:
- Author Bailey Albertson [email protected].
- Public 2023-12-17 12:53.
- Last modified 2025-01-23 12:41.
Installing the Windows operating system on a Mac
Apple computers are very popular. Users who prefer to purchase them want to get a stable and productive device for their money. But what if you're used to working with Windows and not OS X? Let's take a look at several ways to install the Windows operating system on a Mac computer.
Content
- 1 Ways to Install Windows Operating System on Mac
-
2 Installing Windows on Mac using Boot Camp
- 2.1 Installation requirements
-
2.2 Installation process
2.2.1 Video: How to Install Windows on Mac Using Boot Camp
-
3 Installing Windows on Mac using a virtual machine
- 3.1 Installing with Parallels Desktop
-
3.2 Other programs for creating a virtual machine
- 3.2.1 VMware Fusion
- 3.2.2 Oracle VM VirtualBox
- 3.2.3 Video: Install Windows on Mac Using a Virtual Machine
- 4 Windows hybrid installation on Mac
- 5 Pros and Cons of Each Way to Install Windows on Mac
Ways to Install Windows Operating System on Mac
The ability to install Windows on a computer from Apple appeared a long time ago, and nowadays it can even be done by official methods. Depending on your goals, there are two installation methods to choose from:
- as a full-fledged operating system - if you want to use the maximum computer resources and be able to run games;
- as a virtual operating system - if you need to be able to run certain programs that only run on Windows.
Installing Windows on Mac Using Boot Camp
The installation method using the dedicated Boot Camp program is the official method offered by Apple.
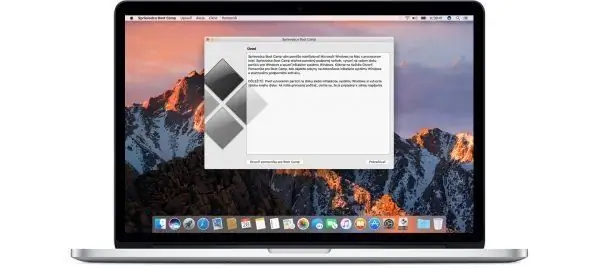
Boot Camp Utility is included by default
Installation requirements
To complete the installation via Boot Camp, you will need:
- Any Mac with an Intel processor
- licensed version of Windows written to an optical disc (or a virtual image of such a disc);
- computer controls;
- a large amount of free space on the device (preferably at least 60 gigabytes);
- an empty flash drive with a volume of eight to sixteen gigabytes.
Installation process
In the utilities section of your computer, find Boot Camp:
- Run the utility.
-
Select the actions to be performed. Check the boxes to burn the installation disc and install.

Boot Camp Assistant Check the boxes for each item
-
Specify the path to the image from which the installation will be performed and select the device for recording it. Make sure that the flash drive does not contain the data you need, as it will be formatted during installation. You can use a blank DVD-RW disc as a drive for the OS image.

Choosing a Boot Camp Image Specify the location of the Windows image
- Wait for the end of the recording process. At this point, you need a stable internet connection to download the necessary drivers and programs.
-
Divide the disc into pieces. For Windows, it is best to allocate the previously mentioned 60 gigabytes. This will allow you to install not only the system, but also a sufficient number of programs.

Creating a Boot Camp Partition Partition your disk
- The computer restarts and prompts you to specify the device from which to install. Select your USB stick.
-
Further installation of Windows on a Mac will not have much difference from installing it on another computer. When the partition selection appears, format the one that was created earlier, and only then continue the installation.

Installing Windows Format the partition created for Windows
-
When the installation of the system is completed, the installation of additional programs and drivers that were previously downloaded from the Internet will begin. The automatic installer will do everything by itself.

Boot Camp Installer Boot Camp will install programs required to use Windows
After completing all these steps, the installation can be considered successfully completed. To switch to the previous operating system, a special icon will appear in the tray (lower right corner of the screen). Now, depending on your needs, you can use both Windows and OS X.
Video: How to Install Windows on Mac Using Boot Camp
Installing Windows on Mac using a virtual machine
Running through a virtual machine will allow you to work with Windows 10 and its programs inside the main operating system. But remember that the load on the OS and computer battery will be high.
Installing with Parallels Desktop
Installing through the paid Parallels Desktop software is the easiest. It also provides a less demanding Windows experience after installation.
This is done as follows:
- After downloading and launching the program, select "Create a virtual machine".
-
In the window that opens, specify how you want to get the operating system. Now we are interested in installing from a flash drive, disk or image, depending on which option was prepared in advance.

Parallels Desktop Select "Install Windows or another OS from DVD or image"
- The program will try to detect the operating system at the specified location.
- Authenticate Windows by entering your Licensed Activation Code.
- Following the steps in the program, go through the usual stages of installing Windows. Wait for all processes to finish.
-
After completing these steps, you can use all Windows features in your OS X.

Windows 10 in a virtual machine You can use Windows features in your OS X by installing it using Parallels Desktop
Other programs for creating a virtual machine
Let's look at a few programs that can also be useful for users who want to install Windows using a virtual machine.
VMware Fusion
A good alternative to the previous program. It stands out for the following features:
- stable operation and support of almost all known operating systems;
- support of vSphere, ESXI, Fusion servers;
- a convenient environment for developers that allows them to test the created programs;
-
the ability to create "Safepoints" to which you can return if you wish.

VMware Fusion Vmware Fusion is a handy software for testing applications on various OS
The program is also paid, although it has a trial version.
Oracle VM VirtualBox
Free open source editing software. It is intended for advanced users. It is distinguished by:
- security. Because of the open source code, each user can be convinced of certain aspects of the program;
- support for multiple cores and processors;
- low consumption of computer resources;
-
work with audio, network and USB devices.

Oracle VM VirtualBox Oracle VM VirtualBox is typically used by advanced users
Video: Install Windows on Mac Using a Virtual Machine
Hybrid Windows installation on Mac
You can also use a system installed via Boot Camp in conjunction with a virtual machine. To do this, do the following:
- Install Windows via Boot Camp as described in the instructions above.
- Go to your OS X.
-
In Parallels Desktop (or another virtual machine program that has this capability), select Use Windows from Boot Camp.

Creating a virtual machine Select "Use Windows from Boot Camp"
The virtual machine will be created by the program, and you can use it without switching to Windows every time. This method allows you to combine the benefits of both installation methods.
Pros and cons of each method of installing Windows on Mac
Installing Windows through Boot Camp gives you the full Windows experience on your Mac:
- installing and running applications on Windows;
- performance of demanding applications, for example, video programs;
- support for games running on Windows.
As a negative point, you can point out the fact that using any features of OS X will require you to reboot, a quick transition between them is not possible.
The created Windows virtual machine running on OS X, in turn:
-
allows you to use Windows as a standalone application;

Windows as an application The created Windows virtual machine allows you to use the OS as an application
- make it easier to work on OS X by providing access to Windows functions;
- will make it possible to run such undemanding Windows OS programs as text editors or applications for working with files.
The negative features are obvious here:
- high consumption of computer resources;
- the inability to run demanding programs.
When using the hybrid method, you can switch between direct access to Windows and its virtual use, depending on your needs at the moment. This is by far the most convenient way. It has only one significant drawback - Windows activation can regularly crash. The user will be forced to reactivate the system.
Knowing all the ways to install Windows on Mac, you can easily choose the best one for your purposes. Using a virtual machine or loading through an official utility will allow you to take advantage of various operating systems on your computer and, of course, install Windows.
Recommended:
How To Install Windows 7, 10 On Mac: Methods With And Without BootCamp, From A Flash Drive And Others
How to install Windows operating system on Mac computers. Overview of the main methods. Installing Windows on a second system and through a virtual machine
Why The Computer Does Not See The USB Flash Drive And What To Do To Solve The Problem
Why the PC does not see the USB flash drive. Ten reasons and solutions to the problem with step-by-step instructions
Mastitis In A Cat (including Nulliparous, Lactating And Others): How To Treat At Home, What To Do With Mastopathy (treatment Methods)

Why does mastitis develop in cats? How pathology manifests itself. When a doctor is urgently needed. How to treat at home. Caring for a sick pet. Prevention
Cystitis In Cats And Cats: Symptoms (blood In Urine And Others) And Treatment At Home, Medications (pills And Others), Veterinarian Advice

What causes cystitis, its symptoms, course forms, diagnosis, treatment. Caring for a sick cat, prevention of cystitis
How To Get Rid Of Ants In An Apartment (domestic Redheads And Others): Recipes With Boric Acid And Others

What to do if ants appear in the apartment and why such a neighborhood is dangerous. Folk methods and chemicals to help get rid of insects quickly
