Table of contents:
- Author Bailey Albertson albertson@usefultipsdiy.com.
- Public 2023-12-17 12:53.
- Last modified 2025-01-23 12:41.
With iPhone in your pocket - transfer contacts quickly
The address book is the most important piece of personal data stored in your smartphone's memory. When changing a device, it becomes necessary to transfer contacts to a new device. This task is handled differently depending on the platform of your old phone. But in each case, there is a solution that will allow you to migrate without spending a lot of time and nerve cells.
Content
-
1 Migration to iPhone from other platforms
-
1.1 Transfer Address Book from Android Device
- 1.1.1 Connecting to iOS Google Account Using CardDAV
- 1.1.2 Video: How to Transfer Contacts from iPhone to Android
- 1.1.3 Transferring Address Book Using vCard
- 1.1.4 Video: Transfer vCard Contacts from One Phone to Another
- 1.1.5 Importing Address Book Using Move to iOS App
- 1.2 Import contacts from SIM card
-
1.3 Importing an address book using iCloud
1.3.1 Video: Transferring Address Book Using iCloud
-
1.4 Importing Address Book from Windows Phone
1.4.1 Video: Migrating from Windows Phone
- 1.5 Importing Address Book from Nokia Devices (OS Symbian)
-
-
2 Switching from an iOS device to a similar
- 2.1 Importing address book using iTools or iFunBox
-
2.2 Transferring Address Book Using iTunes
2.2.1 Video: How to Transfer Contacts from Old iPhone to New
- 3 What errors can occur during the transfer of contact information
Migrating to iPhone from other platforms
The first task that will have to be done after buying a new phone after the iPhone is to transfer the address book from the old device to the new one. Good for those owners of phones who have the entire address book fits on a SIM card. And if the number of records has exceeded one thousand? It is practically unrealistic to transfer such an abundance of information with your hands - if you copy records one by one and transfer “business cards” via Bluetooth, it will take a lot of time. Fortunately, there are programs and tools to make this boring job easier. Let's consider them in more detail.
Transferring Address Book from Android Device
Of course, the most correct option would not be to transfer your address book, but to connect the "apple" to your Google account, so that the information remains and is updated in the cloud. Unfortunately, this is not always the case. The old phone often remains in the family and the Google account is "inherited." In addition, some smartphone owners do not even have the synchronization of contacts with the cloud service configured - they use their powerful device just like the old “pipe” with a monochrome screen. Therefore, we will consider three options for data transfer.
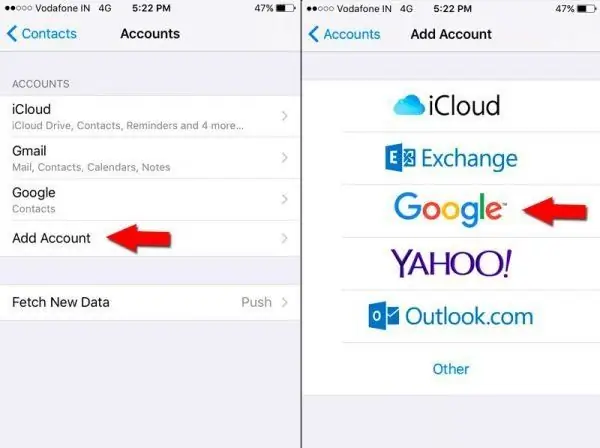
The easiest way to sync - connecting the iPhone to a Google account - does not always help, because some users only store contacts on their phone
Connect to iOS Google Account Using CardDAV
The good thing about this method is that it allows you to set up cloud sync even with old devices - everything will work fine, starting with the iPhone 3GS. In addition, it even allows you to set up a reverse sync to work with an iCloud account on Android. The disadvantage is that this entry will have to be unlinked from the old device, unless both devices remain with you and will not work with a common address book. Another problem is Google's ever-changing policies. Today they support the CardDAV protocol, but tomorrow they may unilaterally terminate. And the owner of the "apple" gadget will puzzle over where his contacts have suddenly gone. At the same time, if the user has several devices that need to work with a shared mailbox and address book, this method is the best one:
- Enter the Settings menu on your new device.
- Select Mail, Contacts, Calendars.
-
From the list of preinstalled services go to the Other section.

Switch to CardDAV service You can add a CardDAV account through the Other menu item Mail, Contacts, Calendars
- Open the CardDAV Account Settings dialog - Add CardDAV Account.
-
Please fill in all required fields carefully. In the User Name field, enter the full address in the format "YourLogin@gmail.com". The system will start checking and configuring the account. If there is no internet connection at this point, the process will end with an error.

Creating a CardDAV account Enter your username and password for authorization in CardDAV
- Click Next in the upper right corner, and on the next screen, from the list of positions that need to be synchronized, select Contacts.
After completing the setup, synchronization will start automatically, after a few minutes your address book will be updated. All changes to your Google account will sync every time you connect to the internet.
Video: How to Transfer Contacts from iPhone to Android
Transferring an address book using vCard
This method is one of the most universal, since the export of contacts to the vCard format is supported by any smartphones and the vast majority of mobile phones except, perhaps, the oldest ones. In some cases, you will have to display the records one at a time, which will take a lot of time, but you can transfer the information in any case. vCard is a plain text format in which the fields of one record are separated by commas. Therefore, by importing data from your old device, you can open the file with a regular text editor, and then check and change it if necessary.
The data transfer is divided into two parts: first, we output the records to the vCard, and then transfer them to the iPhone, which imports the data.
On an Android smartphone:
- Open the "Contacts" application or the "Phone" application and the "Contacts" tab in it.
-
We call the context menu.

Export contacts to vCard file On an Android smartphone, you need to write contacts to a vCard file through the "Export Contacts" menu
- We select the item "Export contacts".
If possible, write the file to MicroSD - this will allow you to access data from a stationary computer.
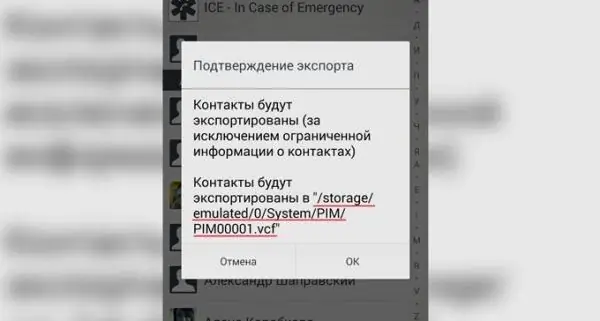
It is better to write a file with contacts to a memory card in order to be able to access it later from any device, including a PC
If you have a file manager that supports mailing installed, send the generated vCard to your mailing address. Alternatively, you can create a letter addressed to yourself in the Gmail application and attach the generated file. If the data has already been copied to the computer, we perform all manipulations with the letter already there. Before submitting, review the list of contacts and make sure that all fields in the records are filled in correctly.
Actions on iPhone:
- Open the Mail client and click the "Receive mail" button in it.
- In the received letter, click on the attachment, the dialog for importing contacts into the address book will open.
-
We agree to add contacts and select the add mode: duplication or merging.

Adding Contacts to iPhone If you sent a file with contacts to the mail, then you can download it to the iPhone via the Mail client
Depending on your choice, duplicate records will be imported as different or will be merged.
Video: Transfer contacts in vCard format from one phone to another
Importing an address book using the Move to iOS app
This method is very convenient for an unprepared user: everything is done very simply and using one program. The possibility of damage or destruction of personal data during the transfer is completely excluded. Before transferring, iPhone needs to be reset to factory settings.
- Install the Move to iOS app on your old Android device.
-
When setting up your new iPhone (or after resetting it to factory defaults), on the Apps & Data screen, select the "Transfer Data from Android" option.

IPhone Transfer Menu The transfer of user data from an Android device is performed through the corresponding menu item "Programs and data"
-
On iPhone, click Continue and wait for the ten-digit code to appear on the screen - the key to sync the two devices.

Synchronization key Get a code to sync contacts
-
On an Android device, launch the previously installed Move to iOS application and enter the received ten-digit code on the main screen.

Entering the sync code on an Android smartphone Enter the sync code to set up Move to iOS synchronization on your Android device
- On the next screen, select Contacts and click Next. In addition to contacts, using this application, you can transfer any user data from an old smartphone.
Importing contacts from a SIM card
In the list of simplicity and reliability, this method is in the first place. Any phone can export a phone book to a SIM card. And those old devices that cannot, simply store it on the SIM card. Therefore, there should be no problems and roughness during the transfer. The method also has disadvantages, but more about them below.
- Save your contacts to the SIM card of your old phone and then install it in the iPhone.
-
From the iPhone Settings menu, go to Mail, Addresses, Calendars.

Settings menu on iPhone Go to the item "Mail, addresses, calendars"
-
Select "Import SIM contacts" and wait for the import to finish.

Importing contacts After clicking on the corresponding menu line, the process of importing contacts from the SIM card will begin
Importing an address book using iCloud
The method is a kind of transferring contact information using vCard. In this case, the address book is written directly to the iCloud account. Once the Apple ID is entered on your iPhone, all information will be pulled from the cloud.
- Before importing contacts, register your iPhone, create an Apple ID and connect it to your machine.
- Save contacts from your old device in vCard format to your computer hard drive. To do this, use the software that came with your phone (Nokia PC Suite, LG PC Suite, Samsung Kies, etc.).
-
Launch any internet browser on your computer, go to iCloud.com and sign in to your iCloud account using your Apple ID.

Sign in to your iCloud account Enter your credentials and sign in to your iCloud account
-
Enter the "Contacts" application, in the lower left corner, click on the settings icon.

Login to the "Contacts" application Sign in to the Contacts app with your iCloud account
-
In the drop-down menu select "Import vCard" and select the file you exported earlier.

Importing a contacts file Click on the line "Import vCard" in the drop-down menu
As soon as you connect your account (Apple ID) on the iPhone, the contact data is instantly synchronized with the device. Don't forget that the operation requires an internet connection.
Video: Transfer Your Address Book Using iCloud
Importing Address Book from Windows Phone
For Windows Phone users, we'll look at transferring contact information from a Microsoft Live account, the full-featured Apple ID counterpart. With an aggressive battle going on between Apple and Microsoft over the mobile market, both companies have made it as difficult as possible to migrate to a competitor's device. Therefore, the transfer algorithm will be long and convoluted.
-
In the iPhone, go to "Settings", sequentially go to "Mail, addresses, calendars" and "Add account". Select Outlook.com from the list of services and enter our Microsoft Live data in the authorization parameters.

Connect a Microsoft Live account To connect an Outlook (Microsoft Live) account, select Outlook.com in the menu for working with accounts
- After a successful login, enable the synchronization of contacts with the record.
- Go to the "Contacts" application and make sure that the contacts are synced with the iPhone.
-
Now we need to back up our contacts. For this, the AppStore has many applications, including free ones. In our example, we will use the Simpler program. Install it, run it and go to the "Backups" tab.

Simpler app To work with a backup copy of contacts, you can use the free Simpler program
-
We press the icon "backup now". If you want, you can do an additional cloud backup.

Back up your contacts To back up your contacts, tap the corresponding icon on the iPhone screen
- To avoid duplicate contacts and complete the process correctly, you need to unlink your Microsoft Live (MS Outlook) account from your iPhone. To do this, go to "Settings" again, from there - to "Mail, addresses, calendars", go to your MS Outlook account and press the red "Delete account" button. This deletes all synced data from the iPhone and clears contacts.
-
We re-launch the Simpler program, enter the "backups" tab and restore from the backup that we created in step 5.

Restore contacts from backup After restoring data from backup, all your contacts will appear on iPhone
- We connect an Apple ID account and save our contacts already in it.
Thus, we have two independent address books, and changes in one will not affect the other. You can give your old Windows Phone with a clear conscience to your children or your wife.
Video: Migrating from Windows Phone
Importing Address Book from Nokia Devices (OS Symbian)
Again, we will export the address book to vCard format. However, there is one unpleasant moment: Symbian OS has a non-standard format for creating address cards - if you try to import them directly, most of the fields in the contact record will be empty, and those that are filled with hieroglyphs instead of Cyrillic. First, we use Nokia PC Suite to create a backup copy of the smartphone user data, and then, using a parser program, we extract the address book entries from it and write it to the vCard file. Therefore, with Nokia, the algorithm of actions will be longer and a little more complicated.
-
Install the Nokia PC Suite program on your computer, connect your Nokia smartphone, and backup your contacts in *. NBU format.

Nokia PC Suite software Nokia PC Suite needs to save contacts to NBU file
- Download and install the NBUparser program. Open the NBU file, select "Write *.vcf (UTF-8)", specify the folder in which it will generate vCard (*.vcf) contact cards.
-
In the folder where the vcf files are located, you need to run the Windows command line and in the window that opens, run the command copy / B *. * All_in_one.vcf, which will simply combine all the vcf files.

Merge contacts into one file To combine contacts into one file, you need to start the Windows command line and execute the corresponding command in it
- We send the resulting list all_in_one.vcf to our mailbox, open the letter using the iPhone and allow import from it.
Switching from an iOS device to a similar one
There is a category of users that fundamentally does not work with Apple cloud services. Someone - in order to avoid the leakage of their personal data, someone does not like simple solutions designed for schoolchildren and housewives. For those who are not looking for easy ways in life, we will consider ways to import contact information using direct editing of the file system of the "apple" gadget.
Importing an address book using iTools or iFunBox
ITools and iFunBox programs allow direct access to the iPhone file system, including those folders where the address book information is stored. The utilities are designed for a trained user, there is no "foolproof" in them, mistakenly replacing a couple of files in some system folder, you disable your smartphone. For these programs to function, your iPhone must go through the JailBreak procedure.
- Launch the iTools program.
- We connect the iPhone to the computer, close iTunes if it starts automatically.
-
We go to the folder at var / mobile / Library / AdressBook.

Folder with iPhone address book files IPhone address book files are located in var / mobile / Library / AdressBook folder
- We copy all records to a previously created folder on the computer. This is a backup of your contacts. One file - one record.
- We disconnect the device from the computer and instead connect the iPhone to which the contacts need to be transferred.
- Copy the contact records to var / mobile / Library / AdressBook.
The procedure for copying an address book using the iFunBox file manager looks similar:
- Download the iFunBox file manager and launch it.
- Connect your old iPhone to your computer and wait for iFunBox to detect it. If iTunes is not installed on the computer, the program will not work.
-
In the Browse Folders window, go to RawFileSystem → var → mobile → Library → AdressBook.

Go to contacts folder via iFunBox app The iFunBox application is a convenient file manager with which you can quickly go to the folder with contacts
- Copy all the files in this folder to your computer - this will be a backup copy of your contacts.
- By placing these files on your new device's file system, you will complete the transfer of contacts.
If you transfer rather than copy contacts, your old device's address book will be cleared. In addition, direct access to the device's file system is dangerous: deleting one or several system files can turn the gadget into a "brick".
Transferring Address Book Using iTunes
Few iPhone or iPad owners are unfamiliar with iTunes - the main software suite for Apple's mobile devices. In addition to transferring contact information, you can organize your music library, catalog photos, videos, and even audiobooks. If your iPhone freezes or stops turning on, using iTunes you can always restore from a previously created backup of the device, update the system version or do a factory reset.
This method will allow you to copy contact information into the address book of Windows Contacts or MS Outlook, use the convenient editor of these programs to make the necessary changes to the list, and then upload it to the iPhone:
- Start iTunes on your computer.
- Connect iPhone to your computer with a cable.
- Select your machine in the list of connected devices and go to the "Details" tab.
-
Turn on the item "Synchronize contacts with" and in the drop-down menu select the option convenient for you - Outlook or Windows Contacts.

Sync contacts via iTunes ITunes allows you to choose which format to translate data from the address book
- As soon as you connect your new iPhone to iTunes, during the sync process, contacts will be copied to it from Outlook or Windows Contacts.
Video: How to Transfer Contacts from Old iPhone to New
What errors can occur during the transfer of contact information
Are contacts missing from your old device? Not everything transferred to the new? In the text instead of the Cyrillic alphabet "krakozyabry"? Are there names in the records but no phone numbers?
Most of these errors occur in cases of intermediate copying of data to vCard. 5 years ago there was no single standard for the format, so every smartphone manufacturer, while developing software for its devices, “didn’t look further than its garden”. Hence the disappearing fields in the records, problems with the encoding, and even with the import in general.
To avoid mistakes, and even loss of important data, you must follow a number of simple rules:
- Before any operation performed by the device file system managers, back up the address book.
- Provide devices with Internet access.
- When importing the address book into vCard, review the generated data on your computer and make sure that all fields are filled in correctly.
- When using an Apple ID entry, first connect the new device to it, and then untie the old phone.
Despite the large number of programs and Internet services, there are only two strategies for transferring the address book: connecting to an "apple" device cloud recording Android or Microsoft or exporting contact information from an old device to vCard format and transferring them to a new smartphone via email or simple copying … Transferring addresses and phone numbers from "apple to apple" is so simple that alternative methods can be considered rather exotic. By choosing the right tool, you can migrate from any smartphone to an iOS device without losing nerve cells and time consuming.
Recommended:
How To Copy, Transfer Or Transfer Contacts To An IPhone From A SIM Card, Another Iphone Or Smartphone (including Nokia)
How to import contacts to iPhone, iPad from another Apple device, Android, Windows, Mac OS, Windows Phone, Nokia, SIM card. Troubleshooting
How To Find A Phone If It Is Turned Off - At Home And In Other Places, Search For A Device On Android And Other Os Through A Computer, By A Sim Card, Imei
Various ways to find the switched off phone. When the device cannot be found and how not to lose it
The Cat Stopped Eating Dry Food: Why Not Eating, What To Do, How To Train And Transfer To Another, Veterinarian Advice

Why does the cat not eat dry food? What to do to improve your pet's appetite. When is it necessary to visit a veterinarian
How To Recover Deleted Contacts On Your Phone (Android, IPhone)
How to recover contacts deleted from the address book. Step-by-step instructions with screenshots
Soviet Cars Produced In A Single Copy: A Selection With Photos

Cars that were produced in the USSR in a single copy. Features of Soviet cars, characteristics and interesting facts about them
