
Table of contents:
- Author Bailey Albertson [email protected].
- Public 2023-12-17 12:53.
- Last modified 2025-06-01 07:32.
Mansard roof secrets

In modern private construction, attics are becoming increasingly popular, which allow you to expand the usable area of the house. They are full-fledged living quarters arranged directly under the roof. The correct arrangement of the attic roof allows you to make the part of the living space limited to it convenient and comfortable.
Content
-
1 History, characteristic features of the attic and its roof
-
1.1 Advantages and disadvantages of the attic
1.1.1 Video: how to equip a room under the roof of a house
-
-
2 Types of roof roofs and their features
-
2.1 Gable roof
- 2.1.1 Gable roof structure
- 2.1.2 Calculating the height of the gable roof ridge
- 2.1.3 Table: values of tangent and sine of the angles of inclination of a gable roof
- 2.1.4 Stages of construction of a gable roof
- 2.1.5 Video: installation of a gable roof roof system in aerated concrete house
-
2.2 Sloping roof
- 2.2.1 Characteristic features of the construction of a sloping roof
- 2.2.2 Calculating a sloped roof
- 2.2.3 Materials for arranging a sloping roof
- 2.2.4 Installing the roof frame
- 2.2.5 Video: installation of the rafter system of a sloping roof
-
2.3 Semi-mansard roof
- 2.3.1 Advantages and disadvantages of a semi-attic roof
- 2.3.2 Design of a semi-attic roof
- 2.3.3 Installation of rafters on a semi-skylight roof
-
2.4 Hip roof with attic
2.4.1 Table: advantages and disadvantages of a hip roof
-
2.5 Multi-gable roof
2.5.1 Table: advantages and disadvantages of a multi-gable roof
-
2.6 Tambourine roof
2.6.1 Table: advantages and disadvantages of a tambourine roof
-
History, characteristic features of the attic and its roof
For the first time, the attic in a residential building was proposed to be made in the 17th century by the French architect Francois Mansart. From his surname the name of this room was formed. A distinctive feature of the attic is that its facade is part of the roof. When building an attic, it is necessary that the line of intersection of the plane of the facade and the roof passes at a level higher than 1.5 m above the floor. The roof space can be given any configuration, depending on the technical conditions and the wishes of the customer. It can occupy the entire building or part of it.
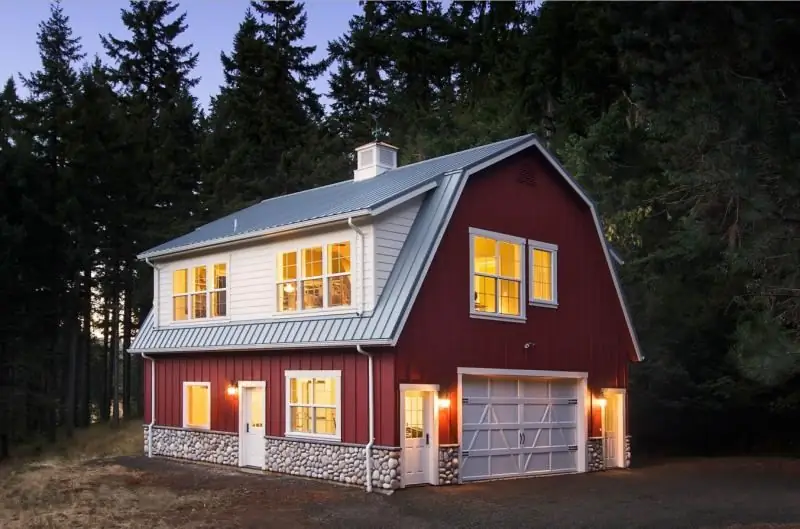
From the point of view of construction, a mansard (sloping) roof differs from others in that its upper part is flat, and the lower one is steep.
Advantages and disadvantages of the attic
Compared to a conventional attic space, the attic arrangement allows significant advantages:
- when equipping an attic in an existing building, its infrastructure is used;
- living space increases;
- costs are reduced in comparison with the construction of a full-fledged floor;
- the appearance of the house improves;
-
heat loss decreases.

House with mansard roof The installation of a mansard roof significantly improves the appearance of the building, increases its living space and makes it warmer
The attic is, of course, not a full-fledged residential floor, so it has the following disadvantages:
- roof slopes reduce the height of the walls;
- low walls reduce the used area;
- a complex system of heat, hydro and vapor insulation increases construction costs;
- roof windows are quite expensive;
- snow can accumulate on skylights, which reduces the amount of sunlight entering the room.
Video: how to equip a room under the roof of a house
Types of mansard roofs and their features
Depending on the architectural features of the house in general and the attic in particular, there are several types of attic roofs: gable, broken, semi-attic and others. When designing a roof, it should be taken into account that the support points of the rafter system must coincide with the corresponding points and lines of the load-bearing structures of the floor below. The width of the house, the presence of an additional load-bearing wall in the center, as well as wind loads, abundance and types of precipitation in the construction region are taken into account. In general, a gable roof can be installed in structures of any size, while other types of roofs require specific sizes of supporting structures.
Gable roof
The advantage of a gable roof is good protection from rain, wind and snow. This is achieved due to the acute angle of inclination, due to which precipitation does not linger on the surface. In addition, a gable roof is relatively easy to set up and builds fairly quickly and inexpensively.
The disadvantage of a gable roof attic is not the most rational use of the internal under-roof space.
In section, the gable roof is a triangle, the angles of which can have different sizes. Most often, the angle ramps make the connection of 45 on, although there are gabled roofs with a slope of up to 60 on.

Due to the significant angle of inclination, snow and rainwater are not retained on the gable roof attic
This roof shape is used in small buildings (for example, in country houses). An acute angle makes the roof less stable, therefore, it is impossible to build large objects with such roofs.
Gable roof structure
A gable roof consists of the following elements:
- pediment - the end of the roof slopes;
- Mauerlat - a support bar that transfers the load from the rafters to the walls of the building;
- rafters - boards that form the main contour of the roof;
- rafter leg - a beam designed for fastening the lathing;
- ridge - the upper rib, which is formed at the junction of the roof slopes;
- racks - vertical supports supporting the rafter system;
- Lezhen - a bar on which the racks are mounted. Located horizontally;
- girders - horizontal elements necessary to ensure the reliability of the rafter system;
- puffs (crossbars) - beams holding the rafter legs. Roof slopes are pulled together and mounted horizontally;
- struts - supports mounted on a tightening or lying. Connect the attic rafter system to the farm;
-
crate - flooring made of boards or plywood. It is fastened to the rafters from above and is intended for laying the roof covering.

Gable roof elements The supporting frame of the gable roof attic consists of triangular trusses, reinforced with stiffening ribs and connected with a ridge girder and lathing
Calculation of the height of the ridge of a gable roof
Having chosen the angle of inclination of the roof, we can determine the height of its ridge. This is done according to the formula: A = B ∙ tg C, where A is the height of the ridge, B is half the width of the roof, C is the slope angle. For the convenience of calculations, there are special tables of values of trigonometric functions of the most common slope angles of gable roofs.
Table: values of tangent and sine of the angles of inclination of a gable roof
|
Tilt angle C in degrees |
tg C | sin C |
| five | 0.09 | 0.09 |
| ten | 0.18 | 0.17 |
| fifteen | 0.27 | 0.26 |
| 20 | 0.36 | 0.34 |
| 25 | 0.47 | 0.42 |
| thirty | 0.58 | 0.5 |
| 35 | 0.7 | 0.57 |
| 40 | 0.84 | 0.64 |
| 45 | one | 0.71 |
| 50 | 1.19 | 0.77 |
| 55 | 1.43 | 0.82 |
| 60 | 1.73 | 0.87 |
Let us explain the described calculation procedure using an example. Let the width of the roof be 9.5 m, and the angle of inclination is 50 o:
- We calculate half the width of the building: B = 9.5 / 2 = 4.75 m.
- From the table we select the value of the slope tangent: tg 50 o = 1.19.
- We calculate the height of the ridge: F = 4.75 ∙ 1.19 = 5.65 m.
Stages of construction of a gable roof
- Calculation of weight and load on external and load-bearing walls. This is a very important stage, since if the requirements for the dimensions and cross-section of the roof elements are not met, due to the loads acting on it, the entire structure can collapse. This work is rather complicated and requires professional skills. Therefore, it is better to entrust it to a civil engineer.
-
Mauerlat installation. There are several ways to fix the Mauerlat to the wall:
- embed wire rod into brickwork. When installing the Mauerlat, pass the wire through the holes in the bar and tighten it;
-
wall studs made of metal with a diameter of 12 mm or more into the masonry. The distance between them should not exceed 120 mm. The length of the thread is calculated so that it protrudes 20-30 mm above the waterproofing and the bar. Nuts with wide washers are screwed on top. This method is suitable for concrete walls or building blocks;

Mounting the Mauerlat on threaded rods On a wall made of concrete blocks, the Mauerlat is easiest to fix using studs with nuts
-
in the masonry of bricks or blocks, pre-lay wooden inserts to which to attach the Mauerlat with brackets.

Fastening the Mauerlat with staples To fasten the Mauerlat to the wall of building blocks, wooden inserts can be laid into the masonry, into which metal brackets can then be driven
-
The construction of the rafter system. Its feature is the continuity of the rafters. Above them, a ridge serves as a support, and a Mauerlat from below. The rafter system of a gable roof can be suspended or layered:
- the hanging system is used for small buildings. It is quite simple: the rafter legs are connected in pairs by puffs. The support is made on the side walls;
-
The layered system is used if the width of the structure exceeds 6 m. Here, girders and racks (fights) are additionally installed. The run serves as an auxiliary support for the rafters. When installing the purlin, racks are placed, resting on the bench. Beds and racks act as a frame.

Types of roof truss systems Depending on the width of the span, hanging or layered structures are used for the construction of the roof truss system
-
Pediment making. The pediment continues the wall and is located between the roof slopes. With a gable roof, it is triangular, and its frame is the extreme trusses of the rafter system. The gables must be installed strictly vertically and of equal height. A ridge girder is attached to the upper part of the gables, which connects all the rafter structures. Windows are often equipped in the gables, especially if an exploited attic is being built. In the future, the pediment is insulated.

Mansard roof stone pediment The pediment is a continuation of the wall, and its shape is formed by the extreme rafter trusses
-
Installation of heat, hydro and vapor insulation of the attic roof. One of the main requirements for thermal insulation material is fire resistance. Therefore, mineral wool is most often used. Do not use styrofoam or other flammable polymer materials. When exposed to high temperatures, they release toxic fumes. The thickness of the insulation layer is recommended to be 150-200 mm. Thermal insulation is mounted on an additional frame attached to the rafters. When laying the insulation in several layers, they are mounted in a checkerboard pattern with overlapping of the joints of the plates. Waterproofing and vapor barrier to facilitate the structure is carried out with insulating films designed for these types of work.

Skylight Roofing Pie When installing a warm attic roof, it is necessary to lay layers of thermal, hydro and steam protection in the required sequence
-
Roof installation. The attic structure is quite heavy. To reduce the load on the walls and foundation, a lightweight roofing material is selected. In addition, it is important that the roof has good thermal insulation and low sound transmission. These characteristics are fully consistent with the soft roof. You can also use ondulin (euro slate).

Installation diagram of a gable roof attic with a soft roof A soft roof in combination with other elements of the roofing pie of the attic roof allows you to make the under-roof space warm and quiet
- Installation of window openings. There are two ways to arrange windows: vertical and inclined. The tilted version is better: it is easier to mount and allows more light to pass through. The area of the windows should be approximately 12.5% of the area of the walls.
Video: installation of a gable roof truss system in aerated concrete house
Sloping roof
The sloping roof is a gable structure with breaks on the slopes. This method of roofing has a number of advantages:
- the useful space of the attic increases;
- the appearance is improved;
- it becomes possible to build a two-level attic;
- heat loss is reduced.
The main disadvantage of a sloping roof is a decrease in the height of the walls due to the sloped ceilings.

The sloping roof gives the house an attractive appearance and allows you to increase the usable space of the attic
Characteristic features of the construction of a sloping roof
A sloping roof has two types of rafters: upper and lower. The installation angle of the lower rafters - 60 on or more top - 25-30 about. With the right choice of slope angles, you can make the ceiling of the required height. If the lower rafters taken an angle greater than 60 on, the snow load on the roof in the calculation is not considered, since it is negligible. It is recommended to make the width of the sloping roof 5-6 m. In this case, unnecessary complication of the structure can be avoided. The sloping roof element system is practically similar to the corresponding gable roof system. Only the arrangement of elements, their number and articulation changes.

A characteristic feature of a sloping roof is two types of rafters with different slopes
Sloped roof calculation
The calculation of a sloping roof is carried out in two stages: first, the area of / u200b / u200bthe roof covering is considered, and then the bearing capacity of the rafter system.
-
Calculation of the roof area. It is done quite simply:
- we multiply the length and width of each slope, we get its area;
- add up the values obtained and thus calculate the total roof area;
- we divide this value by the area of one roofing element. As a result, we determine the required number of such elements;
- we add a margin for cutting and random errors (5-10%), overhangs and overlaps when laying the roof and we get the final required amount of roofing material.
- Checking the bearing capacity of the rafters. This stage is quite complicated and requires some knowledge and experience, but the task is greatly simplified when using online calculators that provide complete calculations of the angle of inclination, rafter system and lathing of a sloping roof.
Materials for arranging a sloping roof
For the construction of a sloping roof, lumber, fasteners, materials for heat, hydro and vapor insulation, roofing are used.
- Wooden roof elements are made of beams and edged boards. The beam is necessary for the construction of the Mauerlat and rafter legs. The battens and counter battens are made of battens with a thickness of 32 to 50 mm. You will also need thick plywood to connect the rafters. All specific dimensions can be obtained using an online calculator.
- Fasteners include: steel brackets, self-tapping screws, stainless brackets, studs with a diameter of 8-12 mm. For the installation of roofing (metal, ondulin), as well as for attaching the battens to the rafters, nails and roofing screws will be required.
- Insulation. It is recommended to use mineral wool.
- For waterproofing and vapor barrier, it is better to use film materials and roofing material.
- Roofing - according to operational characteristics, it is better to use a soft roof or ondulin.
Roof frame installation
Step by step, the process of installing a sloping roof frame is as follows:
- Mauerlat laying. Roofing material is laid on load-bearing walls as waterproofing. Next, the Mauerlat is installed. It is made of timber, laid on top of roofing material and fixed with anchor bolts, brackets or studs, depending on the material of the walls of the house. Installation of a sloped roof Mauerlat is carried out in the same way as on a gable roof.
- Installation of floor beams. Their cross section depends on the existing loads, but usually they are either 150x50 mm boards or 100x200 mm beams. With a wide span or a significant distance between the rafters, they double.
-
Installation of the attic frame. Racks are installed strictly vertically on the floor beams. The distance between adjacent posts is no more than 2 m. First of all, the extreme posts are mounted, strings are stretched between them, and then the rest are aligned along it. Further, they are reinforced with spacers. The height of the racks is made 100 mm more than the height of the ceilings. Adjacent racks are connected with horizontal girders.

Installation of the frame of the attic room The frame of the attic room consists of vertical trusses connected by guy wires and horizontal girders connecting all future trusses
- Installation of puffs. Crossbars (tightening) are attached to the purlins with supports in the center to prevent sagging. For the same purpose, after installing all the puffs, they are fastened with a board with an offset from the center by 200 mm.
-
Installation of rafter legs. The bottom rafters are installed first. On the Mauerlat, markings and cuts are made in the places calculated for their installation. The recommended step is 1-1.2 m. Twine is pulled between the outer rafters. This increases the accuracy of setting intermediate lags. Next, the upper rafters are fixed. With a roof length of more than 7 m, they are placed on a ridge beam, otherwise struts (stretch marks) are installed under them.

Installing rafters on a sloping roof The upper and lower rafters are mounted after the final fixation of the puffs and purlins
After the installation of the roof frame, they move on to its hydro, steam and thermal insulation.
Video: installation of the rafter system of a sloping roof
Semi-mansard roof
A semi-attic is originally a residential floor, combined with a roof. The end walls are load-bearing and have a height of 1.5 m and more. The side walls are a continuation of the main walls of the first floor and pass into the roof slope. An important feature of a semi-attic roof is the construction of its rafter system.

A half-mansard is an effective compromise between a full-fledged floor and a mansard (sloping) roof
Advantages and disadvantages of a semi-attic roof
The way of arranging a room with a semi-attic roof determines several important advantages of such a solution:
- the construction of a semi-attic roof is cheaper than the construction of a full-fledged second floor;
- the semi-attic roof makes it possible to make vertical glazing, which also saves money;
- there is an opportunity for a more rational use of space.
This type of roof has its drawbacks:
- the semi-attic roof has significant heat loss, but this problem is solved by insulating it;
- the equipment of a dwelling with a semi-attic roof will cost more than an attic floor.
Semi-attic roof design
The roof of the half-attic is not made high, as this will disturb the proportions of the house, but it is important that it withstands the snow load. The number of roof slopes is one, but more often two. To reduce the load on the walls, the rafter system is made without thrusting and layered. Rafter legs have some degrees of freedom. This means that one support of the rafter is fixed, but can rotate freely, and the second is mobile and also rotates freely. Such a device allows the rafters to work in bending and not transfer the spacer load to the walls. The spacer-free system is usually used in the construction of buildings from block materials (stone, brick, etc.).

The spreader-free rafter system works for bending and does not transfer the horizontal load to the Mauerlat and walls
Installation of rafters on a semi-attic roof
Consider the installation option, which is most often used when arranging a gable semi-attic roof.
The bottoms of the rafter legs are attached to the Mauerlat with a movable connection (slide). The tops are connected with bolts or nails, and are sometimes tied with wood strips or metal plates. The support of the rafter legs occurs in the run or between themselves. To attach the rafter legs to the Mauerlat, nails are used, which are driven into their lateral surface at an angle. To protect the roof from strong winds, the rafters are additionally fastened with wire twists.

In the upper part, the expansion-free rafters are connected with bolts, wooden lining or metal plates and rest on the ridge girder
Gable, sloping and semi-attic roofs are most often used in the construction of an attic. Other types are used less often, so we will only cover them briefly.
Hip roof with attic
The hip roof is hipped. It is suitable for large houses.

A hip roof looks beautiful when arranging an attic in large houses
A hip roof has certain advantages and disadvantages from the point of view of the attic room arrangement.
Table: advantages and disadvantages of a hip roof
| Benefits | disadvantages |
|
|
Multi-gable roof
The name of the multi-gable roof comes from the corresponding architectural element. A gable is the top of a wall that sits between two adjacent ramps. The difference between the gable and the pediment is that it is not separated from the roof by the cornice. A multi-gable roof is well suited for large buildings that have multiple parts.

The multi-gable roof is very suitable for large buildings that are structurally divided into several parts
Table: advantages and disadvantages of a multi-gable roof
| Advantages | disadvantages |
|
|
Tambourine roof
A roof of diamonds is called a roof with diamond-shaped slopes that do not have kinks. The tambourine roof is mainly used in one-story houses with a square base.

The device of the tambourine roof allows you to get a spacious and well-lit attic room
A tambourine roof belongs to exotic types of roofing, but it looks very impressive, especially in combination with a good home decoration and beautiful roofing material.
Table: advantages and disadvantages of a tambourine roof
| Benefits | disadvantages |
|
|
The variety of mansard roof projects makes it possible to equip houses with a reliable roof of almost any architectural form. Modern mansard roofs are durable, reliable, have a long service life and provide comfort for living and working.
Recommended:
Inverted Roof, Its Structure And Main Elements, As Well As Features Of Installation And Operation
What is an inversion roof. Inverted roof types. What materials can be used. DIY installation of an inverted roof. Operating rules
Copper Roof, Its Structure And Main Elements, As Well As Features Of Installation And Operation
Copper roof, its types and advantages. Installation of roll and tiled copper roofs and features of their installation. Copper roof maintenance and repair
Roofing Elements Made Of Metal Tiles, Including Their Description And Characteristics, As Well As The Ridge For The Roof, Its Structure And Installation
The main elements used in the construction of metal roofing. Their description, characteristics and purpose. Features of mounting the ridge strip
Broken Mansard Roof, Its Structure And Main Elements, As Well As Features Of Installation And Operation
Brief description of the mansard sloping roof. The device of the rafter system. Calculation of the cross-section of the rafters. The procedure for installing a sloping roof and the rules for its operation
Mansard Roof, Its Structure And Main Elements, As Well As Features Of Installation And Operation
What is a mansard roof. Design, types and features of DIY installation. Calculation of materials, operation and repair of mansard roofs
