Table of contents:
- Author Bailey Albertson albertson@usefultipsdiy.com.
- Public 2023-12-17 12:53.
- Last modified 2025-06-01 07:32.
Broken mansard roof: design features and installation procedure

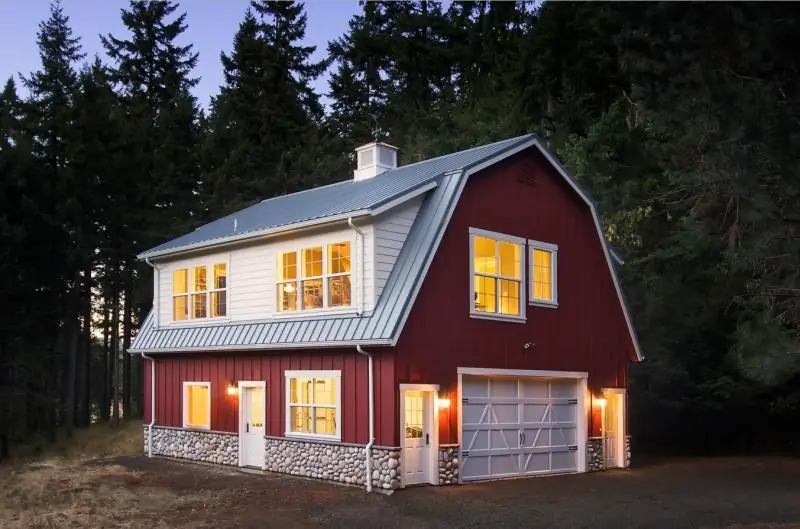
A beautiful gable roof transforms the building from a banal box into a complete architectural composition. But you can go even more complex way and instead of a roof with straight slopes, build a broken line. It looks even more impressive and allows you to make the attic so spacious that it is quite possible to equip a living space in it - an attic. Our conversation will be about what such a roof is and how it is built.
Content
-
1 Sloping mansard roof: description
1.1 Sloped roof rafter system
-
2 Designing a sloping roof
-
2.1 Calculation of the rafter section
- 2.1.1 Table: Correction Factor for Calculating Wind Load (taking into account building height and terrain type)
- 2.1.2 Table: Correction Factor for Calculating Wind Load (Taking into account roof configuration and wind direction)
- 2.1.3 Table: dependence of the length of the rafter leg on its section and the step between the rafter trusses
- 2.2 Other elements of the rafter system
- 2.3 Video: calculation of the attic roof system
-
-
3 DIY construction of a sloping roof
3.1 Video: how to make a mansard roof
-
4 Ways to increase the size of the attic
- 4.1 Installation of floor beams with extension beyond the walls
- 4.2 Rejection of racks
- 4.3 Transparent roof
- 4.4 Video: an interesting option for the attic
- 5 Features of the operation of a sloping mansard roof
- 6 Repair of a sloping roof
Sloping mansard roof: description
A sloping roof differs from the usual one in that its slope consists of several parts with different slopes.

Sloped roof slopes consist of two or more parts located in different planes
There are usually two of them, but there may be more. The slope gradually increases from the ridge to the cornice:
- the upper part of the slope is usually fairly flat;
- subsequent ones are more and more steep.
Thus, a sloping roof is inherently similar to a semicircular roof, only it is easier to implement.
Most often, there is a gable sloping roof, along the ends of which pediments are erected - vertical enclosing elements that are a continuation of the walls. The pediment, made of the same material as the wall, is quite massive, and this must be taken into account when designing the foundation. The lighter is the frame pediment, which consists of racks and cladding of boards or sheet material fixed to them. Such a pediment can be insulated from the inside, while a stone pediment can only be insulated from the outside.
The hipped roof looks somewhat more interesting, but it is more difficult to build, and the volume of the attic space is noticeably reduced.

In a mansard sloping hipped roof, all slopes can have the same length, but in some cases the side elements are made shorter
If the shape of the building in plan is square, the roof slopes converge at one point - such a roof is called a hip roof.
Since a sloping roof is almost always erected for the purpose of arranging an attic, it often includes structural elements accompanying the living space:
-
Roof windows. They are located on the slopes, therefore, they are facing upwards and cannot be protected by a visor. Because of this, it is necessary to use special types of glass (tempered or triplex) and pay special attention to sealing the joint between the window and the roofing, which leads to an increase in the cost of the product.

Types of roof windows Roof windows can have different designs, but are always installed in the roof slopes at an angle
-
Balcony. The presence of a balcony makes life in the attic much more comfortable. This element is easiest to position from the side of the pediment. In order to attach it from the side of the slope (to make a roofing balcony), you will have to make changes to the rafter system, while its calculation will be somewhat more complicated.

Attic with balcony It is easier to equip a balcony from the side of the pediment than a roof one
-
"Cuckoo" or "cuckoo". It is a ledge with a vertical wall and its own roof. The name is explained by the fact that this element resembles a cuckoo walk.

Attic with "cuckoo" In the "cuckoo" you can mount a regular window, which will be located vertically
There are several benefits from the "cuckoo" device:
- it becomes possible to install a regular window, which is much cheaper than an attic;
- the useful volume of the attic increases;
- you can harmoniously fit a small room into the attic - a pantry or a toilet.
Today, broken mansard roofs are increasingly equipped with the latest type of balcony - a balcony-window. When folded, such a structure is a window, consisting of two parts joined along a horizontal line. If both parts are pushed forward, the window turns into a balcony with a canopy.

When sliding parts of the window forward and upward, it turns into a balcony
The pediment of a gable sloping roof can be performed with a bay window - a semicircular or multifaceted glazed ledge, which is often called a lantern.
Sloped roof rafter system
When erecting a sloping roof on each side of a truss, instead of one rafter, two have to be used, as a result of which the design becomes somewhat more complicated. They do this:
- A U-shaped element is installed on the floor beam.
- On the right and left, side rafters are supported on it, the sole of which is installed on the Mauerlat.
-
Above they have a "house" more gentle rafters, which are called ridge.

Diagram of the rafter system of a sloping attic roof The rafter truss consists of two types of rafters - side and ridge
The trusses are combined into a one-piece structure using horizontal beams - girders attached to the racks of the U-shaped element from above.
Thus, in a sloping roof, two types of rafters are used: the side rafters are layered, the ridge ones are hanging, only the tightening from them is in the upper part of the racks. Such a rafter system is called combined.
As an additional reinforcement, the same elements are used as in a conventional rafter system:
- the ridge knot is connected with a tightening by a vertical bar - a headstock;
- side rafters can be reinforced with inclined struts (struts), the bottom of which is at the base of the rack.
If it is necessary to build a "cuckoo" or a balcony into a broken roof, the rafter system has to be weakened, forming an opening in it.

The roof rafter system is weakened when an opening is formed in it for a "cuckoo" or balcony
In each case, the calculation is carried out according to an individual method, depending on the dimensions of the structural element and the changes introduced into the rafter system. It is important to choose the correct section of the parts framing the opening so that their strength compensates for the weakening of the structure.
If the project provides for a dormer window, then at its location between the rafters, you need to fix the bars - they will serve as supports for the window structure.
Sloping roof design
The process of designing a sloping roof can be simplified as follows:
- Draw a cross-section of the structure to scale.
- The position of the ridge knot is noted: it should be located at a height of 2.5 to 2.7 m above the floor.
- Taking into account the desired dimensions of the attic room, a U-shaped element is depicted (after sheathing, the racks will turn into walls, tightening into the ceiling).
-
Connecting the nodal points of the U-shaped element with the ridge knot and the upper edges of the walls, they indicate the position of the rafters.

The device of the rafter system of a sloping roof When designing a sloping roof, it is necessary to calculate the type and location of installation of additional elements that increase the strength of the structure
For further calculations, you need to know the length of the rafters and their angles.
Calculation of the rafter section
To pick up the rafters, it is necessary to assess the load on them from snow and wind. For different regions, their own normative values have been established - they can be found in the SNiP "Construction climatology" (numbered 23-01-99 *).
Standard values of snow load:
- zone I: 0.8 kPa (80 kg / m 2);
- zone II: 1.2 kPa (120 kg / m 2);
- zone III: 1.8 kPa (180 kg / m 2);
- zone IV: 2.4 kPa (240 kg / m 2);
- zone V: 3.2 kPa (320 kg / m 2);
- zone VI: 4 kPa (400 kg / m 2);
- zone VII: 4.8 kPa (480 kg / m 2).
Zone VIII is considered extreme, so it is not recommended to build a mansard roof in it.

The snow load for the calculation is selected depending on the location of the object
Standard values of wind load:
- zone 1a: 24 kg / m 2;
- zone 1: 32 kg / m 2;
- zone 2: 42 kg / m 2;
- zone 3: 53 kg / m 2;
- zone 4: 67 kg / m 2;
- zone 5: 84 kg / m 2;
- zone 6: 100 kg / m 2;
-
zone 7: 120 kg / m 2.

Wind load map The territory of Russia is divided into seven main zones, each of which is characterized by a corresponding value of wind load
Based on the standard loads, taking into account the parameters of the roof, the calculated loads are calculated - according to them, the rafters are selected.
To determine the calculated snow load, it is necessary to multiply the standard value by a coefficient that takes into account the slope of the slope: P = P n * k. The value of k is:
- for slopes with a slope of up to 25 o - 1.0;
- from 25 to 60 o - 0.7;
- more than 60 o - 0 (for such slopes, the snow load is not taken into account at all).
When calculating the calculated wind load, the standard value is multiplied by two factors: W = W n * k * c.
The coefficient k takes into account the presence of wind obstacles at the construction site and the height of the building.
Table: Correction factor for calculating wind load (taking into account building height and type of terrain)
| Zone | Building height (z) | ||
| no more than 5 m | from 5 to 10 m | from 10 to 20 m | |
| AND | 0.75 | one | 1.25 |
| B | 0.5 | 0.65 | 0.85 |
| IN | 0,4 | 0,4 | 0.55 |
Zones in the table should be understood as:
- A: coasts of reservoirs and other open areas, territories without forests (steppes, tundra, etc.).
- B: areas with forests, town houses and other obstacles to the wind (including relief folds) with a height of 10 m or more.
- B: a densely built urban area with an average building height of 25 m.
The C factor depends on the roof configuration and the prevailing wind direction.
Table: Correction factor for calculating wind load (taking into account roof configuration and wind direction)
| Slopes, degrees | When the wind blows into the roof slope | With the wind in the pediment | |||||||
| F | G | H | I | J | F | G | H | I | |
| 0 | - | - | - | - | - | -1.8 | -1.3 | -0.7 | -0.5 |
| fifteen | -0.9 | -0.8 | -0.3 | -0.4 | -1.0 | -1.3 | -1.3 | -0.6 | -0.5 |
| 0.2 | 0.2 | 0.2 | |||||||
| thirty | -0.5 | -0.5 | -0.2 | -0.4 | -0.5 | -1.1 | -1.4 | -0.8 | -0.5 |
| 0.7 | 0.7 | 0.4 | |||||||
| 45 | 0.7 | 0.7 | 0.6 | -0.2 | -0.3 | -1.1 | -1.4 | -0.9 | -0.5 |
| 60 | 0.7 | 0.7 | 0.7 | -0.2 | -0.3 | -1.1 | -1.2 | -0.8 | -0.5 |
| 75 | 0.8 | 0.8 | 0.8 | -0.2 | -0.3 | -1.1 | -1.2 | -0.8 | -0.5 |
A negative value of the C coefficient indicates that a lifting force acts on the roof section from the wind side. If it is present, the pressure of the air masses on the roof will be reduced, but it is necessary to provide for a reliable fastening to prevent separation.
Next, the sum of the calculated loads from snow and wind is calculated, after which the cross-section of the rafters is selected on its basis. In most cases, for the manufacture of rafters, coniferous wood of the 1st and 2nd grade is used, all calculations for which have already been made and tabulated into special tables.
Table: dependence of the length of the rafter leg on its cross-section and the step between the rafter trusses
| Rafters section, mm | Snow and wind loads (total) | |||||
| 100 kg / m 2 | 150 kg / m 2 | |||||
| Step between trusses, mm | ||||||
| 300 | 600 | 900 | 300 | 600 | 900 | |
| 40 x 89 | 3.11 | 2.83 | 2.47 | 2.72 | 2.47 | 2.16 |
| 40 x 140 | 4.9 | 4.45 | 3.89 | 4.28 | 3.89 | 3.4 |
| 50 x 184 | 6.44 | 5.85 | 5.11 | 5.62 | 5.11 | 4.41 |
| 50 x 235 | 8.22 | 7.47 | 6.5 | 7.18 | 6.52 | 5.39 |
| 50 x 286 | 10,00 | 9.06 | 7.4 | 8.74 | 7.66 | 6.25 |
For other types of wood and even for other types of softwood, the values will be different
The step between the rafters can be varied over a fairly wide range, but 600 mm should still be considered optimal. With this step, the rafter system is the most durable, in addition, it is more convenient to attach insulation to it (this step corresponds to the standard width of the plates).
Other elements of the rafter system
In addition to the rafters, the roof frame includes:
- Floor beams: when relying only on external walls, the minimum allowable section is 200x100 mm, in the presence of internal load-bearing walls - 150x100 mm. In any case, the cross section must be checked by calculation.
- Mauerlat: in this capacity, a bar of 150x100 mm or 150x150 mm is used.
- Racks: depending on the load, a bar with a section from 100x100 mm to 150x150 mm is used.
- Counter lattice: boards 100-150 mm wide and 50-70 mm thick.
- Sheathing: boards, slats or waterproof plywood depending on what will be used as roofing.
- Subfloor, fixings and wood trims for selected assemblies: unedged boards of varying thickness.
Video: calculation of the attic roof system
DIY construction of a sloping roof
Roof trusses can be assembled on the ground. But then, for their delivery to the roof, lifting equipment will be needed, which an individual developer does not always have. Therefore, in private construction, the truss system is mainly built right on the spot:
-
The upper edge of the outer walls is covered with roofing material, after which the Mauerlat is laid on them. If it consists of several short bars, they must be connected with an oblique cut and bolted. The Mauerlat can be attached to the wall with anchor bolts with a diameter of 12 mm, but it is better to pre-wedge studs of the same diameter into the wall. In any case, the fasteners must be embedded in the masonry by 150-170 mm. Also, sometimes an annealed wire with a diameter of 3-4 mm is embedded, with which the timber is tied up.

Mauerlat mount To fasten the Mauerlat to a wall of concrete blocks, studs are used, embedded in the masonry at the stage of pouring the armopoyas
- Next, the floor beams are laid. Their ends rest on the outer walls and are fastened to the Mauerlat with staples or corners. If the beams also rest on internal walls, they should also be covered with roofing material.
-
Having retreated to the left and right from the middle of the beam, a distance equal to half the width of the attic room, install the racks. Those should be located strictly vertically, so they must first be "grabbed" with nails and only after leveling with a plumb line or level should they be finally fixed. Wooden plates and special corners are used as fasteners.

Connecting elements for assembling the roof frame Various metal plates and corners are used to securely fasten the elements of the roof frame
-
Having installed both racks, they complete the creation of the U-shaped element by installing the upper crossbar (it plays the same role as tightening in a conventional rafter system). The crossbar is fastened to the posts using shaped corners.

Installation of the attic frame Vertical racks, fastened by upper horizontal transoms, form the frame of the attic room
- On both sides of the U-shaped element, side rafters are installed. For installation on the Mauerlat, a groove must be cut out at the bottom end, which will ensure the reliability of the connection. Each rafter lath is attached to the Mauerlat with staples.
-
In the event that the length of the side rafters exceeds the maximum allowable for the selected combination of the cross-section of the beam, the load and the inter-rafter pitch, struts should be installed under them. In addition, scrapes and additional racks can be used to strengthen the rafter structure.

Elements of strengthening the rafter system To strengthen the rafter system, additional racks, runs and fights are installed
- Having finished work on the lower tier, they move on to the upper one: ridge rafters are installed on the U-shaped element. The place where they abut against each other should be fastened with bolts (instead of washers, steel plates are often used) or steel plates.
- Further, the junction of the ridge rafters (ridge knot) and the middle of the crossbar of the U-shaped element are connected with a vertical bar - a headstock.
- Having completed the construction of one truss, they move on to the next. The trusses are erected in this order: first the extreme ones, between which the threads are pulled, then along these threads - intermediate ones.
-
Finally, the trusses are connected with horizontal girders.

Mansard roof rafter system After installing all the trusses, they are tied with horizontal runs
Subsequent manipulations with a sloping roof - installation of roofing and insulation - are no different from those performed on a conventional roof:
- The rafters are covered with a waterproofing film, which is fixed with a counter-lattice (boards packed on top of the rafters parallel to them).
-
A crate is stuffed onto the counter-lattice across the rafters.

Sheathing for sheet roofing The counter battens are packed along the rafters to form a ventilation gap, and then the sheathing is placed on it under the roofing
- Roofing is being installed.
- Insulation plates are installed in the rafter space, after which the racks are sheathed with boards or plasterboard.
The counter lattice provides a blown gap under the roofing material, due to which steam condensation on it is excluded (moisture will be removed by a draft). If a vapor-proof film is used as waterproofing, then there must also be a gap between it and the insulation.
The gaps must be blown out: holes must be left in the cornice and under the ridge, which will ensure air circulation
If the cross-section of the holes is not enough (during the design, a separate calculation is made for roof ventilation), devices are installed on the roof to improve circulation - aerators.
Video: how to make a mansard roof
Ways to increase the size of the attic
The construction of the rafter system of a sloping roof described here is, one might say, classic. However, if desired, it can be slightly modified.
Installation of floor beams with extension beyond the walls
The essence of the solution: the attic floor is made up of beams that exceed the width of the building in length. The beams are laid on the Mauerlat and attached to it.
With this design, the side rafters are no longer installed on the Mauerlat, but at the ends of the floor beams. Accordingly, the attic becomes more spacious.

Due to the removal of the floor beams and rafters, it is possible not only to increase the size of the attic room, but also to make a reliable canopy over the entrance
Refusal of racks
In this version of the rafter system, the racks remain, but they move closer to the outer walls, turning into supports for the side rafters. In this case, the joint of the side and ridge rafters, which now has no support, must be fastened so firmly that the pair of rafters turns into a solid broken beam.
For this, steel plates with a thickness of at least 4 mm and several pins are used. The overlays must be cut so that in their shape they correspond to the knot in which the rafters are joined.

If the junction points of the side and ridge rafters are fastened with powerful plates and threaded rods, you can abandon the racks and significantly increase the size of the attic room
With this design of rafters, the attic room also receives additional volume.
Transparent roof
If the attic is not considered as a permanent residence, it can be covered with a transparent roof and used as a summer veranda. In this case, the roofing material is monolithic polycarbonate. In comparison with glass, it wins in several ways:
- is cheaper;
- is plastic;
- has a low weight.

For fixing polycarbonate, a simple frame is mounted without insulation
Polycarbonate sheets are fixed in a frame, which is assembled from special profiles. It should be borne in mind that plastic has a high temperature coefficient of expansion, so it must be fixed in accordance with the following rules:
- the gap between the self-tapping screw and the edges of the fastening hole should be 1-1.5 mm (the difference in diameters, respectively, is 2-3 mm);
- you need to tighten the screws without much effort, just to grab the sheet, and not press it tightly.
In this case, the attic roof is built according to the rules of a cold attic: it is not the roof that is insulated, but the attic floor. The dimensions of the attic in this case remain the same, but increase purely visually, due to the greater amount of light entering the room.
Video: an interesting option for the attic
Features of the operation of a sloping mansard roof
A sloping roof differs from the roof of a non-residential attic in that after warming and installing the walls, its rafter system becomes inaccessible for inspection. Thus, timely detection of wood rot, which may appear as a result of leaks, becomes impossible.
For this reason, the roof should be regularly inspected for leaks, especially in the places of passage through the roof of the chimney and ventilation outlets, the abutment of the main roofing to the cuckoo cover, etc. If in doubt, potentially dangerous places should be sealed with external sealant. works. In addition, some preventive measures should be taken:
-
Equip the attic roof with an anti-icing system. It consists of heating cables that are laid along the slopes and in the elements of the drain. You will have to allocate funds for operating costs - you will have to pay for the electricity consumed by the system, but the roof will be guaranteed to be protected from damage by sliding ice.

Roof anti-icing system The heating cable is laid along slopes and gutters and protects the roof from the formation of snow drifts and icing
- In a newly built roof, rafters and other wooden elements can shrink if they have not been pre-dried. In this case, there is no need to rush to the installation of insulation and sheathing in order to be able to tighten the nuts on the bolts and studs.
- Monitor the condition of the holes in the cornice, ridge and aerators through which air enters the under-roof space. In case of clogging, they should be promptly cleaned: in the absence of air movement, moisture will condense on the wooden elements, which will provoke their rapid deterioration. Condensation of moisture on the lower surface of the roof covering is equally undesirable.
- Inspect the condition of the protective grilles installed in the eaves (air intake holes). Their contamination significantly reduces the throughput, as a result of which the roof ventilation will not be able to work with the efficiency envisaged by the project.
- If the roof is rebated, seal the rebates regularly. If no polymer coating is available, the steel roofing material should be painted with oil paint every three years.
-
Remove leaves and other debris from gutters in the fall.

Cleaning the gutters In the fall, you need to periodically clean the gutters of leaves, branches and debris
- Remove snow from the roof in winter. In order to avoid damage to the roofing, the snow is not completely removed, but a layer 5 cm thick is left. A thin layer of ice, if any, is also not touched, since when it is removed, the roof can be damaged with a high probability. If the roof is covered with slate, then only loose snow is removed from it: due to its fragility, slate can be very easily destroyed.
Broken roof repair
How to restore the functionality of the roof depends on the nature of the damage. Let's consider the most common:
- The rafters were deformed. If they were selected with an error or the wood is of a lesser grade, excessive deflection may occur. In this case, the rafters need to be strengthened by installing supports under problem areas.
- The roofing has lost its tightness. The method of restoring moisture resistance of the roofing material depends on its type.
Fistulas appearing in the seam roof can be closed with burlap or fiberglass, and then coated with putty. To prepare it, you need to take the following components:
- drying oil: 2 parts by weight;
- grated red lead: 1 part;
- rubbed whitewash: 2 parts;
- chalk: 4 parts.
Epoxy-based mastics are also used with great success for the purpose of repair.
In case of extensive damage, patches are installed or the roofing sheet is replaced.
If the metal roof has been painted, and the paint has peeled off in some places, it is important to touch up this place as soon as possible, without waiting for the appearance of foci of corrosion and their spread to the entire roof. Painting is also used for galvanized parts, for example, gutters, if rust appears on those as a result of wear of the zinc coating.

For painting metal roofs, special paints are used for outdoor use.
Today, roofing mastics, which are commonly called liquid rubber, are often used to repair holes in the roof. Mastic is a bitumen-polymer or polymer composition and can be produced both in one-component and two-component versions. After a while after application, it hardens and really becomes like rubber.
The service life of various mastics is different and depends on the composition:
- bitumen-polymer mastics "Elamast", "Venta-U", "Gekoplen" serve 15 years;
- bitumen-latex "BLEM-20" - 20 years;
- butyl rubber and chlorosulfopolyethylene "Polikrov M-120", "Polikrov M-140" and "Polikrov-L" - 25 years.
With a certain frequency, which depends on the type of roofing and the complexity of the roof, it is necessary to carry out its overhaul. It usually runs like this:
- The roof covering, lathing, counter-lattice, waterproofing film, insulation and vapor barrier film are removed.
- The rafters are inspected for mold or mildew damage. If there are such places, they are cleaned and treated with antiseptic compounds.
- If there are cracks or delamination in the rafters, they are sealed with adhesive tapes or sealant to prevent moisture from entering.
- A new waterproofing film is laid on top of the rafters. It should fit snugly against the rafters, for which double-sided adhesive tapes are used. Then the film is pressed with a counter grid.
The adhesive tape will only stick to planed wood. If the rafters have a rough surface, the foil must be glued with polyurethane or synthetic rubber adhesive.
In terms of complexity, the sloping roof is significantly superior to the usual one: it has more nodes, and the calculation is also more complicated. But the game is worth the candle: by building a sloping roof, instead of a low cramped attic, you will get a spacious, high attic, in which you can live with great comfort. Our advice will help not only to properly build such a roof, but also to make its service life as long as possible.
Recommended:
Inverted Roof, Its Structure And Main Elements, As Well As Features Of Installation And Operation
What is an inversion roof. Inverted roof types. What materials can be used. DIY installation of an inverted roof. Operating rules
Copper Roof, Its Structure And Main Elements, As Well As Features Of Installation And Operation
Copper roof, its types and advantages. Installation of roll and tiled copper roofs and features of their installation. Copper roof maintenance and repair
Liquid Bulk Roof, Its Structure And Main Elements, As Well As Features Of Installation And Operation
What are the properties of a liquid roof. How does it differ from other roofing materials. Liquid rubber roofing instructions
Wooden Roof, Its Structure And Main Elements, As Well As Features Of Installation And Operation
What is a wooden roof. What materials is it made of. Installation of a wooden roof and its features. Safety and operation
Mansard Roof, Its Structure And Main Elements, As Well As Features Of Installation And Operation
What is a mansard roof. Design, types and features of DIY installation. Calculation of materials, operation and repair of mansard roofs
