Table of contents:
- Author Bailey Albertson albertson@usefultipsdiy.com.
- Public 2023-12-17 12:53.
- Last modified 2025-06-01 07:32.
Types of roof truss system: their characteristics and installation features

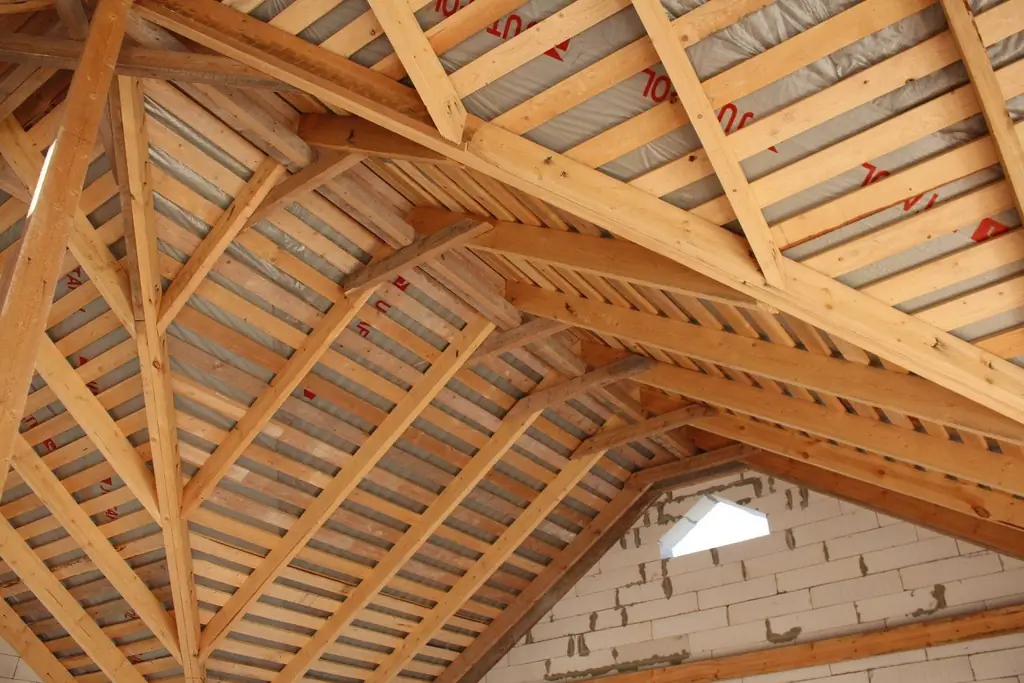
The service life of a house depends not only on the reliability of the erected foundation. The building has an equally important part - the roof, which is based on the rafter system. It is she who takes the blow of the vicissitudes of the weather, which means that she protects living quarters from rain, wind and snow. Therefore, it is so important to equip it correctly.
Content
-
1 Types of truss systems with description and characteristics
-
1.1 Reclining rafter system
- 1.1.1 Elements of the layered rafter system
- 1.1.2 Types of rafter rafter systems
- 1.1.3 Video: how to create a rafter system without spacers
- 1.1.4 Rules of arrangement
- 1.1.5 DIY installation: step by step instructions
- 1.1.6 Video: installation of layered rafters
-
1.2 Hanging rafter system
- 1.2.1 Elements of the hanging rafter system
- 1.2.2 Variety of designs of the hanging rafter leg system
- 1.2.3 Step-by-step installation instructions
- 1.2.4 Video: installation of a hanging rafter system
-
Types of truss systems with a description and characteristics
There are two types of rafter systems. Each of them has its own area of application.
Rafter roof system
It is designed for roofs with a span of 10 to 16 meters, the slope does not matter. The only rule is that inside the building there must be load-bearing walls that can be replaced with columns.

The rafter system is suitable for flat and pitched roofs
Elements of a layered rafter system
The main advantage of such a rafter system is a long service life, this is due to the arrangement of through ventilation, which means that there is practically no risk of decay of structural elements. Also, the layered rafter system is valued for its ease of installation, which allows you to install it yourself. The structure consists of:
- rafter legs;
- rafter elements;
- lathing or flooring.
The design may differ slightly depending on the shape of the roof (flat or pitched). In the first case, it represents separate rafters, which rest on each of their edges on opposite walls of the building. When arranging a gable roof, these are pairs of layered legs resting on the lower walls, and a run, which is supported by racks. Rafter legs, or racks, are mounted only in the case of an increased run. This prevents deflection of the rafters. A similar method of strengthening the system is used in the case of arranging legs from several boards.

Racks will help to increase the reliability of the layered rafter system
The rafter elements include:
- Horizontal grip. Serves to increase the stability of the system, but does not significantly affect it. It is necessary to fasten the fight at the intersection with the installed racks that hold the ridge run. This element works in compression and tension and allows you to evenly distribute the load. It should be located at a height of 1.8 m or more from the floor of the attic, which allows a person to move freely around the room.
- Pass-through. It is present if there are two internal walls. Then the truss structures rest on the bench through the supports themselves. It fits on installed internal partitions.

The roof rafter system is suitable for roofs with significant spans
Types of rafter rafters
Such a system can be spaced and non-spaced. They differ in design and installation technology.
In the case of a non-thrust system, you can choose one of three implementation options:
-
A bar is attached to the end of the rafter or a cut is made. This procedure is necessary to securely attach the rafters to the Mauerlat. A cut is also made in the upper part. It should be horizontally oriented and oversized. In this case, the cut should be beveled. This is necessary so that the emphasis does not fall on the side cheek and there is no resistance to bending of the rafters. There are certain restrictions on the size of the crop. If the height of the rafter leg is more than 18 cm, then the size of the felling should not exceed 30% of the height of the timber, if within 12-18 cm, then this parameter is 40%, if less than 12 cm, then 50%. The length of the trim should not exceed the height of the rafter leg. If this procedure is not possible, then it is recommended to build up with a bar, which is fixed using metal plates.

Types of rafter connections in a non-thrust system You can connect the rafters by cutting
-
The bottom of the layered rafters is performed on a slider. The top is secured with nails or bolts. It is allowed to rest the rafter legs against each other, after which the elements must be combined with steel plates with fine teeth. The use of overlays is allowed, preferably made of wood. During installation, pay attention to the calculated design step. The rafters need to be fixed with special nails, which should be driven only at an angle into the side surfaces.

Spreadless system on a slide The bottom of the rafters is equipped with a slider, and their top is fixed with nails
-
A rigid fixation of the top is performed, due to which the bottom is made on the sliders. In the ridge knot, which is firmly connected, a bending moment is formed at its maximum manifestation. This force tries to break the knot so the rafter legs do not bend. Such fixation allows you to obtain a margin of safety, which significantly increases the bearing capacity of the rafter system.

Rafter system with rigid top fixation Rafters with a rigid top fixation do not bend
All these types are similar to each other by fastening one edge of the rafters to hinges, and the other to a sliding support, which makes rotation possible.
The spacer structure of the rafter system has supports with one degree of freedom. This is the main difference between these two types of systems. It is necessary to fix the upper edge of the rafters with nails or bolts, which allows you to get a hinged base.

Spacers can have one degree of freedom
Video: how to create a rafter system without a spacer
Arrangement rules
The reliability of the system is ensured by fulfilling the basic requirements:
- The thickness of the elements must exceed 5 cm.
- All nodes of the rafter system must have a smooth, planed surface. This will protect them from rotting and the appearance of fungus.
- It is not recommended to equip additional units, since the system is clearly designed.
- Mauerlat must be laid strictly horizontally. This also applies to the joining surface with the rafter leg.
- The location of the struts and struts should be as symmetrical as possible.
- When joining the rafters to the masonry, you must first equip the waterproofing layer.
- The rafter leg should be a maximum of 4.5 m long if there are no struts or struts in the system.
DIY installation: step by step instructions
The installation process consists of several stages:
-
Lay a horizontal bar - Mauerlat on the upper edge of the walls. Under it, you first need to lay a waterproofing material.

Mauerlat Mauerlat can be made of timber or boards
- Place a bed on top of the intermediate wall. It is required for fixing uprights.
- Fix the vertical posts on the bed. The distance between them should be from 3 to 6 m.
- Place the ridge girder on the racks.
-
Now you can install the rafters. They should be placed in increments of 60-120 cm. The lower edge should be attached to the Mauerlat in any of the selected ways, the upper edge should be laid out on a ridge run or connected to each other.

Fastening the rafters to the Mauerlat Fixing the rafters to the Mauerlat must be reliable
-
If necessary, install a horizontal grapple, struts and supporting elements.

Installation of the rafter system Installation of sub-rafter elements is not always necessary when installing a rafter system
Video: installation of layered rafters
Hanging rafter system
This type of rafter system is most often equipped with a gable roof with a span of no more than 6 m, while there are no walls inside the attic. The rafters have two supports: from above they lean on each other, from below - on the Mauerlat.
Elements of the hanging rafter system
The simplest rafter system is a triangle, two sides of which are formed by rafter legs resting on each other, and the third is a tightening. The advantage of such a system is that the spacer is not transmitted to the walls due to its leveling by tightening. This means that there is no horizontal pressure on the walls, which leads to increased reliability and strength of the structure of the support units.

Hanging rafter system resembles triangles
The main elements of the hanging rafter system are:
- rafters;
- rack;
- Mauerlat - can be replaced with boards that fit on a waterproofing material;
- brace;
- tightening - wooden block or metal bar;
- crossbar;
- grandma.
When choosing the design of a rafter leg system directly for your home, you need to consider:
- climate, in particular, snow and wind load, annual precipitation;
- the type of roof, because the rafter system of the gable and hipped roof is fundamentally different from each other;
- the angle of inclination of the slopes (for a flat structure, the hanging rafter system is not used);
- type of roofing (different materials differ in weight and requirements for lathing).
These parameters allow you to calculate the cross-section of the rafters, the span width, the location of the tightening.
Varieties of designs of the hanging rafter leg system
There are several types of structures that can be used when installing a suspended pitched roof truss system. The arch can be:
-
Three-hinged triangular. The shapes look like a closed triangle. It has a clear structure in which the rafters create a bend and the tightening work goes in the opposite direction. It is recommended to observe the height of the ridge run, which should be at least one sixth of the length of the arch span. Most often, such a design is used when arranging an attic, the floor of which will play the role of a tightening for the rafters.

Three-hinged triangular system diagram The shape of the three-pivot system has the form of a closed triangle
-
With a grandmother. A suspension may be present instead. This arch is also a triangular arch. This type of construction is appropriate when arranging an attic with a span of more than 6 meters, when the use of a solid timber is impossible. The tie must be carefully suspended from the ridge. The pendant can be wooden or metal. In the first case, she is often called a grandmother, and in the second, a heavy one. To achieve the desired level of tightening, smaller parts are used, which are joined together and attached to a clamp.

Rafter system with headstock The headstock in the rafter system is a support hanger
-
With a raised puff. This rafter system is appropriate when arranging an attic. It is characterized by the location of the tightening at any height of the bar, and this parameter depends on its tensile stress. When arranging the attic, it performs the function of beams of the interfloor overlap of the first floor, which means that it does not carry any payload. Additionally, a suspension is installed, which is able to prevent the sagging of the stretch.

Raised roof rafter system Tightening optionally located at the bottom of the rafters
-
With a crossbar. In this design, the lower support unit is a fixed support, while the rafter leg on the Mauerlat is fixed by a cut. This approach makes the arch quite stable. In a rafter system with a crossbar, the tie is also raised, but its action is aimed at compression.

Rafter system with transom The work of the screed in a system with a crossbar is aimed at compression
-
With struts and suspension. This design is chosen when it is necessary to install long rafter legs. The braces that support the rafters prevent them from bending. The braces with their lower end should rest against the headstock, since they have no other support. The peculiarity of this system is the circular transfer of loads. Schematically, it looks like this: the rafters act on the installed struts, the latter, in turn, stretch the suspension, which pulls down the upper end of the rafter leg and the ridge girder, after which the struts are compressed with the rafters.

Rafter system with struts and suspension A special feature of the system with struts and suspension is the circular load transfer
There are also several options for arranging the cornice assembly:
- orthogonal frontal cut with one or double teeth;
- plate mount;
- board fixation.
Step-by-step installation instructions
There is a certain sequence of steps for installing a hanging rafter system. It includes several stages:
-
Make saws on the rafter legs. First, you need to sort the left and right rafter legs, since they have washed down on opposite sides. This will make the mount to the Mauerlat reliable and stable. Don't forget to mark each one.

Cuts on the rafters You can connect the rafters using the saw system
-
In their upper part, connect the rafter legs, while it is recommended to choose the fastening method in advance.

Rafter connection At the top of the rafters can be connected with metal plates
-
After installing the first pair of these elements, you can make templates for all the others. This will allow preparation on the ground, lifting the rafters up and strengthening them there. It is recommended to install the second pair of legs on the opposite side of the building, then stretch the string and only then mount the remaining rafters. This will allow you to strictly control the correctness of the installation. In the event that the height is not enough, you can use wood lining.

Truss templates Triangular blanks can be made on the ground
- To control the step of installing the rafter legs, it is necessary to make markings on the Mauerlat in advance. At the top, you can apply it to a temporary board.
- Tightening installation is carried out in case of a significant distance between the partitions. The distance between the ties should be equal to the pitch of the rafters. This parameter must be strictly controlled.
Video: installation of a hanging rafter system
Compliance with the technology of installation of the roof rafter system is just as important as the correct choice of structure and its calculation. Only with a balanced approach to work at each stage can you end up with a high-quality rafter system, and therefore the roof of the house.
Recommended:
MDF Doors: Entrance And Interior Doors, Their Varieties With A Description And Characteristics, Advantages And Disadvantages, As Well As Installation And Operation Features

Doors from MDF: features, characteristics, varieties. Making and installing MDF doors with your own hands. Door restoration. Reviews, photos, videos
Types Of Roofing Materials With A Description And Characteristics And Reviews, Including Roll, As Well As Features Of Their Operation

Types of roofing materials: sheet, soft and tile roofs. Technical characteristics and features of operation of various types of coatings
Roofing Elements Made Of Metal Tiles, Including Their Description And Characteristics, As Well As The Ridge For The Roof, Its Structure And Installation

The main elements used in the construction of metal roofing. Their description, characteristics and purpose. Features of mounting the ridge strip
Skylights, Their Types With A Description And, Characteristics, As Well As Installation Features

Classification of roof windows: types, location, design, materials. Overview of sizes and basic installation rules
Rooflights, Their Types, Purpose And Characteristics, As Well As Features Of Installation And Repair

What are rooflights and why are they needed. Types and features of lanterns. Skylight dome design and calculation
