Table of contents:
- Garden Moidodyr: we make a country sink ourselves
- Choosing the right place for the washbasin
- We use available means
- What can be used to make a washbasin in the country?
- More complex washbasin design
- Choosing a reliable water tank
- We make a cabinet for a moydodyr ourselves
- Additional washbasin elements
- Video about installing a washbasin at a summer cottage
- Author Bailey Albertson [email protected].
- Public 2023-12-17 12:53.
- Last modified 2025-01-23 12:41.
Garden Moidodyr: we make a country sink ourselves

Each owner of a summer cottage tries to create comfortable conditions on his estate. This is especially true for residents of large cities who are accustomed to the benefits of civilization at hand. In addition, in the country you need not only to rest, but also to work, and if you do not have a running water supply, then you will face certain difficulties. We will tell you how to make a sink in the country with your own hands.
Content
- 1 Choosing the right place for the washbasin
- 2 We use available means
- 3 What can be used to make a washbasin in the country?
- 4 More complex washbasin design
- 5 Choosing a reliable water container
- 6 We make a cabinet for a moydodyr ourselves
- 7 Washbasin accessories
- 8 Video about installing a washbasin in a summer cottage
Choosing the right place for the washbasin
If you intend not only to come to the dacha in the evenings, but also to live on it for several days in a row, then you need constant availability of water. Waking up in the morning, it is so pleasant to wash with cold water, drive away sleep and cheer up to start work with renewed vigor.
Most often, we are faced with the lack of water supply and sewerage systems in suburban areas. Of course, you can independently drill a well and provide the estate with an almost full-fledged water supply, but this is a time-consuming and expensive activity, and, moreover, it is far from paying off, especially against the background of the fact that you will only use it in the warm season. In winter, without control, pipes can freeze, burst, or even simply disperse in the hands of unreliable social elements.
Therefore, we will choose a simple, lightweight and familiar washbasin design - a washbasin. The first thing to decide is where will this washbasin be installed - in the yard or inside the house?

Find a comfortable place in your yard for your washbasin
It would be most correct to make or purchase such a structure, which in summer, in hot weather, can be left in the yard or in the garden, and with the onset of cold weather, it can be brought into the room. So you don't have to adjust the sewerage and water supply. The only thing that remains for you to decide is where exactly to put the sink.
The washbasin must be in an accessible place so that you can use it at any time. If you like warm water, install the structure on the sunny side so that the water-containing container heats up well. However, many believe that it is better to place the washbasin in the shade, especially if the container is made of plastic.
Well, one more important question, which washbasin to choose? It all depends on your personal preferences and capabilities. Washbasins are:
- bulk;
- suspended;
- washbasins with a cabinet;
- heated washbasins.
Each of these washbasins can be used as portable or can be firmly fixed in a certain place. If you don't want to bother, then any kind can be purchased in the store. But making it yourself, especially from improvised means, is not only much cheaper, but also more fun.
We use available means
Even if you still only have plans to create a moidodyr in the country, you still have to wash your hands and wash your face. In this case, the simplest travel option will come to our aid - a plastic bottle with a volume of 1.5 liters or more. Cut off the bottom, turn it over and fasten it on a wire to a tree branch, fence, etc. Water is poured from above and warms up well enough. You can make a complete washbasin by attaching holders for soap, toothpaste, and a brush.

Washbasin diagram from a plastic bottle
So that water from such a bottle does not flow constantly, but when it is needed, several devices can be used.
- The easiest way is to nail into the cork. Make a hole in the center of the bottle cap and insert a nail into it so that the cap stays inside. Screw the plug tightly. The disadvantages are that the water leaks, and from this the nail rusts, moreover, it is not very convenient to wash your hands with such an inconsistent water supply.
- The second method is easier to use. A hole is made on the side of the cover. When the lid is unscrewed, water starts pouring out as much as you need. Screw the cap back on and the water stops. The disadvantage of this method is that it is not very easy to control the sufficient level of unscrewing so that the lid does not break off thoroughly.
- The third method is also simple: you can attach a faucet, for example, from a washing machine, to the neck of the bottle with electrical tape. The water will flow just the way you need it, and you can be sure that the faucet will not break if it is properly fixed.
- The same faucet (or purchased from a hardware store) can be attached to a plastic container with a volume of 5 liters or more. To do this, it is enough to drill a hole of the required diameter and fix the tap in it. A tin or enamel bucket is also great as a container.
Such homemade washstands from available tools can be decorated with various patterns. Children will be very happy to have the opportunity to use their imagination and efforts for a common cause.
What can be used to make a washbasin in the country?


More complex washbasin design
Such a washbasin will be heavier, which means that it must be installed in a permanent place. This also implies a drainage point, which, however, can be replaced with a bucket or basin. The accumulated used water can be adapted for watering small flower beds or beds.
So, you will need:
- large capacity (bucket, canister, can of 10 liters or more);
- squeeze;
- tap gaskets;
- clamping nuts;
- tap for water supply.
Mark a hole in the container. It should not exceed the diameter of the squeegee. Depending on the material of the container, knock out, drill or cut a hole and place the squeegee into it.
Put on rubber gaskets on both sides of the squeegee and fix with nuts on both sides. Now install the faucet and your garden sink is complete. When placing it on the site, pay attention to the soil at the installation site. If you do not plan to drain to a cesspool or garden, then be sure to pour several buckets of gravel under the sink. This will save you from muddy puddles.

Use a large plastic barrel for the washbasin
If you are not constrained in time and money, you can make a more practical and thorough country sink in the same way. For him you will need:
- tank and plumbing fittings;
- sink of the right size from the right material;
- materials for the frame or connection of the tank with the sink into one structure;
- materials for water supply and drainage.
Build a frame of metal and wood, taking into account the dimensions of the tank, sink and hoses. Install all the elements in the finished frame, connect them to the water supply and drainage system. If you are planning a bulk sink, then a water connection may not be required.
Choosing a reliable water tank
If your plans are to make a washbasin with a cabinet, then you shouldn't make a container for water yourself from improvised means - you will only waste time, and such a design will look unaesthetic. A ready-made tank with a built-in tap is inexpensive, but it looks much more beautiful.
The optimal volume of the basin for the washbasin is 10-20 liters. The smaller one does not make sense to take, and the larger one is suitable for a country shower. As a tank for a washbasin, it will be too bulky, and the water in it may stagnate.
The shape of the washbasin is also very important. The pressure of the water pouring out of the tap directly depends on it. If the container is low and horizontal, the water will flow out in a thin stream. As we remember from the school physics course, the higher the tank column, the greater the pressure. Therefore, it is better to choose a tank with an elongated shape. The best option is a washbasin with a non-planar bottom that slopes towards the tap.

Choose your tank containers carefully
Don't be reminded that the tap should be located as close to the bottom of the tank as possible. Nowadays, washbasins are becoming more and more popular in which the valve is located on the front wall. The pressure from it will be lower than from a sink with a volume of up to 5 liters with a pressure tap. In such a tank, water pressure is lost due to the location of the tap. Due to the loss of pressure, the water in the tank will have to be refilled often. Therefore, choose the model with the lowest possible crane position.
We make a cabinet for a moydodyr ourselves
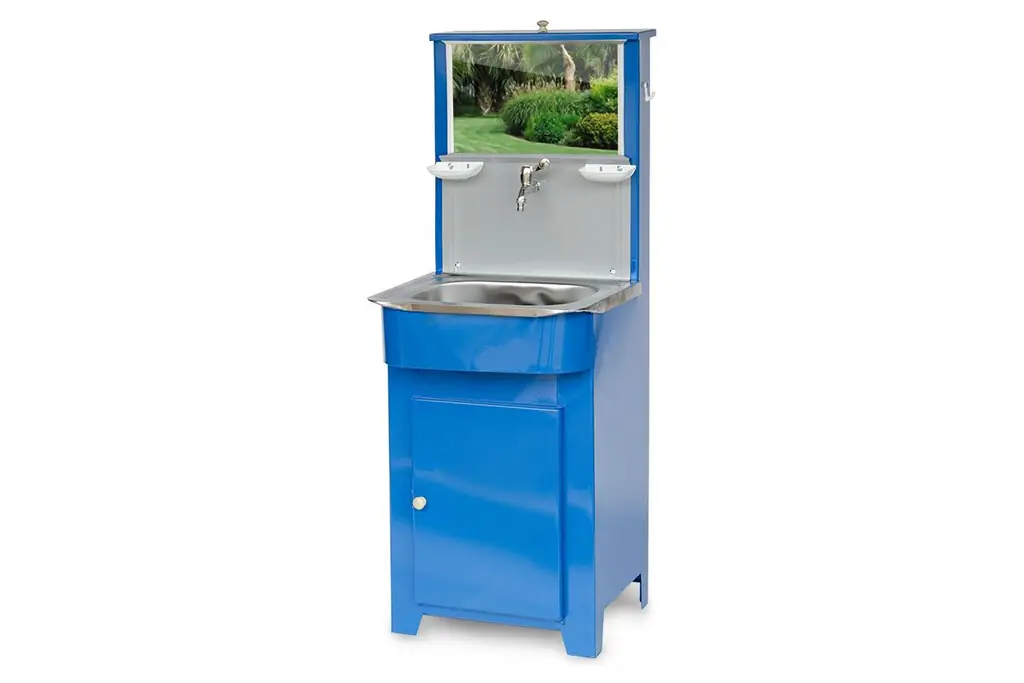
Perhaps you have a Soviet-style sink from the old days. It fits perfectly under a standard tank and sink. In this case, you only need to clean it up, paint it, and maybe add a couple more elements to the structure. Well, if there is no such sink, then you can easily make the frame yourself. For it you will need wooden blocks with a section of 50X50 - 80X80 mm or steel corners 25X25-40X40 mm.
The optimal height of the cabinet on which the sink will be located is no more than 1 m. Take a corner or timber and cut 4 sections of 85 cm each. The size of the cabinet frame should be such that the sink easily lies on its edges, so carefully measure the structural elements.

Modern models of moidodyrs
Cut 8 pieces of timber (corner) to the size of the sink. As a rule, this is 50 cm. Assemble the frame and fix it: knock it down if you used a bar, and weld it - if it is a metal corner.
The cabinet frame can be sheathed with the following materials:
- plywood board;
- wooden plank;
- polycarbonate;
- steel sheets;
- plastic panels.
To prevent plywood and wood from becoming unusable, after getting wet on the street, cover the structure with varnish. Cover the back wall and sides of the curbstone completely, firmly fixing the material to the frame. At the front, hang a door made of the same material as the frame on the hinges.
Make the floor in the cabinet out of boards, leaving gaps of about 1 cm between them so that spilled water goes into the ground and air circulation is provided.
Additional washbasin elements
You don't have to be limited to the framework of the vanity unit. To make it convenient to use the sink, attach a countertop to it that can serve as a dish drainer.
- The dryer can be attached on one or both sides. To do this, take wooden boards with a section of 25 X 15 mm and knock them down so that you get a dryer in the form of a lattice. The distance between the boards should be 1.5-2 cm.
- You can make a two-level dryer. To do this, at a height of 35 cm above the ground, make another frame and stuff boards on it.
- Be sure to cover the dryer with varnish so that it does not delaminate over time and does not deteriorate from moisture.
- For the countertop, take a plastic or wood board and place it on a frame made to fit the board.

Washbasin frame can be made by yourself
We talked about how to organize the drainage of water from the sink. You can use a regular bucket for this. This is especially good if you wash not only your hands, but also vegetables and fruits, as well as dishes with food leftovers. Thus, there will be organic residues in the water, and such slops can be sent to the compost heap for humus.
If cleaning products and food residues will not be discharged into the sink, then a corrugated pipe can be connected to the drain hole and taken to the gutter.
Video about installing a washbasin at a summer cottage
Your garden area is now equipped with a convenient and functional washbasin. We hope our tips will help you get it done quickly and easily. Tell us about your experience in making country washbasins. Have a warm summer and light work!
Recommended:
How To Make A Children's Sandbox In The Country With Your Own Hands, Photos And Videos

DIY step-by-step instructions for building a simple children's sandbox. Different sandbox models
How To Make A Children's Swing In The Country With Your Own Hands (made Of Wood Or Metal, Drawings, Photos And Videos)
Step-by-step instructions for the construction and installation of a swing at a summer cottage. Material selection, tools, model drawings
How To Make A Wattle Fence In The Country With Your Own Hands - A Step-by-step Guide With Photos And Videos
Do-it-yourself wattle: selection and preparation of material. Weaving patterns. Step-by-step instructions for making wattle fence. Care of the finished fence. Photo and video
Installing A Sink In The Bathroom: How To Properly Install A Washbasin With Your Own Hands, At What Height To Fix And Other Installation Features
Types of bathroom sinks. The sequence of installation, connection to water supply and sewerage, performance check. Errors and methods of their elimination
The Interior Of The Kitchen And Living Room In A Loft Style In An Apartment And A Country House: Examples Of Design Design, Choice Of Color And Material, Decoration, Photo
The main features of the loft style and how to decorate the kitchen in such a design. The choice of materials, colors and textures for finishing. Loft-style lighting and decor for the kitchen
