
Table of contents:
- Author Bailey Albertson albertson@usefultipsdiy.com.
- Public 2024-01-17 22:26.
- Last modified 2025-06-01 07:32.
How to make a long burning stove with your own hands

Potbelly stove of long burning is convenient and easy to use. The possibility of making a stove from scrap materials makes the design popular among those who like to create. Below we will tell you how to make such a structure with your own hands.
Variations and the advantage of burzhuik
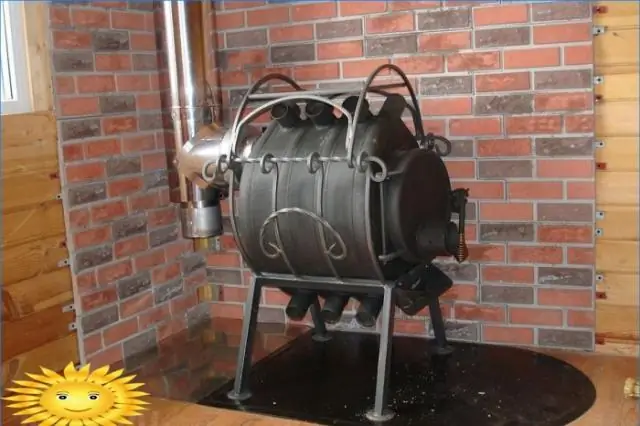
Potbelly stove of long burning is a stove with a long burning time of wood. The names and options are varied: bubafonya, slobozhanka, pyrolysis oven. The fuel is wood, sawdust, wood chips and other combustible waste. The main advantage is the process of long smoldering, which can last from 7 hours to 24 or more. Therefore, the efficiency of such stoves reaches 95% (in conventional ovens not higher than 60%). No constant supervision required. Such stoves are convenient for use in garages, summer cottages and small cottages, in utility rooms. The disadvantages of such a stove include:
- requirements for the chimney, since it is impossible to equip the pipe with a large number of bends;
- after the end of burning, the stove cools down quickly;
- the outer parts get very hot.
Furnace design and operation
Possible furnace designs are varied. It all depends on the chosen model and materials. You can cut from metal sheets and weld a rectangular potbelly stove. It is convenient to use a ready-made steel barrel or an empty gas cylinder. But the principle of operation in these structures is the same - long burning. In a conventional firebox, due to the powerful draft and large air volume, the fuel burns out very quickly. When the air flow decreases, the flame decreases, the fuel smolders, heating the room for a long time.

Diagram of the potbelly stove
Potbelly stove design
Any suitable container can be used for the pyrolysis oven shell. To determine the dimensions and parameters that affect the heat transfer and performance of the potbelly stove, it is necessary to make calculations, taking the dimensions of the container used as a basis. Measure the diameter and height.

Drawings for making a potbelly stove with your own hands
- the ratio of the diameter and height of the potbelly stove should be within 1: 3. The performance and quality of the structure depends on this;
- the thickness of the metal for the case must be 4-5 mm. The durability of the device depends on this;
- the correct calculation of the diameter and thickness of the piston is important. A thin and light piston will accelerate combustion, too heavy can extinguish
Table: Piston ratio
| inner diameter of the tank | pancake thickness |
| 400 mm | 6 - 8 mm |
| 600 mm | 4 - 6 mm |
| 800 mm | about 4 mm |
Table: calculation of the height of the ribs (channels, corners) welded on the piston pancake
| inner diameter of the tank | piston rib height |
| 400 mm | 50 mm |
| 600 mm | 60 mm |
| 800 mm | 80 mm |
Dimensions of the remaining parts of the stove
The remaining dimensions of the structure during manufacture can be rounded in any direction. This will not affect the productivity of the stove. Accuracy of clearances and vias is important.
Materials and tools, preparatory work
It is good to make a stove from a metal barrel for storing petroleum products with a volume of at least 200 liters. This is a very cheap option. You can make a model in a few hours. You need to properly organize the workplace. The master always has a variety of locksmith tools at hand. In addition, you need to prepare:
- two metal pipes: 10-12 cm in diameter for air draft and 15-20 cm for chimney;
- metal corners (channels, blades);
- Electric welding machine, electrodes, protective mask;
- hacksaw machine:
- angle grinder (grinder):
- a set of locksmith and measuring tools.
First of all, we need to prepare the barrel. Wash thoroughly inside and out to avoid the generation of corrosive fumes when heated.
Making a long burning stove with your own hands
Cut off the top of the barrel with a grinder. It is desirable to process the cut by slightly bending the edges inward. Do not throw away the cut-off top, it will come in handy later. Cut a circle out of metal of such a diameter that it can freely pass into the barrel. Cut a hole on the circle for the air supply pipe. Weld the pipe (diameter 10-12 cm, length 15-20 cm more than the height of the barrel). Install a damper on the upper end to regulate the air supply. To increase the weight, weld corners (channels) to the back of the circle. Now we need to make a cover for the stove from the top of the barrel. To make it easier to clean the ash, you can make a firebox and ash pan. Cut two rectangular holes at the desired level of the barrel. Doors can be bought ready-made or made from cut-out parts. On the inside of the barrel, about 10 cm below the firebox, fix the corners for the grate (weld from fittings or buy ready-made).
Photo gallery: the creation process - from barrel to stove
-

The beginning of the furnace manufacturing process - Barrel preparation
-

Pipe for supplying air to the furnace - The piston for the stove is ready
-

Correct disk size - The piston freely enters the future potbelly stove
-

Potbelly stove details - Capacity, piston and lid for a stove
-

Long burning oven -
Potbelly stove collected
Chimney installation

Furnace equipment for long burning with a chimney
To determine the place of fixing the chimney, it is necessary to mentally divide the barrel into three parts. In the upper third, cut a hole equal to the pipe diameter (15-20 cm). To create a good draft, the length of the chimney should be 4-5 meters. Install next to the stove, conveniently on the legs. Weld the lower end tightly. Connect the stove to the elbow welded to the chimney, tighten it with a clamp, placing a glass cloth under it so that smoke does not leak out. Weld a ball valve under the pipe elbow. This must be done to drain the condensate. A collapsible chimney will make it easier to clean and repair.
Precautions and rules of operation
During the heating, the stove gets very hot

Safe use of a stove
It is desirable to make a reflector, moreover, it will improve the distribution of hot air flows. To increase heat transfer, you can overlay the stove with stones or bricks. I recommend installing it on the foundation. You can make it out of bricks and mortar. Keep flammable materials at a safe distance. The stove produces almost no ash, so it will need to be cleaned very rarely, using a scoop with a short handle. Over time, the metal of the case may burn out. It will have to be replaced with a new one.
Pyrolysis ovens can only be fired with wood (wood chips, sawdust). Liquid fuels will not have a long burning effect. In addition, toxic substances are thrown into the air and pollute the atmosphere. Before kindling, remove the lid and take out the piston. Firewood is laid on top, then chips and paper are placed. Ignite through a pipe supplying air. Open the flap and throw a lighted paper or rag inside (matches go out due to strong pull). When the wood is well lit, close the air supply. The combustion process goes from top to bottom.
Video: how a handmade potbelly stove works
The task is not difficult - to make a stove with your own hands. Determination in achieving a goal and a little creative ingenuity. Observe the technology, show perseverance and the fruit of your labor will serve for many years, creating a warm atmosphere.
Recommended:
Making A Buleryan (breneran) Stove With Your Own Hands: Advantages And Disadvantages Of The Design, A Device With Drawings, Instructions With A Video, Etc
Design and principle of operation of the "Buleryan" furnace (breran). DIY recommendations with instructions and drawings. Maintenance and operation
How To Make A Gazebo Out Of Wood With Your Own Hands - Step-by-step Instructions With Photos, Drawings And Video
A gazebo made of wood, who has not dreamed of having it? Now you have such an opportunity, read and get to work on making the structure yourself
How To Make A Steam Generator For A Bath (steam Gun) With Your Own Hands - Step By Step Instructions With Photos, Drawings And Video
How to make a steam generator and a steam gun for a bath with your own hands. Description of the device and its features. Instructions for creating a structure
Long-term Burning Stove (including Sawdust And Wood) With Your Own Hands: Diagram, Drawings, Etc. + Video
How does a long burning stove work. Production of a long-burning furnace from a gas cylinder and sheet metal. Features of operation and repair of furnaces
How To Make A Comfortable Computer Desk With Your Own Hands: Drawings, Diagram, Detailed Instructions + Video
Practical advice and recommendations for making a computer desk. Required materials and tools, step by step instructions
