Table of contents:
- Author Bailey Albertson [email protected].
- Public 2023-12-17 12:53.
- Last modified 2025-01-23 12:41.
Welding plastic pipes - a magical technology for creating a water supply system

Many people associate the word welding with sparks and bright light. Yes, this is indeed the case when welding metal structures, but today we will consider a completely different welding - joining plastic pipes using a welding machine.
I don’t know from anyone how, but when carrying out repairs on my own, with the advent of plastic elements of the water supply system and this welding technology, a mountain fell off my shoulders.
If someone remembers how difficult it was to make the water distribution in the bathroom with metal pipes or replace the radiators and tie them, he will understand me. What was needed was not just a welder, but a very qualified welder who knew how to cook very cool and high quality.
With the advent of this technology, everything has become much easier and any person can carry out the installation of the water supply system.
Let's consider the connection of plastic pipes using the example of the most popular material - polyvinyl chloride using an apparatus for welding plastic products. The main components of the installation are pipes, fittings and the welding machine itself.
Of the necessary tools, we need
1. Welding machine for welding plastic parts (in the common people nicknamed the iron).

It is a heating element with a handle and a stand that allows you to cook in any position. It has an adjusting wheel, which makes it possible to set the required heating temperature, a stand and holes in the heating element, which allow fixing nozzles of the required diameter.
2. Paired Teflon coated tips.

They are attached to a heating element and serve to simultaneously heat two parts to be welded. Depending on the diameter of the elements to be welded, the same diameter and nozzles are installed.
3. Cutting scissors.

These are special reinforced scissors, with the help of which the plastic, in fact, is cut off. The lower supporting jaw is fixed, the upper jaw is sharpened, descending to the lower one and making a cut. Cutting scissors allow you to cut very accurately and quickly.
4. Stripping tool (if aluminum reinforced pipes are welded).
They are a head with well-sharpened knives, with the rotation of which the upper reinforcing layer is removed. The depth of stripping to the stop in the head determines the welding depth.
With frequent welding work, it will be rational to purchase a complete welding kit sold in a suitcase. Its average price in 2012 ranged from 2,000 to 3,500 rubles.

The kit includes the following items:
- Heating element;
- Four sizes (20, 25, 32, 40 mm.) Teflon coated tips;
- Cutting scissors;
- Bolts for attaching nozzles to the heating element;
- Level;
- Heating element support;
- Hexagon for tightening bolts.
If the welding works are carried out one-time, it would be more rational to rent the equipment for welding (in 2012 the price ranged from 250-350 rubles per day).
Consider the process of connecting plastic pipes or welding them
We prepare the welding machine:
- set the temperature to 260˚; - we fix paired nozzles (if connections of different diameters are used, we install several pairs of nozzles); - we warm up the device to the desired temperature (when the operating temperature is reached, the indicator lamps will light up). 2. We prepare the pipe and fitting:
- degrease the welding points (if the pipe is reinforced, remove the top layer of aluminum);
- we measure the required length of the workpiece and cut it to the desired size;
- mark the alignment on the welded elements with a marker for the correct positioning of the fitting relative to all other structures of the water supply system.

We measure the depth of the nozzle into which the pipe will enter and mark this size minus 2 mm.
Step 1. We take the pipe in one hand, the fitting in the other and simultaneously insert them into the nozzles.

Fitting to the stop, pipe along the previously marked strip (not to the stop, otherwise the end will warm up and when connected, an influx on the inner diameter is formed) and we maintain a certain time (column heating time, sec). The specific holding time depends on the diameters of the products to be joined and is indicated in the table below. During heating, the rotation of parts on the Teflon nozzles is unacceptable.
| 14 | 25 | |||
| eighteen | 40 | 12 | ||
| 23 | 63 | 24 | ||
| 28 | ten | 90 | 40 | |
| 32 | 12 | After the parts have warmed up, we connect them together, maintaining alignment and observing our marks for the correct orientation of the fitting relative to our welded structure. We introduce the pipe into the fitting and very smoothly, without rotation, we make the connection. The connection time should not exceed the time indicated in the table for the selected diameter.
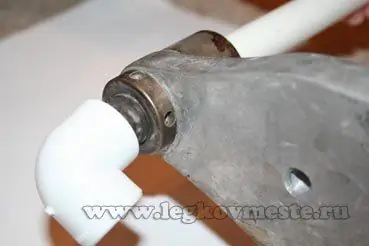
Step 3. We fix the welded unit until the material has completely solidified for the time indicated in the table (Column cooling time, min.). For the correct connection of plastic pipes, the following conditions must be observed:The welding machine must be warmed up to the operating temperature; The longitudinal axis of the pipe and the longitudinal axis of the fitting must match; After connecting the parts to each other, a uniform small influx of plastic should form on the pipe surface at the point of its abutment to the fitting; On the lumen of the connected parts from the inside, there should be no sagging that reduces the flow area; There should be no gaps between the elements to be welded. After welding, such a collar should form on the outer diameter of the pipe at the junction with the fitting. (see photo below). 
The pipe should be clear to the lumen without overflow on the inner diameter, as in the next photo. 
The welded connection of plastic pipes is very reliable and practical. Thanks to a huge selection of fittings and transitions, you can make almost any design, supply water to a bathtub, sink, toilet, make a drip irrigation system at your summer cottage. I will write in more detail about the types of fittings in the next article. That's all for me. I hope the article was helpful to you. See you, Vladislav Ponomarev. Video: "How to connect plastic pipes"PS Joke of the Day: - How many imperfections did you find in your new apartment? - While one! - Hurrah! This is a great result! Which one? - I just can't open the front door. Recommended:How To Wash Sneakers In A Washing Machine (including An Automatic Machine) Correctly, And Then Dry Your Shoes
Tips for washing sneakers in a washing machine step by step. Nuances, features, use of special products, drying rules Do-it-yourself Roof Gutters, Including From Plastic Pipes, How To Make And Install
Manufacturing of a drainage system from materials - from sewer pipes, galvanized steel, metal and plastic bottles. Calculations, assembly and installation Welding Linoleum Or How Cold Welding Of Linoleum Is Done
Welding linoleum with glue. Features when welding linoleum with glue. How to cold weld linoleum at the joints with your own hands Why You Can't Look At Welding
Welding arc and its radiation. Danger of welding for sight by types of radiation. Myths about the dangers of welding. Is it possible to get blind due to welding Signs About Getting Married In A Leap Year 2020: Why Astrologers Advise Against Joining The Knot
Where did the superstition come from that in a leap year one cannot marry. The opinion of astrologers. What to expect if you still decide to get married in 2020, and how in this case to avoid unpleasant consequences |
