Table of contents:
- Author Bailey Albertson [email protected].
- Public 2023-12-17 12:53.
- Last modified 2025-06-01 07:32.
Do-it-yourself roof gutters from scrap materials

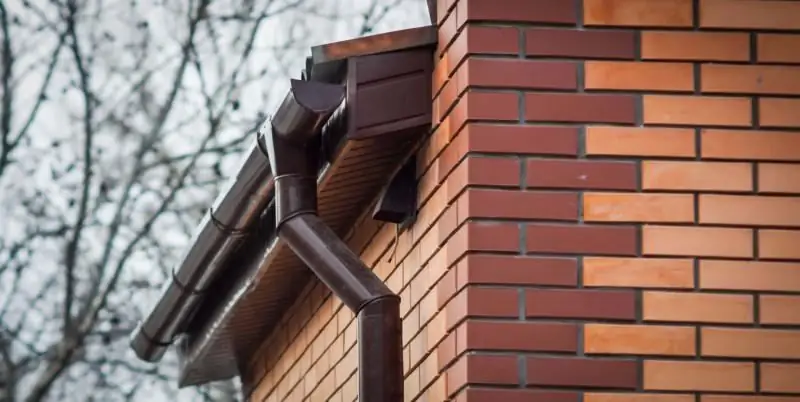
Any building needs high-quality drainage of atmospheric precipitation. The roof itself is sealed, and storm water and snow go away thanks to the slopes. But if the flowing moisture gets on the facade or foundation of the building, then they will become damp and wear out faster. Therefore, every building needs a drain. It is a protective structure consisting of a system of gutters located along the perimeter of the roof and outlet pipes.
Content
-
1 Why do you need a drain
- 1.1 Functions of the drain
- 1.2 Types of gutters
- 1.3 Materials for homemade gutters
-
2 Drainage from sewer pipes
-
2.1 How to make a drain with your own hands
2.1.1 Tools for work
-
-
3 Construction of the drainage system
- 3.1 Creating gutters
-
3.2 Manufacturing and installation of brackets
3.2.1 Video: installation of eaves brackets
-
3.3 Installation of external drainage pipes
3.3.1 Video: drainage from sewer pipes
-
4 Homemade galvanized steel gutter
- 4.1 Tools
-
4.2 Making a pipe from tin
4.2.1 Step by step instructions
-
4.3 Installation of a steel gutter
4.3.1 Video: metal gutter construction
-
5 Drainage from plastic bottles
- 5.1 Tools and materials for work
-
5.2 Step-by-step instructions for making an ebb from plastic bottles
5.2.1 Video: Plastic Bottle Chute
Why do you need a drain
An external gutter is a set of open gutters that collects moisture from the roof and directs it into vertical drain pipes. The places where the structure ends are equipped with containers for collecting water or storm sewers.

The gutter protects the house from the damaging effects of moisture
Functions of the drain
The drain performs the following functions:
- Protective. It consists in the disposal of wastewater from the walls and basement of the house.
- Decorative. A beautiful homemade gutter will become a decoration of your home or gazebo.
- Cumulative. With the help of such a system, storm water can be filled into a special reservoir for irrigation.
Industrial gutters are made of special plastic or galvanized steel and their cost is quite high. And if you add plugs, funnels, corners and elbows, then the price will double. Ready-made parts have their advantage - they are easy to assemble, like a constructor. To save money, the craftsmen found an alternative and began to independently manufacture drainage systems from improvised means, for example, from plastic sewer pipes. Therefore, if there is already a house or summer cottage, but there is no drain there, then you can risk making it yourself.

Homemade gutter can last for years
If you approach the matter wisely and choose the right material, then a homemade drain can be used as the main one
Types of gutters
The drain is of the following types:
- Outside or outside. This type is suitable for self-assembly.
- Internal, which is provided in the project. Most often, this type is installed on flat roofs; pipes made of any material are suitable for it.
Materials for homemade gutters
Previously, only metal was used to assemble the ebb systems. More often - galvanized or polymer-coated steel, less often - copper or aluminum. Now the range of suitable materials has increased significantly:
-
Galvanized steel gutters. They are durable, reliable, resistant to stress and temperature fluctuations. Their disadvantage is noise and corrosion.

Galvanized steel gutter Galvanized steel is one of the most popular gutter materials
-
PVC ejection systems. They are characterized by low weight and low noise, are easy to assemble and resist temperature extremes well.

PVC gutter PVC gutter - reliable and quiet
-
Drainage systems from sewer pipes. Thanks to their convenient installation and a wide variety of adapters, such pipes have become an excellent replacement for industrial PVC gutters.

Sewer drain Sewer pipes are excellent gutter material
-
Ceramic pipes and gutters. They will need special clay and pottery skill.

Ceramic pipes Ceramic pipes are very durable
-
Ebb from plastic bottles. They are quick to install, but suitable as a temporary alternative.

Ebb from plastic bottles Bottle plastic is the most affordable material for creating drainage
-
Wooden gutters. Made by hand, they last a long time only in the case of special processing.

Wooden gutter Wooden gutter is very decorative
-
Copper drains. Suitable for long-term use, but over time they become covered with a patina.

Copper gutter Copper gutters look noble and prestigious
Sewer drain
For the hand-made manufacture of a standard drainage system, plastic pipes for sewage are often used. They have a number of undoubted advantages:
- affordable price;
- a wide range of pipes and adapters, as well as all kinds of fastening mechanisms;
- light weight, which facilitates transportation and installation;
- the possibility of self-cutting;
- durability.
Since such pipes come in different colors, you need to figure out which ones are recommended to be used to equip the drainage system:
- White. This type of pipe is used only indoors, when pipes of a different color do not fit into the interior. They are not suitable for external installation.
-
The gray ones. These pipes are more durable, but they do not withstand stress and are not intended for use in cold weather. Suitable only for regions with warm winters.

White and gray pipes White and gray pipes are not suitable for outdoor installation
-
Brown or red pipes. They are recommended for outdoor drainage, as they tolerate low temperature and water pressure well. They cannot stand the long exposure to sunlight and become fragile over time.

Red sewer pipes Brown pipes are most suitable for drainage
How to make a drain with your own hands
Before purchasing pipes, a diagram of the entire system is drawn up, including all parts of the structure and their number:
- roof gutters (length is calculated based on the perimeter);
- drain pipes - one per 10 m of the gutter;
- brackets - 17 pieces per 10 m;
- bends - by the number of drains;
- funnels - by the number of sinks;
- stubs;
- corners (the number depends on the type of roof);
- connecting elements for gutters, they need 1 less;
- knees - depending on the complexity of the scheme;
- adapter couplings;
-
outlet for the stormwater inlet or mark.

Elements of the drainage system The easiest way to install a drain from plastic pipes
The cross-section of the pipes is selected based on the area of the roof slope. You can use the following scale:
- slope area up to 50 sq. m - pipe diameter 8 cm;
- up to 125 sq. m - 9 cm;
- more than 125 sq. m - 10 cm.
The rest of the elements are purchased based on the diameter of the pipes from which the gutters are made.
As already noted, before purchasing materials and installing a drain, it is necessary to draw a detailed diagram in which the following should be noted:
- roof perimeter;
- length and number of gutters;
- attachment points for brackets, joints and funnels;
- location of drains.
Based on the perimeter of the roof, the footage of the pipe for future gutters is determined. Since it is cut in half and two pieces are obtained from one blank, the required pipe length will be equal to half of the roof perimeter. Next, the number of drainage pipes is calculated. For this, a plan is drawn, on which all elements are marked. The distance between them cannot exceed 5 m. After determining the number of gutters, their length is calculated, for which the distance from the eaves overhang to the ground is measured. This will be the estimated height of the riser. This figure is multiplied by the number of parts and the desired pipe length is obtained. Tees connecting the gutters and risers are calculated next on the project. If the risers deviate at an angle, ready-made adapters are purchased. And also a special universal joint sealant is required.
Tools for work
For work you need:
- self-tapping screws for wood;
- screwdriver;
- grinder, jigsaw;
- hacksaw for metal;
- screwdriver;
- construction cord;
- level and tape measure;
Scaffolding will also be needed.
Construction of a drainage system
After purchasing the materials, you can begin to manufacture and assemble the drainage structure.
Create gutters
To make a gutter from the pipe, it should be cut in half. This can be done with a grinder by choosing a diamond-plated disc and segments. Then the plastic will not melt during cutting. You can also use an electric jigsaw. For convenience, you need to design something like a guide and fix it on the workpiece so that the cut is even. It can also be done with a simple hacksaw. A ruler attached to the workpiece with tape, or a thread pulled over self-tapping screws screwed into the pipe from both ends, can act as a guide. The pipe sections entering the tee are not sawn. This ensures reliable connections.

One plastic pipe makes two gutters
Manufacturing and installation of brackets
Brackets are used to secure the gutters. You can buy them or make your own from strips of sheet metal, bending to the size of the gutter. The bracket is the basic component of the outdoor gutter that supports the gutter. With the help of hook-shaped holders, the configuration of the intake circuit is formed.
The brackets can be made independently from a strip of steel with a thickness of at least 2 mm, because they must be reliable. You can purchase ready-made strips for electrical work. Their section is initially suitable, it remains only to cut the blanks along the length.
Workpiece size:
- length 40 cm;
-
width 2 cm.

Bracket made of steel To make a bracket out of steel, you need to make a workpiece with the correct dimensions
To ensure that all brackets are the same, you can use a steel strip bending tool or a steel pipe of the correct size as a template. It is also recommended to fill nails on a thick board in the desired sequence and bend the holder using a piece of pipe as a lever.
After shaping, holes are drilled in the brackets - two for attaching to the cornice, the next two for attaching the gutter. Finally, the holders are painted with rust paint - it is more durable. The brackets are attached in several ways:
- to the crate. It is carried out at the stage of roof installation and such fastening is considered the most reliable, because the brackets hold elongated clamps that fix them at two points;
- to the frontal boards. This method is used when the roof has already been installed;
-
to the rafter legs. This option is relevant if there are no frontal boards.

Gutter brackets Brackets - base for gutters
Brackets are mounted taking into account the following principles:
- The gutter is mounted with a slope towards the drain and must protrude over the edge so as to catch the flow of water.
-
The far edge of the entire system should be located below the roof plane.

Mounting the bracket on different types of overhangs Bracket attachment depends on overhang
Having chosen the method of fixing the brackets, you can get to work:
-
The first are the two extreme brackets, between which the required slope is maintained.

Mounting brackets The two outer brackets are attached first
- A cord is stretched between the fixed brackets, and along this line, places are outlined for attaching all other elements.
-
The brackets are screwed to the base with a pitch of 550-600 mm.

Securing the brackets The distance between the brackets is 5-6 cm
-
Next, plastic adapters or funnels of the future drain are mounted. One funnel is capable of collecting water from 120 m of the roof.

Funnel installation The hole for installing the funnel is cut with a hacksaw
-
Gutters are installed. They gather both on the ground and under the roof. The main thing is to correctly connect the joints. They are attached with glue or docked with special aluminum clips. In case of docking, the use of a sealant is mandatory. Bracket mounting height varies by region. If there is little snow in winter, then you can fix it wherever it is convenient. Otherwise, the gutter is lowered so that the snow coming down from the roof does not carry the drain with it.

Installing gutters The gutters are joined by clips or put on glue
-
When the gutters are assembled and rest on the brackets, the adapter pipes made of solid pieces of pipes are inserted into tees or drain funnels. Before that, they are treated with a sealant. At the upper end of the drain system, a plug is always installed.

Mounting the plug The plug is installed on a rubber seal
Video: installing eaves brackets
Installation of external drainage pipes
Assembling downpipes looks the same as connecting gutters. If the pipe is lengthened, then an adapter is placed between the segments on the sealant. The process requires compliance with a number of rules:
- the drainpipe should extend 10 cm from the wall;
- for fastening to walls, you need to use clamps;
- the pipe should be mounted from top to bottom;
- Insert the upper section into the funnel and secure with sealant.
If necessary, the riser pipe can be connected to the storm drain adapter. It is recommended to replace it with a knee, under which a container for flowing water is placed.

The installation of the downpipe must be carried out in accordance with the rules
It is recommended to additionally protect the finished gutter from littering by installing a building mesh rolled into a roll in the gutters. The diameter of the rolled roll should be slightly less than the diameter of the pipe from which the gutters are made. The protection is fixed with plastic clips.

The drain can be protected with a mesh of different materials
Video: drainage from sewer pipes
Homemade galvanized steel gutter
The creation of a drainage system from galvanized steel requires certain knowledge and skill. Roofing sheet steel of 0.5-0.7 mm is usually used. It should not be less than 270 g per sq. m.
Tools
You need to prepare:
- scissors for metal;
- marker for marking;
- hammer and mallet;
- pliers.
Making a pipe from tin
Pipes are a simple element of a drainage system and are very easy to make at home. For work, galvanized steel sheets or thin sheet metal are suitable. The manufacturing method for these materials is the same.

Steel pipe is easy to make by yourself
Step-by-step instruction
The work is carried out in the following sequence:
-
Calculation of the amount of materials and their purchase.

Metal sheet for downpipe The weight of the steel sheet must be at least 270 g per sq. m
-
A sheet of metal laid on a flat surface is cut to the size of the gutters and pipes of the future drain. The width of the workpiece for the pipe should have a margin of one and a half centimeters to join the edges. A fold line is also applied - on one side at a distance of 0.5 cm, and on the other - 1 cm. Before shaping, the workpiece can be painted to extend its service life.

Steel drainpipe blank To make the downpipe last longer, it can be painted
- With the help of pliers, the pattern is bent from the smaller side at an angle, and from the larger side - the letter G.
- The metal is leveled with a mallet at a right angle. The sides of the workpiece are connected, and the smaller part should go into the larger one.
-
A cylindrical or semi-cylindrical workpiece can be manually formed using a template. A sheet of metal is laid on a pipe or log of the required diameter and tapped with a mallet.

Production of galvanized pipes You can also shape the drain pipe with your own hands.
Installation of steel gutters
The principles of the galvanized metal gutter system are similar to the installation of the gutter from plastic pipes. But there are also differences:
- After determining the starting point, the gutter brackets are mounted.
- Metal gutters are overlapped with a length of 7-10 cm. The overlap is designed to compensate for the expansion of the metal in the summer.
- Funnels are installed, which should be located between the brackets. Holes for funnels are cut with metal scissors.
- The funnels are connected to the pipe at a sufficient distance from the wall.
- The pipes are fixed with clamps.
- The ebb is attached to the bottom of the pipe.
- An anti-icing system is being installed.
Video: metal gutter construction
Drainage from plastic bottles
The cheapest and easiest option is to create a drain from a plastic container. It will be easy to accumulate the required amount of such material, but the design will require 1.5-liter straight-shaped bottles. In addition to them, you will need wire and brackets.

Bottled plastic gutters are quick and cheap to assemble
Tools and materials for work
It is worth preparing:
- furniture stapler and staples 10-12 mm;
- construction knife;
- drill or screwdriver;
- thin drill;
- wire;
- awl;
- plastic containers.
Step-by-step instructions for making an ebb from plastic bottles
- The first step is to calculate the length of the future drain. For convenience, you can draw a sketch. The functional part of the bottle will be 15-20 cm. This plastic is not suitable for long (more than 5 m) structures.
- The bottles are cleaned of stickers and labels.
-
Then the bottom and the neck are cut off from the plastic container in the place where the upper part narrows. For the gutter, the resulting cylinder is sawn in half.

Plastic bottle A plastic bottle needs to be prepared in order to make a drain out of it
-
The gutter is assembled from plastic rectangles using a stapler. The plastic is overlapped (1.5 cm) and fixed with two or three brackets. The bottoms are used as plugs for rotary structures.

Plastic bottle gutter You need to fasten the parts of the bottles for the gutter with a stapler
- The resulting light gutter is attached to the roof. To do this, holes are drilled in the slate or other roofing material at a distance of 20-30 cm. Similar holes in the gutter are made with a screwdriver or an ordinary awl. Next, a wire is passed through the holes, which attaches the weir to the roof.
-
The drainage system is also easily constructed from bottles. We cut off the neck of one of them, and from the rest we make the already familiar cylinders. A bottle with a cut-off neck will act as an adapter - you will need to make a hole in it for the edge of the gutter.

Drainage from plastic bottles A ready-made construction of plastic bottles will last about a year
The finished structure will last at least a year, but then you have to take care of creating a more perfect system.
Video: plastic bottle gutter
It is obvious that self-construction of a drainage system is available to anyone who wants to equip their home with an economical and practical design.
Recommended:
Joining Of Plastic Pipes By Welding - Installation Of Plastic Pipes Using A Welding Machine
Welding plastic pipes with your own hands. Replacing the plumbing in the bathroom and kitchen with your own hands using a plastic pipe welding machine
Plumbing Installation - How To Install Plastic Water Pipes With Your Own Hands
Plumbing installation from plastic pipes. How to properly install plumbing in the bathroom and kitchen. Do-it-yourself little tricks when installing a water supply system from plastic pipes
How To Make A Roof For A Bathhouse, Including With Your Own Hands, As Well As The Features Of Its Design And Installation
Types of roofs in baths and features of their design. The choice of materials for this design. Roof construction for a bath. Bath roofing repair
How To Make A Roof On A Balcony, Including The Features Of Its Device, As Well As How To Repair A Roof
How the roof of the balcony is arranged and what materials are needed for its manufacture. The procedure for installing the roof of the balcony and the technology for eliminating breakdowns
Heating Of The Roof And Gutters, Including How To Properly Install The System
Causes of roof and gutter icing. How to deal with roof icing. Selection and installation of roof heating systems. Rules for their operation and maintenance
