Table of contents:
- Heating the roof and gutters: installing an effective do-it-yourself snow melting system
- Reasons for icing the roof and how to eliminate them
- Roof and drain heating system: device and features
- How to choose a roof and gutter heating system
- How to install an anti-icing system
- Recommendations for the maintenance and operation of roof heating systems
- Author Bailey Albertson [email protected].
- Public 2023-12-17 12:53.
- Last modified 2025-06-01 07:32.
Heating the roof and gutters: installing an effective do-it-yourself snow melting system

The snowy winters, which bring so many pleasant moments for adults and children, bring many problems to public utilities and private house owners. And if the accumulation of snow on roads, sidewalks and garden paths is relatively easy to remove, then the fight against snow deposits and the formation of ice on the roof requires a disproportionately large expenditure of effort, time and money. Not a single caring owner will let such a situation take its course, because ice build-ups on the cornices and drainage elements not only pose a danger to others, but also contribute to the rapid destruction of the roof and facade. A system that will melt the snow in time and prevent ice from forming on the roof will be able to correct the situation.
Content
-
1 Causes of roof icing and how to eliminate them
- 1.1 Mechanical removal of snow and ice
- 1.2 Use of ultrasonic, laser and electrical impulse anti-icing systems
- 1.3 Application of chemicals
- 1.4 Roof heating
- 2 Roof and gutter heating system: device and features
-
3 How to choose a heating system for roofs and gutters
3.1 Video: How Self-Regulating Cable Works
-
4 How to install the anti-icing system
-
4.1 What places on the roof need to be heated
- 4.1.1 Eaves and straight roof sections
- 4.1.2 Endows
- 4.1.3 Elements of the drainage system
- 4.2 How much heating cable is needed for roof heating
-
4.3 DIY installation of a roof and gutter heating system
4.3.1 Video: how to make your own gutter heating
-
- 5 Recommendations for the maintenance and operation of roof heating systems
Reasons for icing the roof and how to eliminate them
Of all the factors affecting the durability and integrity of a roof, ice formation is the most damaging. Frost is formed from the water that appears on the roof in winter under certain conditions:
- alternation of positive and negative ambient temperatures, which contributes to the constant melting of snow;
- complicated roof structure with a large number of inner corners, turrets, collars and horizontal platforms on which snow caps accumulate;
- imperfect roof insulation system, contributing to heat loss through the ceiling. On a roof with high heat losses, the bottom layer of the snow cover melts even at negative outside temperatures.
I must say that even on a roof built according to all the rules, snow accumulations melt under the influence of solar energy. Water, as it should be, should enter the gutters and leave the roof, but at negative air temperatures, it does not have time to reach the ground, freezing in cold funnels, gutters and pipes. The process proceeds like an avalanche - over time, the ice crust reaches such a thickness that it completely overlaps the flow sections of the elements of the drainage system.

Snow melting in winter often leads to an avalanche of water from the roof, which immediately freezes and blocks the drainage channels
The danger of this phenomenon is as follows:
- water enters the roofing layer, where, when frozen, it expands and destroys the coating materials;
- moisture contributes to the decay of insulation and wooden elements of the roof truss system;
- snow and ice create an increased load on the roof, reducing its service life;
- water runs down the façade and damages the finish, walls and foundations;
- icicles and ice blocks form on window sills, cornices and other external details of buildings, which pose a danger to the lives of others and can cause damage to vehicles and other material values.
There are several ways to combat the formation of ice on the roof surface today.
Mechanical removal of snow and ice
Mechanical cleaning for a long time remained the only way to get rid of snow piles and ice. It would seem to be the simplest and cheapest option, right? In fact, work on the roof will require a staff of trained employees, special equipment and the need to block sidewalks (and in some cases, roads). However, this is not the main disadvantage of manual cleaning. The danger of this method lies in the fact that shovels, scrapers and ice axes, even with the most careful handling, inevitably damage the roofing and the drainage system.

For mechanical cleaning of roofs from snow, industrial climbers are often attracted
Use of ultrasonic, laser and electric pulse anti-icing systems
In ultrasonic installations, ice breakdown occurs due to a powerful pulse at frequencies from hundreds of kHz to several MHz. Devices operating on this principle are used only due to very low energy consumption, since otherwise the ultrasonic destruction method has many disadvantages, including the high cost of equipment (up to 200 euros per 1 m of cornice), negative impact on humans and high operating costs.
Even more investments are required for laser equipment using power plants pumped with CO 2 and a beam power of up to 250 W. Nevertheless, it also finds its application in strategically important objects of the national economy.
Electric pulse installations were first used in 1967 to prevent icing of the fuselage and wings of aircraft. A little later, such anti-icing systems began to be installed on buildings. The electric pulse cleaning method consists in the installation of conductors on drainage funnels, gutters and pipes. Several times a day, the installation transmits an impulse to prevent ice formation. The rather high cost of protecting one running meter of drainage (from 20 to 60 euros) and considerable maintenance costs limit the use of this method, even despite the ultra-low energy costs (the power consumption of the installation is from 20 to 50 W).
Application of chemicals
Protection with chemical means is that the roof planes are covered with a special emulsion that prevents the crystallization of the liquid and the transition of the substance into a solid state. The use of special reagents is a rather expensive technology, their duration is still short, and application requires special equipment and trained personnel. That is why this method is justified only if it is not possible to use other options.

Chemical reagents successfully cope with melting snow and ice, but have a high cost
Roof heating
Heating systems for the most problematic areas are based on the properties of conductors with high internal resistance to heat up when an electric current flows. The simplicity and low cost of such anti-icing systems contributes to the growth of their popularity among owners of private houses, so we will tell you more about this method.
Roof and drain heating system: device and features
Heating the most problematic areas of the roof and gutters helps prevent the formation of ice, eliminate the danger of snow accumulation and ensure timely removal of moisture in winter. The performance of the anti-icing system is ensured by electric heating cables equipped with:
- flat roof surfaces at eaves and drainage elements;
- valleys;
- gutters;
- funnels and trays that are used to collect water;
- drain pipes.
For the efficient operation of the drain, it is also necessary to equip potentially dangerous elements of the drainage system with heating cables - places for water redistribution near storm sewers, trays, gutters, adjacent to the soil surface, etc.

Heating cables are located in the most problematic areas of the roof and drain
The design of snow melting systems is in many ways similar to the installation of electric warm floors. System performance is ensured by:
- separate circuits from the heating cable;
- signal and power conductors;
- humidity and temperature sensors;
- automatic control and protection devices.
In the simplest roof heating systems, a mechanical or electronic thermostat is used to turn on the heaters. The voltage supply is carried out only depending on the condition of the temperature sensor on the roof, therefore, it is possible that the roof will be heated in the absence of snow. Most often, simple anti-icing systems are used in manual mode, drawing conclusions about the need to turn them on based on visual observations.

In addition to heating elements, the snow melting system includes a control unit, sensors, signal and power wires
More expensive designs involve the installation of a control unit, which decides on the need to turn on the heaters based on the readings of temperature, moisture and precipitation sensors. Heating occurs only when the roof and gutter elements are covered with snow and ice. In this case, the water sensor should signal the minimum humidity, which is possible only when the liquid goes into a solid state of aggregation. As soon as the ice melts, the signal sensor gets wet and the electricity supply is cut off. Such systems are economical, and their operation does not require human participation.
It should be remembered about the most "advanced" installations of snow melting, which analyze not only temperature and humidity, but also data from the meteorological station, which is part of them. Intelligent systems are devoid of inertia and can work "ahead of the curve", therefore they are the most efficient and economical.
How to choose a roof and gutter heating system
Roof heating systems use a resistive or self-regulating heating cable with a heat output of at least 20 W per linear meter.
-
The heat-generating element of a resistive heater works on the principle of ohmic losses in a conductor and consists of one or two metallic conductors with high internal resistance. A protective layer of heat-resistant plastic, reinforcement with a metal braid and a top coating of durable and plastic PVC make the cable invulnerable to moisture and mechanical stress. The heat dissipation of the resistive heating element reaches 30 W / m, and the temperature reaches 250 ° C. These parameters, as well as the resistance of the internal conductors, are constant, therefore the heat transfer along the entire length of the heating cable does not change. The advantage of this type of heater is its simplicity, low cost and stability of characteristics. The disadvantages of resistive technology are:
- high power consumption;
- the possibility of local overheating in places of overlap and accumulation of debris;
- the need for accurate calculation of the length of the heaters;
- cable length restrictions;
-
failure of the entire circuit due to burnout of the heater in one place.

Resistive cable device A resistive cable has a simple device and a low price, but it consumes a lot of electricity and often fails.
-
The self-regulating cable is devoid of the above disadvantages. Unlike a resistive heater, its current-carrying conductors are located in a layer of a special thermoplastic with many graphite inclusions. The grains of carbon form a long chain, playing the role of parallel variable resistors in it. The resistance of the polymer matrix depends on the temperature, therefore, the degree of heating is adjusted in automatic mode. Above the self-regulating cable is protected by a double thermoplastic sheath, between the layers of which there is a mesh metal screen. The maximum length of a self-regulating cable for connecting to a 220 V network is 150 m. If it is necessary to increase the heated area, use several circuits connected in parallel.

Self-regulating cable device Self-regulating cable has a temperature-sensitive braid and adjusts the degree of heating automatically
The disadvantages of high-tech heaters include higher cost and instability of parameters over time. During operation, the conductive properties of the polymer matrix decrease and the thermal power of the cable decreases.
It is best to use both types of cables to build a durable, efficient and economical roof heating system. In this case, a resistive heater should be installed in areas of a large area and length - it is there that its high specific power will be fully demanded. The self-regulating cable is ideal for equipping drainage elements - funnels, gutters, pipes and trays.
To switch heaters of a budget heating system, you can use a simple thermostat with built-in solid-state or electromagnetic relays. It can be used to adjust the boundary temperatures for switching on and off the heaters. If the power of the heating cables exceeds the permissible load, then intermediate switching equipment is used to connect them - contactors, magnetic starters, etc.

In a simple system with a control thermostat, a resistive cable with one or two conductors can be used)
A more advanced system can be built using controllers with a weather station. In this case, it will be necessary to install not only temperature sensors, but also sensors showing the presence of precipitation, humidity, etc. This option will cost much more than a design with a thermostat, but it is he who is recommended by experts for areas with high humidity.
Video: How Self-Regulating Cable Works
How to install an anti-icing system
Before proceeding with the installation of a snow melting installation, you should determine the most problematic areas of the roof and calculate how much cable is required to heat them. Knowing the specific power of 1 running meter of the heater, it is not difficult to calculate the total power consumption of the system. These data will be required in the future when selecting switching and protective equipment.
What places on the roof need to be heated
In order to make the “anti-ice” system productive and at the same time economical, the roof structure should be analyzed and zones on it should be identified, the heating of which will allow timely and efficient removal of precipitation from the roof. First of all, the heating system should cover the most problematic areas.
Eaves and straight roof sections
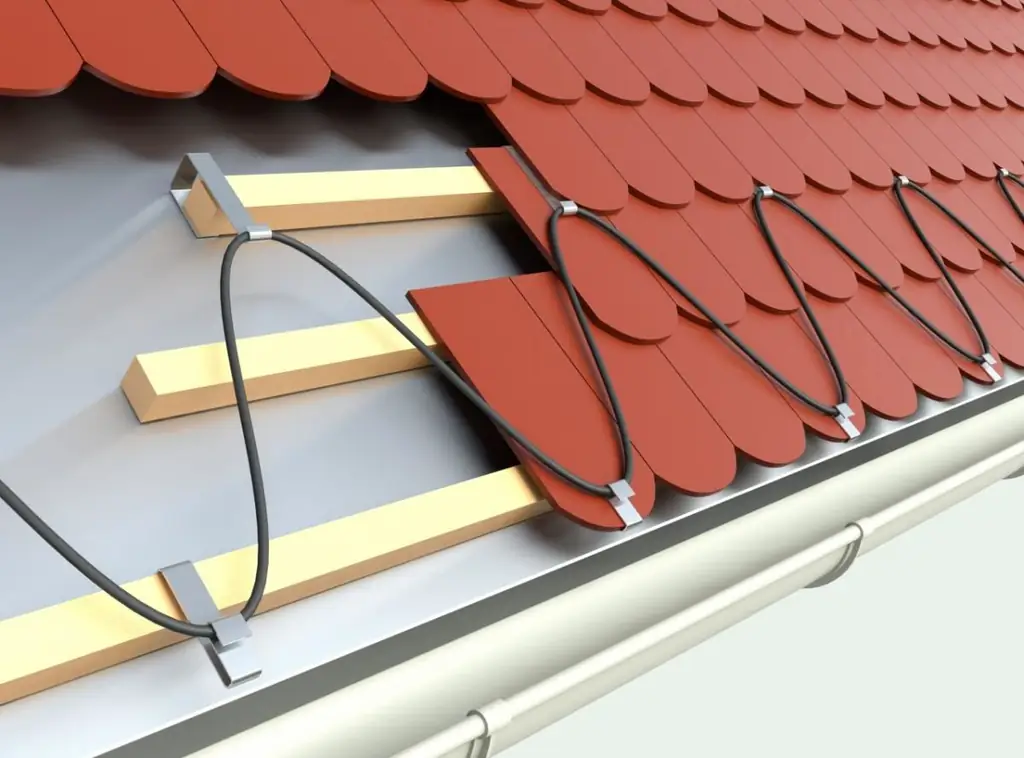
The decision on the amount of heater and how to install it depends on the slope of the slope. On surfaces with a slope of up to 30 °, the cable is mounted with a "snake", covering the cornice and the lower section of the slope at a distance of at least 30 cm from the projection of the bearing wall. On more gentle slopes of the roof, the cable is additionally equipped with the junction points to the drainage funnels. In this case, the heated area must be at least 1 m 2. It is enough to equip the abutments and parapets with one heater branch laid along the structure.

When heating roofs with a slope of up to 30 degrees, the heating element is laid in a snake along the eaves
Endows
Endovs (gutters) are areas in which adjacent roof slopes are joined. Like any internal corners, they are primarily subject to the formation of snow caps, and during snow melting they pose a risk of flooding the roof space. To heat the gutter, one or two loops of the heating cable are enough, which is equipped with from 1/3 to 2/3 of the valley in its lower part. The heater step depends on the specific power and varies within 10-40 cm.

The grooves are heated with several parallel heating cable lines
Elements of the drainage system
In trays and gutters, two parallel cable branches are used, which are fixed at the very bottom. The funnels and areas around them are equipped with a heater in such a way as to cover an area within a radius of at least 50 cm. In this case, the heater should descend along the water distributor in the form of a loop with two parallel lines on opposite sides and penetrate below the upper overlap line. The roof sections near the water cannons are also equipped in the same way, with the only difference that the heater is laid along the bottom of the water collectors.

Heating of gutters requires the utmost attention, since it most of all affects the efficiency of the snow melting system
When laying the heater in a vertical drain, a loop is constructed in its lower part. The cable is attached to the walls of a pipe or a steel cable - it all depends on the length of the downpipe.
How much heating cable is needed for roof heating
Knowing the specific power of 1 running meter of the heating cable, it is easy to calculate how much heater is required to heat a particular section of the roof and drain. Experts recommend calculating the thermal power based on the following practical data:
- along the gutters and valleys, you will need 250-300 W of thermal power per 1 m 2;
- for heating cornices - not less than 180-250 W / m 2;
- in pipes and trays, the diameter or width of which is more than 100 mm - 36 W / m;
- in pipes and trays with a width or diameter of less than 100 mm - 28 W / m.
Based on the roof diagram with the applied dimensions, the packing density and the heating element consumption in meters are established. To calculate the total electrical power of the heating system, the found value is multiplied by the value of the specific power of one running meter of the heating cable.
The procedure for installing a roof heating system and gutters with your own hands
Installation is started only after the roof surface is completely cleaned of leaves, dirt and debris accumulated there. You should carefully inspect the places where the heaters will be installed. All protrusions and sharp corners that could damage the sheathing of power, signal or heating cables must be smoothed out.

Before starting work, it is necessary to draw up a detailed diagram of the location of sensors, heaters and automatic devices for the roof anti-icing system
Installation work is carried out in strict sequence.
-
Install sensors for precipitation, temperature and humidity. The former are located in the open air, while the latter are fixed at the bottom of the gutters and at the edge of the areas adjacent to the funnels. Thermal sensors are fixed so as to exclude the influence of solar radiation on them, as well as heat from internal engineering systems.

Installing a humidity sensor Signal sensors are located in places that are primarily covered by melt water
- Signal wiring and power cables are laid using special plastic brackets and plastic ties. All conductors are checked for breakage, and the supply circuits are also checked for insulation resistance, which should be at least 10 megohms / m.
-
According to the previously developed scheme, heating elements are laid out on the surface of the slopes. Their fixation is carried out using the brackets and clamps provided by the manufacturer, but if there are none, you can also use perforated tape for fastening the plasterboard profiles. It is necessary to eliminate the possibility of sagging cables and make sure that the resistance heaters do not overlap. When using handicraft clamps, you must be extremely careful not to damage the sheath of electrical cables. Protective structures should be installed in places where cables and sensors can be damaged by snow caps and blocks of ice coming off the slopes.

Bracket for heating cable For mounting the heating cable, special clamps and perforated tapes are used
-
Installation of heaters in the elements of the drainage system is carried out sequentially, starting from the vertical elements of the structure and ending with water collectors. First, the heaters are mounted in the drainpipes, for which the cable loop is fed inward and fixed with steel clamps near the water intake. Next, the parallel lines of the heating element are fixed at a distance of 5 cm at the bottom of the vertical drain from the side of the house. The cable should be laid in the funnel and secured in a ring. If the vertical drain consists of several pipes, then the cable must be fixed with steel clamps at the beginning and end of each section.

Heating cable laying diagram The heating cable inside the downpipe is attached to the cable lowered into it, as well as to the drain at the beginning and end of each section
- Junction boxes and control cabinet are installed.
- The ends of the cables are connected according to the connection diagram and carefully insulated.
-
The control unit for the snow melting system is installed and power cables and outputs of signal sensors are connected to it. The control cabinet is connected to the protective earthing circuit, automatic switches and RCDs are mounted.

Roof heating wiring diagram The roof de-icing system must be connected to the electrical network through an RCD and a circuit breaker
- Connect the system to the electrical network.
The test of the roof and gutter heating system is carried out at sub-zero temperatures. First, a test switch is performed and the current strength in all circuits is measured. If there are large discrepancies with the calculated values, the causes of the malfunction should be found and eliminated. After that, the system is tested for 1-2 hours, observing how timely the heaters are turned off.
Video: how to make heating gutters with your own hands
Recommendations for the maintenance and operation of roof heating systems
In order to ensure a long and trouble-free operation of the equipment, random people should not be allowed to service it. Workers must be instructed (including in safety precautions) and have appropriate qualifications. The heating system for roofs and gutters is a fairly reliable structure, but it will please with its trouble-free operation only with high-quality and timely maintenance.
To do this, at the beginning of each season, the roof surface is freed from fallen leaves and other debris - it is this that causes the heaters to overheat. For work, use only soft brushes and brooms, otherwise the insulation of the cables can be damaged. After the places where the cables and sensors are installed are cleaned, a thorough inspection of the protective sheaths of the conductive elements is performed. If necessary, the insulation is restored, and the heavily damaged sections of the cables are cut out and replaced.

Fallen leaves and other debris are the most common cause of overheating of heating elements.
Inspection should be made quarterly to ensure that the sensors, heaters, and retaining cables are securely attached. Since the system operates at high voltages, the earthing points are periodically audited and the operating speed of the residual current devices is checked.
To install snow melting devices, it is not at all necessary to contact specialized companies. You can do the work on installing the heating system for the roof and gutters with your own hands. Everything that is needed for this can be purchased as a kit or as separate parts and assemblies. The key to successful work will be the skills of electrical work, the utmost accuracy and compliance with safety rules.
Recommended:
Roof Gutters: Types, Elements And Purpose Of Drainage Systems, Do-it-yourself Device
What is a drainage system. What elements does it consist of. How to calculate the correct amount of gutters. Installation, operation and repair rules
Do-it-yourself Roof Gutters, Including From Plastic Pipes, How To Make And Install
Manufacturing of a drainage system from materials - from sewer pipes, galvanized steel, metal and plastic bottles. Calculations, assembly and installation
The Rafter System Of A Gable Roof For Corrugated Board, Including Its Scheme And Design, As Well As Installation Features
The rafter system of the gable roof, its design and calculation, as well as the main components. Stages of construction, step of rafters and installation of crate for corrugated board
Gable Roof Rafter System, Including Its Layout And Design, As Well As Installation Features

Features of the design of a gable roof. Material selection criteria. Installation of a gable rafter system. Types of connections of the main nodes of the roof
Installation Of The Drainage System, Including With Your Own Hands, As Well As How To Install It Correctly If The Roof Is Already Covered
Do-it-yourself installation of the drainage system. Features of the installation of internal and external gutters. Possible installation errors and their consequences
