Table of contents:
- Umbrella over the entrance to the house: polycarbonate canopy
- Pros and cons of a polycarbonate visor
- Polycarbonate types suitable for canopy
- Polycarbonate door canopy frame structures
- Making a visor from a transparent material
- Repair of a polycarbonate visor
- Reviews on the use of polycarbonate for the construction of a canopy
- Author Bailey Albertson [email protected].
- Public 2023-12-17 12:53.
- Last modified 2025-06-01 07:32.
Umbrella over the entrance to the house: polycarbonate canopy

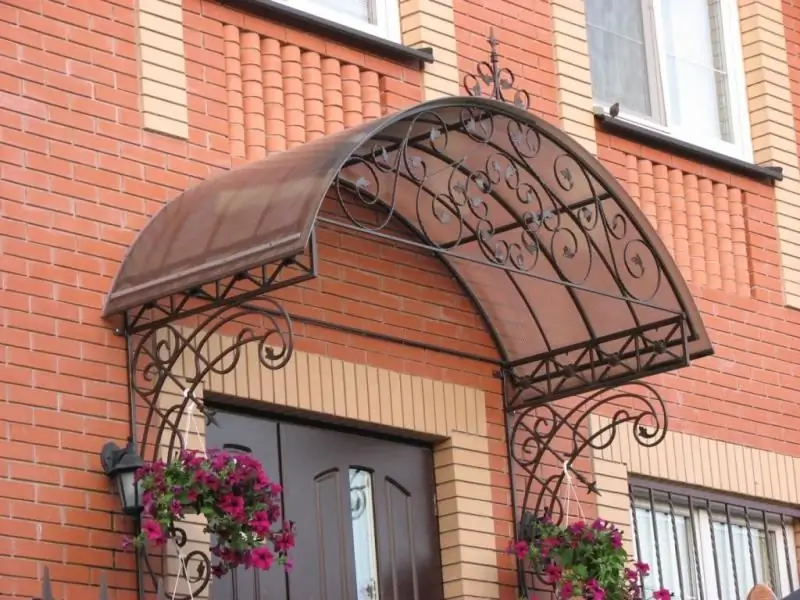
In the polycarbonate visor, practicality is skillfully combined with aesthetics. Without a canopy, the entrance to the house looks boring. And with a visor, especially made of a transparent, but not at all fragile material, it takes on the appearance of not only a finished, but also an interesting architectural composition.
Content
- 1 Pros and cons of a polycarbonate visor
- 2 Kinds of polycarbonate suitable for canopy
-
3 Polycarbonate door canopy frame structures
3.1 Table: Forms of the frame for the visor and their properties
-
4 Making a visor from a transparent material
- 4.1 Tools and materials
- 4.2 Design
- 4.3 Frame construction
-
4.4 Installation of a polycarbonate canopy roof
4.4.1 Video: how to attach polycarbonate to a metal crate
- 5 Repair of the polycarbonate visor
- 6 Reviews on the use of polycarbonate for building a canopy
Pros and cons of a polycarbonate visor
The polycarbonate canopy above the entrance has the following advantages:
- simplicity of design - it does not clutter up the space and does not require large labor costs;
- non-standard look. Sheets of flexible material can take any shape, even an arched shape, thereby protecting the area at the front door from oblique rain;
- strength. If the canopy is covered with sheets of at least 6 mm thick, it will be resistant to the pressure of snow and the impact of falling icicles;
- transparency to sunlight, which will not allow the porch to become a dull place, as is the case if the canopy over the entrance is made of slate or profiled sheets;
- an interesting color capable of fancifully changing light in the shadow;
-
safety, since polycarbonate does not spread flames during a fire and, unlike glass, does not fly into sharp fragments.

Polycarbonate canopy over the front door Made of transparent material, the visor does not deprive the entrance area of the house of sunlight
Among the disadvantages of a polycarbonate visor are usually distinguished:
- poor abrasion resistance, which is expressed in the fact that the material is covered with cracks in contact with sand and objects that scratch the surface;
- fear of hail, due to which holes or cracks may form on polycarbonate;
- loss of color saturation, and the speed of this process depends on the structure of the leaf and climatic conditions;
- expansion due to heat, which can cause the material to crack as soon as the air temperature drops sharply.
Polycarbonate types suitable for canopy
The following types of polycarbonate can become raw materials for making a visor over the entrance to the house:
-
honeycomb, consisting of several sheets of plastic, between which special bridges are installed - stiffening ribs, and is intended for the construction of a light canopy that will not break even if a large amount of snow accumulates on it;

Cellular polycarbonate Cellular polycarbonate can include more than two layers of plastic
-
profiled, resembling corrugated board and slate in shape, but differing from them in transparency and therefore suitable for those who do not want to make the area at the door too simple and completely devoid of daylight;

Profiled polycarbonate Profiled polycarbonate is considered a transparent plastic copy of slate
-
monolithic - it looks like glass (but better in strength) and is used to create a visor with a small radius and an inexpensive coating that will not get clogged with dust from the inside and will easily take a curved shape.

Monolithic polycarbonate Monolithic polycarbonate due to its appearance can be confused with glass, but it is much stronger
Polycarbonate door canopy frame structures
The frame of the visor made of polycarbonate can have several variants of shapes, differing in appearance and complexity of manufacture.

The frame of the visor can be either simple single-slope or complex domed
Table: frame shapes for the visor and their properties
| Frame shape | The resulting view of the visor | The main difference |
| Rectangular triangle, the short side of which is adjacent to the wall of the house, and the hypotenuse is formed from a tilted sheet of material | Shed roof canopy | Ease of assembly and installation |
| Isosceles triangle (house design) | Canopy with two slopes roof | Easily frees itself from the snow mass |
| The dome, assembled from wedge-shaped parts, like an umbrella | Dome canopy | Difficulty installation due to rounded parts |
| Arch obtained through the installation of arched elements | Arched roof | Can be mounted above the door of any home |
| Summer awning in a cafe (awning "Marquis") | Rounded canopy | Big size |
| A slide formed by several elements bent downward | Concave design | Originality and impracticality, as it is difficult to clear snow and therefore can be extremely dangerous |
Making a visor from a transparent material
The construction of a canopy over the entrance to the house should begin with preparing tools and creating a project.
Tools and materials
In addition to the main coating for the manufacture of a polycarbonate visor, you need:
- welding machine;
- Bulgarian;
- drill with drills of various diameters;
- puncher;
- screwdriver with a nozzle for installing self-tapping screws;
- paint brush (for priming and painting the product frame);
- metal pipes (frame elements);
- primer for metal;
- paint emulsion for metal;
- self-tapping screws with a decorative cap;
- dowels;
- fasteners - "kerchiefs";
- level and plumb line;
- electric jigsaw.
Design
The first step in creating a project for a visor over an entrance door is choosing the sizes that are suitable for the product. The length and width of the canopy should be such that as little construction waste as possible remains after work.
Since the standard width of a polycarbonate sheet is 210 cm, it is more advisable to build a visor, the width of which can be divided by this value without a remainder. Values of 210, 420, 630, 840 cm, etc. are considered suitable.
Since the template length of a polycarbonate sheet is 6 m, then a reasonable length of the visor will be 2, 3 or 6 m. And the height of the product is chosen taking into account the average height of a man and is usually not less than 180 cm.

The drawing should reflect the dimensions of the visor and help avoid a lot of waste
When designing a crate for polycarbonate sheets, they are guided by the weather conditions typical for the territory of construction work. Transparent material 6-8 mm thick usually adheres well to the base, the elements of which are laid every 60-70 cm. And thicker sheets are usually fixed on the crate in 1 m increments.
Frame construction
Most often in Russia, an arched visor is made, which has two supports, since it is he who is appropriate in harsh climatic conditions. To build it over the front door, you need to do the following:
- Place pegs on the borders of the future canopy.
-
Dig holes along the perimeter of the marked area at a distance of 1.5-2.5 m from each other (depending on the planned dimensions of the visor), removing a layer of earth half a meter thick.

Pit for installing a canopy post For the installation of the post, it is required to dig a hole with a depth of at least 50 cm, since sand and gravel will be poured into the hole in the ground to fix the support
- Fill the bottom of the holes with a layer of sand 10 cm thick, which must be carefully tamped.
- Cover the sand with a layer of medium-grained crushed stone, which is also well compacted.
-
Immerse metal supports into crushed stone, to the lower end of which reinforcing bars are welded, check their verticality using a plumb line and pour liquid concrete.

The process of installing the supports for the visor Each metal post of the canopy should be inserted into a layer of rubble and filled with concrete to the very edges of the pit
-
After three days, fix it with dowels on the wall of the house (opposite the vertical pillars) along a small metal profile and weld parts to them that ensure the rigidity of the frame.

Arch canopy frame After the installation of the pillars, the installation of those elements that connect the visor to the wall of the house is performed
-
With the help of fasteners called kerchiefs, in front and behind the metal structure, fix the two arcuate elements that form the arched vault.

The scheme of fastening the arched element "kerchief" Triangular gusset-type fasteners allow you to firmly connect the post to the arched profile
-
Using welding equipment, complete the frame with lathing.

Frame construction process An arched frame can consist of two pillars, two rounded elements and several transverse parts
- Clean the welded seams with a grinder, treat the metal frame with a primer, and then paint.
- Level the area around the entrance to the house by removing debris and a 10 cm layer of soil.
- Cover the area under the future shed with sand, forming and carefully tamping a layer of 7-8 cm.
-
Put paving slabs on a sand pillow, pressing it with a rubber hammer and flooding it with water so that it sticks to the layer of sand.

Laying paving slabs at the porch After laying the tiles on the sand, water is used, which will help the material to fix in place.
Polycarbonate canopy roof device
The frame of the visor over the entrance to the house is covered with polycarbonate as follows:
-
Using a jigsaw, prepare sheets of the desired size. The excess is carefully cut off from the sheets, placing them on a flat horizontal surface.

Cutting polycarbonate It is customary to use a jigsaw to cut polycarbonate, since it is inconvenient to saw it with a hacksaw
- The protective sheath is removed from the outside of the material.
- The first sheet of polycarbonate is placed on the crate so that it protrudes 4-5 cm beyond the edges of the structure.
-
Narrow holes are drilled in the metal parts of the crate at intervals of 30-35 cm, and slightly wider holes in polycarbonate (2-3 mm larger than the diameter of the thermowell leg).

Polycarbonate fixing scheme A hole is pre-drilled in polycarbonate, where a thermal washer is first inserted, and then a self-tapping screw is screwed
- Thermal washers are inserted into the holes on one edge of the transparent sheet and self-tapping screws for metal are screwed in, onto which special covers are put on.
-
Before attaching the other edge of the material, if several sheets of polycarbonate are used, the lower part of the split connecting profile is laid under it at the junction with the lathing element. Having screwed it to the frame, the next sheet is mounted. Polycarbonate is inserted into special fasteners not all the way - 5 mm of free space is left for the thermal expansion of the plastic. The connecting profile is sealed with a lid and closed with a plug from the end.

Connection diagram of polycarbonate sheets It is better to install polycarbonate sheets using a special profile, which guarantees the tightness of the flooring and allows the material to expand freely when the air temperature rises
-
In the same way, the rest of the sheets of material are installed on the metal base. The edges of the fixed sheets are lubricated with a sealant and closed with an end profile.

Polycarbonate fixing process Polycarbonate is fixed at the joints with the crate
Video: how to attach polycarbonate to a metal crate
Repair of a polycarbonate visor
Repairing a polycarbonate canopy usually comes down to eliminating holes, leaks and small cracks with silicone sealant. However, you can get rid of such defects in this way only once, because they indicate the destruction of the sheet in connection with the end of its service life.

If leaks occur at the joints of polycarbonate sheets, they resort to treating problem areas with a sealant
From significant damage to the polycarbonate sheet, expressed in the appearance of deformation, chips and huge cracks, there is only one remedy - replacement of damaged areas or the entire roof covering
Reviews on the use of polycarbonate for the construction of a canopy
No other visor, except made of polycarbonate, can greet guests of the house with a bright view and an abundance of sunlight. It will be easy to create an aesthetic and at the same time durable canopy made of transparent plastic material if you build a reliable metal frame for it and firmly fix sheets of sufficient thickness on the crate.
Recommended:
Puff Pastry Rhubarb Pie (including Ready-made): Recipe + Photo And Video

Rhubarb Puff Pastry Pie Recipes Step by Step Preparation. Essential products, secrets and cooking features
How To Catch A Rat, Make A Rat Trap With Your Own Hands From A Bottle Or In Other Ways, How To Install, Charge And What Bait To Put In The Trap + Photo, Video
Tips for getting rid of rats with effective DIY traps. Step-by-step instructions for rat traps. Catch it or not. Photo and video
How To Cut A Biscuit Into Cakes Evenly And Correctly With Thread And In Other Ways + Video And Photo
How to cut a tall biscuit into pieces. Proven tips for getting perfectly flat cakes with thread, string, knife and special tools
Figured Ceiling Made Of Plasterboard With Your Own Hands, Wave, Oval And Circle + Photo And Video
Step-by-step instructions for installing plasterboard ceilings using various curly elements. Materials, tools, tips, design options
Desire Visualization Board: How To Make And Arrange Correctly, Photo

Desire visualization board: what it is and how it works. How to draw up a wish board correctly
