
Table of contents:
- Author Bailey Albertson albertson@usefultipsdiy.com.
- Public 2023-12-17 12:53.
- Last modified 2025-01-23 12:41.
The Internet from Rostelecom does not work: causes and solutions to the problem

Every Rostelecom subscriber may suddenly lose the Internet. It's not that the provider is bad - many problems arise from the client's side. How to eliminate the cause as quickly as possible and start using the network again?
Content
-
1 Frequent reasons for disconnecting the Internet by Rostelecom
-
1.1 Client-side problems
- 1.1.1 Internet payment
- 1.1.2 Reboot all devices and check equipment integrity
- 1.1.3 Network Diagnostics Using Windows Built-in Tool
- 1.1.4 Configuring Network Settings
- 1.1.5 Reinstalling or Updating the Network Adapter Driver
- 1.1.6 Creating a new connection
- 1.1.7 Video: how to create a new connection in the top ten
- 1.1.8 Scanning with antivirus
- 1.1.9 Resetting and configuring the router
- 1.2 Problems on the provider side
- 1.3 Video: why the Internet "Rostelecom" may not work and what to do in this situation
-
-
2 The most common mistakes when connecting to the Internet
- 2.1 Error 651 or 692: Incorrect operation of network equipment
- 2.2 Error 691: wrong username or password
- 2.3 Error 678: Deactivated connection
- 3 Technical support of Rostelecom
Frequent reasons for disconnecting the Internet Rostelecom
All reasons can be divided into two large groups: problems on the provider's side and problems on the subscriber's side (improper operation of either equipment or operating system components).
Client side issues
There are quite a few explanations for the lack of the Internet. The most common ones are as follows:
-
There are few funds on the subscriber's personal account. In this case, the provider has the right to block access to the network until the client pays. It should also be noted that the deposited amount may not be credited to the account after payment. This is extremely rare, but it does happen. This situation requires a separate investigation with the service through which you tried to fund your account.

Insufficient amount of funds in the account If the account does not have the required amount, the provider will block access to the Internet
- The router is out of order. In this case, it may require repair or replacement. Before contacting the service, it is necessary to check the integrity of all wires. It is also possible that the device has overheated or many errors have accumulated during operation, then you can get by with rebooting the router.
- Viruses have entered your computer. They are capable of both damaging important system files and blocking access to the Internet.
-
The network or router settings are lost. For example, the wrong IP address is specified. If the problem is in the router, most likely the Wi-Fi and WAN indicators on it will not light up.

Wi-Fi and WAN indicators If the settings of the router are lost, the Wi-Fi and WAN indicators may stop lighting
- Network card drivers are outdated. Update them through the "Device Manager" or reinstall them manually by downloading the required installer from the official page of the manufacturer of your PC or network card.
Internet payment
Pay for the Internet, if you have not done so before, in any way convenient for you: through your personal account, through the terminal, at the company's office, in the Euroset salon or at the nearest bank branch.
If you have a mobile Internet, use it to enter your personal account through the website or the application on your phone. In this case, you can pay via Yandex. Money, Qiwi, WebMoney or a Visa or Mastercard bank card.

If you have a mobile Internet, try making a payment by phone in your personal account of Rostelecom (on the website or through the application)
The payment term for Rostelecom's services depends on the system that was chosen when concluding the contract: advance or credit. In the first case, you need to replenish the account no later than the first day of the month for which the payment will be made. With a credit system, money must be credited to the account no later than the 20th day of the current month.
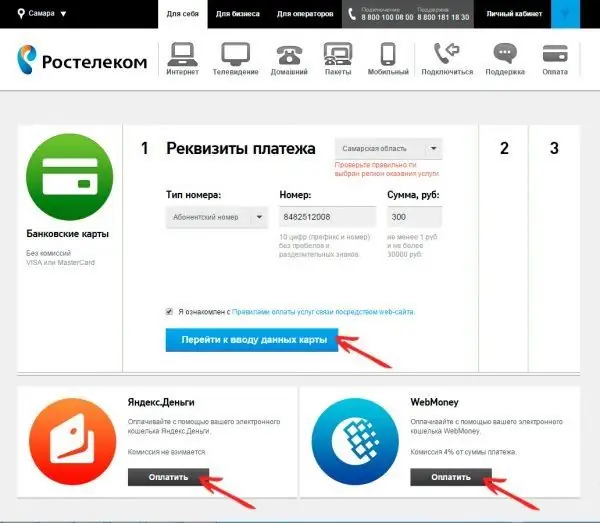
You can pay for Rostelecom's services via the Internet in several ways
If you recently replenished your account using a non-cash method, and your network was still turned off due to lack of funds, this means that the money did not reach. In this situation, you need to contact the managers of the service through which the funds were transferred. You will be asked to indicate the transaction number - the specialist will check the status of the payment and confirm it if necessary. If it turns out that the status of the payment is "Completed", call the provider and find out the reason why the funds were not credited. Their system may have crashed. After the call, the situation should be resolved.

Sometimes it happens that a payment made in advance does not go to your account - in this case, you need to contact the managers of the service through which you made the payment
Rostelecom understands that not all users have the opportunity to replenish their accounts on time, so the company created the Promised Payment option, which can be activated in your personal account or through the support service. You will defer the payment for a week, during which you can use the network to the fullest. There will be no commission for using this option.
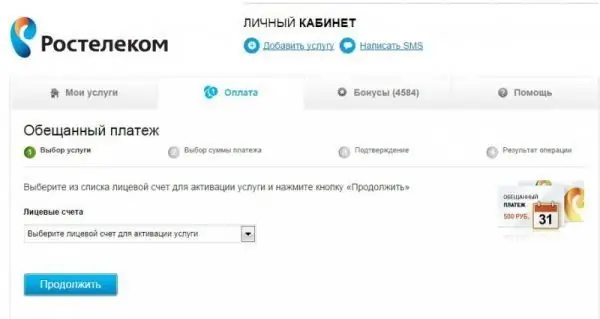
In the personal account of Rostelecom, you can activate the Promised Payment service
Reboot all devices and check equipment integrity
If you know that you have paid for the Internet, go directly to the following steps:
- Pay attention to the DSL / PON-Link and LAN indicators. If they do not light up, most likely the problem is in the wires - check if the cables and contacts are intact. If the cord is damaged, call the provider's support service and call the master at home. You can replace the wires yourself, but it is better to entrust this to specialists.
-
Make sure the cables are firmly connected to the devices (to the router or PC, depending on the type of connection - wireless or wired). If necessary, remove the cables, wipe all contacts with rubbing alcohol or regular cologne, and then insert them back until they click into the desired connectors.

Connected cables See if the cables are firmly connected to the router
- Restart your computer and router at the same time. In this case, the router must be completely disconnected from the power supply - remove the plug from the socket. Restarting with the Power button may not work. After shutdown, at least 10-15 seconds should pass. After that, you can turn on the equipment back. Wait until all the necessary lights on the router light up and check the availability of the Internet.
If you have the Internet connected via a telephone line, it is possible that the splitter is out of order - a device for converting frequencies to the required range. It must be sent for diagnostics to the nearest Rostelecom office.
Network diagnostics using built-in Windows tool
The Windows operating system has its own built-in tool that helps users quickly and easily solve Internet problems. Not all, but most of the problems, the diagnostic tool can fix:
-
Expand the context menu of the network icon and select the "Troubleshooting" option.

Fault diagnosis option Select the "Troubleshooting" item in the context menu of the network icon
-
Wait until the end of the check - it will take some time.

Detecting problems Wait for the system to find any problems
- When the system collects all the information, it will most likely detect some kind of problem and immediately suggest a method to fix it. Click on the link provided to start applying this method.
-
If the tool does not detect a problem at the beginning of the scan, click on "I have another problem."

Pointing out another problem Click on the link "I have another problem" if the tool does not immediately reveal anything
-
Select "Using a specific adapter …".

Using a specific network adapter Click on the bottom link - "Using a specific network adapter"
-
In the list that appears, click on your adapter and click "Next" - the search for problems will start again. If available, the tool will try to find a way out of the situation.

List of adapters Select your adapter in the list and click on the "Next" button
- At the end of the check, the wizard will provide you with a small report on the problems it has resolved and problems that it could not cope with. If they remain, move on to other methods.
Setting network settings
To check if the network settings are correct (IP address, DNS server), follow these steps:
-
Right-click the menu of the network icon, which is located on the taskbar next to the time indicator. Click on the second component of the list to launch the window with network settings (for Windows 10).

Network icon context menu Click on "Network and Internet Settings" in the context menu of the network icon
-
In the window with the parameters, go to the Ethernet or Wi-Fi tab, and then in the right column find and open the "Configure adapter settings" link.

Wi-Fi tab In the Wi-Fi tab, click on the link "Configuring adapter parameters"
-
If you have the seventh version of the "operating system", launch the "Network and Sharing Center" via the context menu of the network icon - the link to change the adapter settings is located there.

"Network and Sharing Center" Click on the link "Change adapter parameters" in the left part of the window
-
In the window with the connections created earlier, find your connection and click on it with the right mouse button. In the menu that opens, select the "Properties" item.

Item "Properties" In the menu that appears, click on "Properties"
-
In the “network” tab, in the list of connection components, find the “IP version 4” object and start its window by double-clicking it, or select it with the left button, and then click on the “Properties” button below the list.

Wireless network properties Find the item "IP version 4" in the list and open its properties
-
Change the parameters in the properties of the selected component. If you have automatic DNS and IP detection, enter the addresses that are registered in your agreement with Rostelecom. If they have already been entered, check their correctness or set automatic detection.

Obtain an IP address automatically Enter the IP address and DNS server manually if they were previously set to auto-detect
- Save all changes by clicking on OK. Then check your internet connection.
Reinstalling or updating the network adapter driver
You can update drivers manually through official resources (a more complicated method) or through the Device Manager application. The latter method is also suitable for beginners. Let's consider the sequence of actions using his example:
- Connect to some other network so that you have access to the Internet. Without it, the system will not be able to download the necessary files and, accordingly, install them.
-
If you have Windows 10, right-click on the "Start" button, which is located in the lower left corner of the display, and find the item "Device Manager" in the menu that appears.

Start button context menu Click on the "Device Manager" link in the context menu of the "Start" button
-
For all other OS versions, the classic method is suitable: right-click on the standard "My Computer" shortcut and select "Properties" in its context window.

My Computer shortcut In the context menu of the shortcut "My Computer" click on the item "Properties"
-
In the system data pane, go to Device Manager using the link on the left side of the screen.

System information In the window with information about the system, open "Device Manager"
-
In the list of hardware devices, expand the "Network adapters" section.

Network adapters In the list of network adapters, find your own and click on it with the right mouse button
-
Select your adapter in the list: if you have a wireless connection, right-click on the item with the word Wireless or Wi-Fi, and if wired, on the component with the phrase Family Controller at the end of the name.

Starting driver update In the menu that appears, select "Update driver"
-
Run an automatic search for driver updates.

Automatic search for updates Select automatic search for an update in the update wizard window
-
Wait for it to complete - the process will take a little time.

Finding driver updates Wait until the check for updates for the selected driver finishes
-
As a result, the operating system will either find and install the update, or inform you that the current drivers are already installed. In the latter case, you can try to reinstall them manually, through the installer downloaded from the official website of the device manufacturer.

Message about the availability of current drivers After verification, the wizard may inform you that the device already has the latest drivers for the network adapter
- Try to deactivate the device for a while - click on the "Delete" button in its context menu (called by the right mouse click).
-
After that, start the configuration update in the Action list - the driver will be installed and the device will appear in the list again. Reboot your PC and check the connection.

Configuration update In the "Action" menu, click on the "Update hardware configuration" button
Creating a new connection
If you have wired internet, you can re-create the connection for your network:
-
Press the key combination Win + R on the keyboard - the Run panel will open. In it, type the command control and click OK so that the system will immediately execute it.

Run window In the "Open" line, type the command control
-
As a result, the "Control Panel" will appear on the screen. Find the "Network and Sharing Center" section in it.

Control Panel In the control panel, find and open the "Network and Sharing Center" block
-
In the next window, follow the link "Create and configure a new connection".

Creating a new connection Click on the option "Create and configure a new connection"
-
In the Network Wizard, select the "Connect to the Internet" option.

Internet connection Select "Internet Connection" and click "Next"
- If you have a router, click on the second or third item and follow the simple instructions of the wizard.
-
If you connect to the Internet via cable, select "High Speed", and if via a modem - then "Dial-up".

High speed and dial-up connection Choose between high-speed and dial-up internet connection
-
On the next page of the wizard, enter the data for authorization in the network from your agreement with Rostelecom. Check the box next to the option to save your password if you like. With the help of a special item at the bottom, you can allow other users of your PC to use the connection you are creating. Also enter a name for the connection and click on the "Connect" button.

Entering data for authorization Enter your username and password in the appropriate fields using the data from the agreement with the provider
Video: how to create a new connection in the top ten
Antivirus scanning
Antivirus with updated databases is capable of detecting malicious files. You can use it as a third-party antivirus, for example, Kaspersky or Avast, or you can run a standard Windows security tool:
-
Expand the Windows tray - the arrow icon next to the network icon. In it, select the white shield - the display will open "Windows Defender Center".

Trey Windows Click on the white shield in the Windows tray to open Defender
-
Go to the "Protection against viruses and threats" section by clicking on the link in the left column with a list of sections or on the corresponding tile.

Windows Defender Security Center Open the section "Virus and threat protection"
-
On the next page, you can start a quick scan right away. If it does not give any result (viruses will not be detected), run a full scan. Click on the "Start new advanced scan" link.

Start scanning If the quick scan did not reveal anything, click on the link "Start a new advanced scan"
-
On the next page, choose between full or offline verification. The first will last quite a long time, but at the same time you will be able to continue your business on a PC. The offline check will require a PC reboot and will take about 15 minutes. Click on the gray button to start a virus scan.

Selecting the scan type Select the scan type and run the scan using the button below the list
-
Wait for the operating system to complete the procedure. Malicious files may appear in the results. Select deletion for them in the list of available actions.

Virus scanning process Wait for the virus scan to complete on the system
- After that, restore all system files in the "Command Prompt" using the sfc / scannow command, as viruses may have damaged them.
Resetting and configuring the router
Setting up your router yourself is pretty easy. Let's take a closer look at this procedure using the example of a TP-Link router:
-
Reset all the previously set parameters of the router: find the Reset button on the back panel with sockets for connecting cables. It is not located on the surface, but inside, so you can press on it only with a thin oblong object - a needle, a sharp end of a pin, a match, etc. Press and hold it for a few seconds.

Reset button Press the slightly recessed Reset button with a thin, long object
-
Go to reconfiguring the router: in any browser, enter or paste a combination of numbers 192.168.1.1 or the phrase tplinklogin.net into the address bar. In the authorization fields, enter admin as your username and password. This is the standard account credentials for setting up almost any TP-Link router.

Login to your router account Enter the word admin in both fields and click "Login"
-
On the left side of the page, find and open the "Network" section - its first WAN tab will open, which is what we need. In the drop-down menu with connection types, set the value "PPPoE (Russia PPPoE)".

Connection type Select "PPPoE (Russia PPPoE)" in the "Connection Type" menu
-
Additional fields will appear on the page for entering the login and password from the Rostelecom Internet. Fill them in carefully, and then click on "Connect" or "Connect". The status "Connected" should appear in the network icon panel on the "Taskbar". Be sure to save all changes using the special button at the very bottom of the page.

Login and password input Enter the data for authorization in the network, connect and save the changes
Problems on the provider side
Your computer and network equipment may have nothing to do with it. If you have taken all measures to troubleshoot problems on your part and nothing helped, most likely the problem is on the side of Rostelecom. The provider may not provide Internet access for the following reasons:
- Line or equipment problem.
- High load on servers.
- Preventive maintenance.
- Line interference due to bad weather conditions.
To verify that the problem is not with your PC, please call support. If it turns out that work is actually being carried out on the line, specify when it will be completed - you have every right to do so. There is nothing you can do here - you just have to wait for the provider to restore access to the network.
Video: why the Internet "Rostelecom" may not work and what to do in this situation
The most common mistakes when connecting to the Internet
When trying to connect to the network, various error messages may appear on the screen. Usually they are accompanied by certain codes by which you can determine the cause of the problem, and therefore understand what measures to take.
Error 651 or 692: Incorrect operation of network equipment
Code 651 indicates that the subscriber's network equipment is not working correctly at the moment: network billing failure, conflict between the modem and the PC. Often, a simple reboot of all existing devices helps in this case. It is also advisable to check the integrity of the cables and see if they are well connected to the connectors.
If restarting the devices did not fix the problem, reset the router to factory settings using the internal Reset key and create a new connection. You can find detailed instructions in the previous sections of this article.
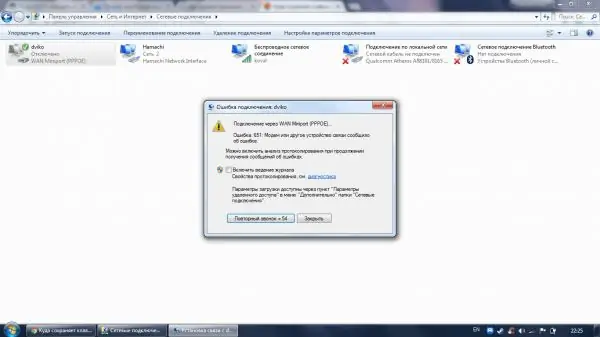
Error code 651 appears when network hardware starts to malfunction
This error can occur when antivirus or Windows Defender Firewall is blocking the Internet connection. In this case, you need to deactivate the security utilities and check the connection. To turn off Firewall, do the following:
-
Launch the "Control Panel" through the "Run" window, as described in the section "Creating a new connection" in this article. You can also open the panel through "Start" or "Windows Search" - just enter the appropriate query.

Windows Search In the search bar enter the query "Control Panel"
-
In the control panel, find the link corresponding to "Firewall".

List of control panel sections In Control Panel, open the "Windows Defender Firewall" section
-
In the left column, click on the Enable or Disable link.

Enabling and disabling protection Find and open the link "Turn on or off Firewall"
-
On the next page, set the value to "Disable" for two types of network - public and private. Click OK to save all changes. Try visiting a website to test your connection.

Disable item Select the value "Disable" and click on OK
Deactivating a third-party antivirus for a while is much easier than standard Windows Defender or Firewall. Let's consider the procedure using Avast as an example:
- Open the Windows tray on the display and click on the antivirus icon with the right mouse button.
-
In the menu that appears, open the Manage Avast Screens section.

Controlling Avast screens In the "Manage screens" menu, select the period during which the antivirus will not work
- In the list that appears, select the time period when the utility will be disabled - its protection will not work during this period, and then it will be automatically activated. During this time, you will have time to check whether you have access to the Internet or not. If you turn off all the screens at once without automatic activation, do not forget, after checking, turn them back on yourself through the same menu in the tray.
Error 651 may be the result of a driver malfunction - reinstall or update it using the instructions in the appropriate section of this article.
Error 691: incorrect username or password
Code 691 is usually accompanied by a message stating that the username or password is not valid for the domain. Most often, this error occurs due to incorrectly entered data for authorization in the provider's network. Make sure that the password and username that Rostelecom provided to you are entered correctly, and if you find an error, correct it and try to connect to the network again.
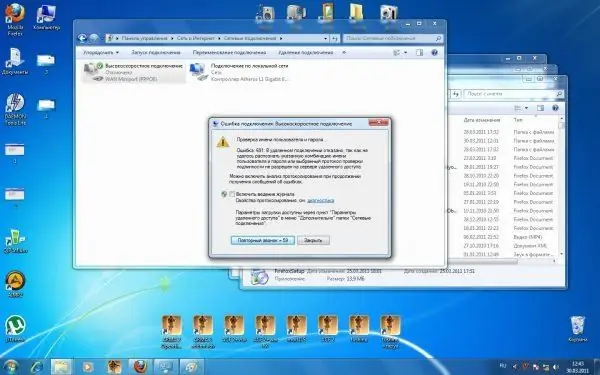
Error code 691 occurs if incorrect data entered for authorization on the network
The cause of error 691 may be an incomplete account - make sure that you paid for the Internet, and if there was no payment, make it to get access to the network.
Error 678: connection deactivated
Error code 678 usually comes with a message that the remote PC is not responding at the moment. This means only one thing - there is no connection between the server and the PC. In this case, as a rule, it turns out that the Internet connection through a specific network adapter is disabled. It can be disabled either by the user himself or by a malicious program.

Error 678 means your PC has a current internet connection disabled
To solve the problem, you need to activate the connection as follows:
- Launch the Network and Sharing Center window on the display from the Control Panel. In it, click on the link to change the adapter settings.
-
In the new window with the list of connections, find your own - it will be gray with the inscription "Disabled".

Disconnected connection Find your connection in the list and right-click on it
-
Click on it with the right mouse button and select "Enable". Check your internet connection.

Turning on the network Activate the connection via its context menu
Rostelecom technical support
If you have any problems with the connection, you have the right to call the Rostelecom support service to clarify the situation. The main number is 8 800 100 08 00. Operators answer calls around the clock. You can also contact any of the nearest office of the company for help.
If you can connect to the Internet in another way (not through Rostelecom), go to the provider's official website on the Help page. Fill out the feedback form, indicating your name, the nature of the problem and the method of feedback. After a while, they will call you back or send you a letter with recommendations for solving the problem.
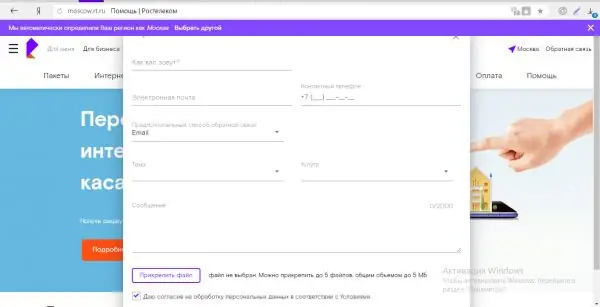
If you have any problem with Rostelecom's services, you can fill out a feedback form, setting out the essence of the problem, on the official website of the provider
The Internet from Rostelecom can be absent for a variety of reasons: from trivial debt on the client's account to problems with network drivers. The first thing to do if the connection suddenly goes down is to check the balance, restart all the hardware and, if that doesn't help, run the standard Windows troubleshooter. If these methods do not work, try changing the network settings and parameters of the router, updating the adapter drivers and creating a new connection.
Recommended:
What To Do If, After Flashing Android, The Phone Or Tablet Does Not Turn On, Does Not See The Network, Does Not Charge

Why does my smartphone or tablet not work after changing the Android version. How to troubleshoot various problems. How to properly reflash a device
Why On Windows 10 The Start Button Does Not Work And The Main Menu Does Not Open

The most common problems in the "Start" menu on Windows 10. The reasons for the appearance. Solutions: universal and for specific cases
What To Do If Google Chrome Does Not Work - Reasons And Solutions For Problems With The Browser, Including When It Does Not Start

The reasons why Google Chrome does not work: does not start, pages do not open, a gray screen is displayed, and so on. Solutions with photos and videos
Why And What To Do If The Google Chrome Browser Does Not Open The Pages - List The Main Reasons And Describe Solutions To The Problem
For some reason, Google Chrome does not open pages. Solution by clearing the cache, editing the hosts file, cleaning the registry, reinstalling the browser, etc
What To Do If Yandex Browser Does Not Open On A Computer - Why The Program Does Not Start, How To Make It Work

Why "Yandex Browser" does not open in Windows. Solution to the problem: disabling autorun, updating and reinstalling the browser, clearing the cache and registry
