Table of contents:
- Author Bailey Albertson [email protected].
- Public 2023-12-17 12:53.
- Last modified 2025-06-01 07:32.
Roof protection from moisture: waterproofing under the metal tile

The metal tile roof especially attracts the attention of the owners of townhouses or cottages. But you need to be careful with this material: in case of improper waterproofing, metal tiles will cause rapid damage to the entire supporting structure of the roof. Installation of a waterproof sheet under a piece of metal roofing is a responsible mission.
Content
- 1 The need for waterproofing metal roofing
-
2 Finding waterproof material
- 2.1 Roofing material
- 2.2 Waterproofing foil
- 2.3 Membrane
-
3 Laying waterproofing under metal tiles
3.1 Video: roof waterproofing
-
4 Nuances of waterproofing roofing elements made of metal tiles
- 4.1 Laying material at the chimney
-
4.2 Installing the waterproof skate board
4.2.1 Video: waterproofing the roof ridge
- 4.3 Adhesion of matter to the roof window
- 5 Errors in laying waterproofing under metal tiles
The need for waterproofing metal roofing
Waterproofing is one of the most important steps in roofing work and the basis for the reliable and successful functioning of the house for a long time.
Experts point out the following reasons for the mandatory waterproofing of metal roofing tiles:
- the formation of a large amount of condensate on the corrugated material of galvanized steel - a “product” of the loss of a significant amount of heat by the metal;
- the risk of damage to the rafter system by moisture seeping into the "roofing pie", which leads to a change in the configuration of the roof under the influence of the "attack" of fungus and mold;
- the danger of moisture penetrating into the insulation, which is saturated with water without a special barrier and becomes useless (even after drying);
- the threat of rust on the inner surface of the metal roofing, especially in the areas of material fixation on the rafter legs.

Condensation is the main enemy of roofing
Ignoring the requirement to lay a waterproofing material under the metal tile is fraught with a significant reduction in the life of the roofing.
Finding waterproof material
When looking for a suitable waterproofing of a metal tile roof, you will have to choose between three materials: roofing material, film and membrane.
Roofing material
Roofing material is famous for its strength and reasonable cost. But it is taken only in a situation where it is necessary to protect the cold-type roof from moisture, because roofing material blocks the access of the steam.

Roofing material - durable and inexpensive waterproofing material
Waterproofing film
A waterproofing film is a thin polyethylene-based sheet created by forcing a melt of material through a forming hole in an extruder. Such building materials have earned a reputation for being relatively inexpensive and good in terms of use.

Waterproofing film is the most popular material for waterproofing
To prevent moisture damage to the roof, several types of films are produced:
- classic film, the main feature of which is double-circuit insulation;
- membrane superdiffusion film, characterized by single-circuit insulation, which allows the roofing insulation to serve as long as possible;
- anti-condensation film characterized by double-circuit ventilation and hairiness, which helps to absorb moisture.
The waterproofing film is also evaluated negatively: it is not able to withstand the negative effects of ultraviolet radiation, due to which it turns into a fragile material.
Membrane
The membrane is the thinnest film material made from polymers of modern times, that is, from low-pressure polyethylene or polyvinyl chloride. The state-of-the-art waterproofing sheet acts as a water barrier and does not block the path of couples leaving through the ceiling of the house. Unlike the film, the membrane is immune to ultraviolet light and water pressure, therefore it unquestioningly serves for the period stated by the manufacturer.

The waterproofing membrane is a material exclusively for "warm" roofs
The membrane is placed under the metal shingles only in the case of creating a "roofing cake" of a warm type. Best of all, the roof structure is protected from the effects of dampness by a fabric with an anti-condenser effect, which includes a reinforced and absorbent layer. Together they protect the roof from the effects of precipitation and "capture" liquid droplets.
An improved waterproofing material - a membrane - is more reasonable to use if the building is located in an area where it often rains.
Laying waterproofing under metal tiles
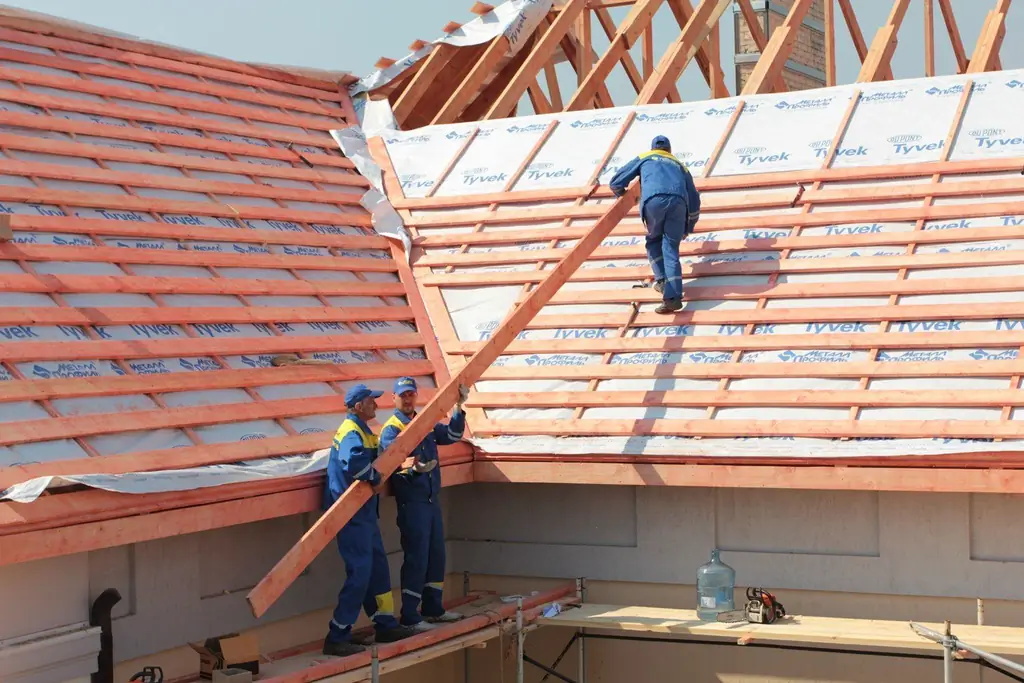
Installation of waterproofing material is a stage of roofing work performed after the construction of a structure from rafter legs.
To properly lay a film or membrane under the metal tile, proceed as follows:
- The material is cut into separate pieces, the length of which is 15% longer than the size of the roof slope.
-
With the perforated side outward, the canvases are spread on the rafter system, moving from the eaves to the ridge. Each strip is laid perpendicular to the wooden elements of the roof supporting structure. In this case, the material is not pulled, but laid loosely, allowing it to sag a little between the rafter legs. Otherwise, soon the canvases will tear under the influence of sudden changes in temperature.

Film laying process The film is laid on the side with which it unwinds
- The strips are connected with edges, making overlaps of 10 cm when the roof is tilted more than 30 °; and 20 cm each - if this indicator fluctuates within 20 °. When the roof is inclined by 21-31 °, the edges of the pieces of material are connected by 15 cm. In carrying out this task, make sure that the overlapping areas of the "tapes" fall on the surface of the rafters. To fix the material on wooden elements, use stainless brackets and a construction stapler. The places where the strips meet are insulated with adhesive tape.
-
On the fixed film or membrane with an interval of 10 cm, slats with a cross section of 40 × 25 mm or slightly thicker are nailed. These are elements of a counter-lattice, the task of which is to create a gap for airing the layers of the "roofing cake". A crate is installed on top of the slats.

Roof waterproofing arrangement Waterproofing is laid between the rafters and the counter-lattice
Roofing material is laid out on the roof in almost the same way as a film and a membrane. But ordinary or galvanized nails are used as fasteners. The seams obtained by superimposing strips of material on top of each other are coated with a moisture-resistant sealant or sealed with construction tape.
Video: roof waterproofing
The nuances of waterproofing roof elements made of metal tiles
In the process of laying waterproofing material, one question most often arises: how to lay the film through the chimney. And a little less often, home craftsmen ponder long and hard about how to join strips of film on the ridge of the roof and how to lay material in the area of the attic window openings.
Laying material at the chimney
Insulation of the abutment of the waterproofing sheet to the chimney is performed in a few simple steps:
-
In the zone of intersection of the waterproofing with the chimney, cuts are made in the form of a trapezoid. As a result, it is possible to make overlaps with a width of 5 cm.

Roof waterproofing scheme at the junction of the chimney At the junction of the chimney, the film is laid with an overlap of 5 cm and fixed on the seal
- Taking the sealing tape, the lower and upper valves are fixed on the element passing through the roof or on the horizontal part of the sheathing.
- By analogy with the upper and lower, side valves are fixed on the chimney.
Installation of a waterproof canvas near the ridge
How to lay a film in the area of the roof ridge is a burning question. Anyone who seeks to properly install waterproofing throughout the entire roof area should know the following:
-
during the laying of the waterproofing sheet on the roof slopes in the area of their intersection, it is necessary to leave a clearance of 5 cm wide;

Installation diagram of the film at the ridge A layer of film is laid on top of the bars, making overlaps of 15 cm
- over the resulting gap after nailing the bars, a strip of film should be fixed, making 15 cm overlaps on both sides.
This approach to roof ridge waterproofing ensures that the space under the roof is well ventilated.
Video: roof ridge waterproofing
Adjoining matter to the attic window
The waterproofing film is applied before the window is installed. The material is cut in the form of an envelope, the resulting valves with a width of more than 6 cm are lifted and placed on the crate.

At the location of the window, a bend of 6-15 cm is made
Then they act according to the instructions of the specific manufacturer of the glass unit - they install a waterproofing circuit, and seal the joints and overlaps with mounting tape.
Errors in laying waterproofing under metal tiles
Unfortunately, home craftsmen tend to make serious mistakes when installing a waterproofing sheet. Usually these oversights are as follows:
- the film is not placed on the roof according to the roll-up principle, which makes it spread on the wrong side;
- the waterproofing is pressed against the insulation, leaving no space for ventilation of the roofing materials;
-
for fastening a waterproof canvas, take ordinary staples, which quickly become covered with rust;

Metal staples Metal staples without galvanizing are taboo, because they lead to corrosion of the metal roofing
- a material that has not been stored in a dark place is used as waterproofing, thereby allowing it to be damaged by the sun's rays.
They approach the issue of waterproofing a roof made of metal tiles responsibly. Incorrect laying of waterproof material leads to sad results - corrosion of the finish coating and even damage to the entire roof structure.
Recommended:
Waterproofing The Roof Of The Garage, How To Do It Right, Including With Your Own Hands, As Well As The Features Of Its Device And Installation
Materials that protect the garage roof from moisture. Waterproofing tools. Laying material on different types of roofs. Replacing the waterproofer
Roofing Cake For Metal Tiles And Its Layers, Depending On The Purpose Of The Roof Space, The Main Mistakes During Installation
What is a roofing pie? What layers are used in the manufacture of different types of roofs. Errors made when installing roof layers
Roofing Elements Made Of Metal Tiles, Including Their Description And Characteristics, As Well As The Ridge For The Roof, Its Structure And Installation
The main elements used in the construction of metal roofing. Their description, characteristics and purpose. Features of mounting the ridge strip
Metal Roof Tiles: Description, Pros And Cons, Installation Features, Reviews And Photos

Features of the production of metal tiles. Its advantages and disadvantages. Do-it-yourself installation of a metal roof. Operation and maintenance of the roof, reviews
Waterproofing The Roof With Liquid Rubber, How To Do It Right, Including Preparing The Roof For Work
Liquid rubber: properties and characteristics. Calculation of the material. Technology and methods of application. Step by step instructions for work
