Table of contents:
- Let's please your beloved pet! How to make a dog booth with your own hands
- Determine the size of the dog booth and its location
- DIY drawing for the booth
- Materials you need
- How to build a dog kennel: starting the process
- Insulated kennel for a dog: what to do to make your pet feel comfortable in winter
- How to properly care for a doghouse
- Video about building a dog house
- Author Bailey Albertson albertson@usefultipsdiy.com.
- Public 2023-12-17 12:53.
- Last modified 2025-01-23 12:41.
Let's please your beloved pet! How to make a dog booth with your own hands

A dog is not only a friend of man, but also a full member of the family. Of course, in a city apartment, it is not always possible to have a shaggy pet. But if you live in a private house, then more often than not you have a dog that plays the role of both a watchman and a friend.
In this case, it is imperative to provide your beloved dog with housing - comfortable, practical and warm.
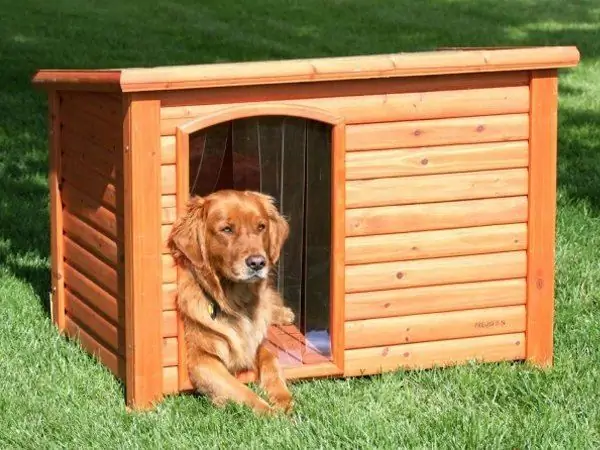
Today you will learn how to make a kennel in which the dog will feel cozy and comfortable in any weather.
Today we will consider all the nuances of building and equipping a dog booth with our own hands, from preparing for work and to installing a roof.
Content
- 1 Determine the size of the dog booth and its location
- 2 Drawing for a booth with your own hands
- 3 Materials You Will Need
- 4 How to build a doghouse: starting the process
- 5 Insulated kennel for a dog: what to do to make your pet feel comfortable in winter
- 6 How to properly care for a doghouse
- 7 Video about building a dog house
Determine the size of the dog booth and its location
First of all, choose a place in which the booth will be located. This is a kind of security post, and the location must comply with certain rules:
- when installing the structure, take into account the direction of the wind, since the booth should not be blown through;
- the place should be well lit, but a shaded area nearby, where the dog will rest from the heat;
- avoid moisture that can accumulate under the booth, install the kennel on a hill in a dry place;
- the kennel should be close enough to the front door of the house, optimally on the south side;
- from the side of the booth, the gate, the entrance gate and most of the site should be clearly visible.
Now let's move on to the next task. Whatever the shape of the doghouse, the dimensions must be calculated optimally for the pet. Therefore, the indicators of the size of the dog with allowances are taken as the basis for calculations.
For the construction of the booth, the following dimensions are traditionally used:
- Small dog booth (for example, dachshund) - 700 mm long, 550 mm wide, 600 mm high;
- Booth for an average dog (Laika, German Shepherd) - 1200 mm length, 750 mm width, 800 mm height;
- Booth for a large dog (Alabai, Caucasian Shepherd Dog) - 1400 mm length, 1000 mm width, 950 mm height.

And to determine them optimally, use this technique in the calculations. To determine the width of the hole, measure the width of the dog's chest, and add 5-8 cm to the obtained value. The height of the hole should be 5 cm lower than the dog at the withers, and the height of the entire booth should be 5 cm higher. The depth of the booth should be the same as in height.
DIY drawing for the booth
So, having decided on the size of the booth and the additional conditions for its installation, we proceed to the exact image on paper.
Consider the additions that make the kennel a good and convenient defensive structure:
- There should be enough space inside the booth for the dog to stand up, turn around or lie down stretched out. The same applies to the entrance manhole. That is, when calculating, do not forget to add a few centimeters to the top, especially if the dog is still a puppy and will continue to grow.
- Use only natural, ecological materials for the construction of the booth. The optimal solution is wood: cheap, affordable and not harmful to your pet's health.
- If you live in cooler climates, make sure your dog is not cold in winter. Be sure to insulate the booth, and if possible, take additional measures. For example, a booth can be two-room. The width of the booth will increase approximately 2 times, while the access to the first room, or vestibule, is located from the yard, and the access to the second room will be made in the inner wall closer to the rear surface of the booth.
- You can also build a booth inside the aviary. This option works well for larger dogs that are not used to chaining. Thus, the pet will not lose freedom of movement, and additional heat preservation will be provided to the booth. If you live in southern, warm regions, it is better to make the booth larger than it should be: the dog will need more coolness than warmth.
- Decide what kind of roof you want for the booth. On a gable roof, the dog can comfortably rest, and under a gable roof, you can equip a small attic for toys.

Taking into account all the nuances, draw up an accurate drawing of your structure. He will also help you calculate the amount of materials needed.
Materials you need
Before building a dog kennel, equip yourself with all the necessary tools and materials. So, in addition to the finished drawing, you need:
- Pencil;
- Saw;
- Shovel;
- Roulette;
- Building level;
- A hammer;
- Nails;
- Hacksaw;
- Drying oil;
- Antiseptic for wood impregnation;
- Paint.

Such wood breathes well, retains heat, is easy to process and durable in use. Use the same lining. Floorboards, plywood sheets, bars, and decorative slats and corners for finishing.
If you need to build an insulated kennel for a dog, take care of its waterproof and windproof as well. For all this you will need:
- Roofing material;
- Polyethylene;
- Mineral wool (it can be replaced with foam);
- Sand;
- Glassine;
- Tarpaulin.
Be sure to clean the lining that you use in the construction of the booth, otherwise the pet may injure itself or splinter its paws. Do not treat the structure from the inside with chemicals or agents or substances with a pungent smell, for example, paint, antiseptic, drying oil: dogs have a very delicate sense of smell, and this can damage the well-being and health of the dog.
How to build a dog kennel: starting the process
Now that we have everything we need, we will describe step by step how to make a kennel.
- First, let's build the bottom and frame. From the bars 40 by 40, we assemble the frame for the bottom and nail the floor boards as tightly as possible to each other so as not to form gaps. If your pet is large and heavy, reinforce the floor with the same planks to keep the floor from sagging. On the finished bottom in the corners, fix the bars 100 by 100 in a vertical position. This will be the base for the walls. Our design is like a table upside down. Now, perpendicular to the bottom, place the 40 x 40 bars between the main bars. They will serve as support for the roof, strengthening the walls and marking the manhole.
- We pass to the walls. In order to sheathe the booth outside, use a lining that does not delaminate over time, unlike plywood. It is better to fix the sheathing with galvanized nails with small heads.
- When the walls are ready, we begin to build the ceiling. If you plan to install the booth in an aviary or under a canopy, a thin ceiling will be enough, which will serve as a roof at the same time. If the kennel will be in an open place, then the ceiling and roof must be made separately and additionally insulated. For the ceiling, take a sheet of plywood of the appropriate size and 40 x 40 bars. Fasten the top with a layer of mineral wool or foam, spread with glassine, and cover with a second sheet of plywood. If you do not plan to install an additional roof, then you can simply close the ceiling with roofing felt and lay shingles.
- Now make the gables of the roof: take 40 x 40 bars for the perimeter, attach the glassine from the inside and sheathe the outside with clapboard.
- The last step is the entrance hole. It must be closed from the wind with a tarpaulin curtain, and so that it does not wrap or open, hang loads on it from the inside, for example, plastic bags of sand.

Well, the booth is ready. To give it a finished beautiful look, cover it on the outside with varnish or paint.
Insulated kennel for a dog: what to do to make your pet feel comfortable in winter
We have already said that additional insulation is not needed in all cases. Your dog may be shaggy enough to do without a warm kennel, and your yard may be close enough to cold winds and dampness. But still, the issue of insulation and waterproofing is worth a separate consideration.
- First of all, remember not to put the booth directly on the ground. This will cause the floor to rot quickly. Install logs on the ground - thick boards, logs or bricks, on which you raise the finished booth. This will be the first step towards waterproofing the structure.
- Turn the structure over so that it is installed upside down. Treat it properly on the outside with an antiseptic, cover it with roofing material and nail on top additionally 100 to 50 bars, also pre-soaked with an antiseptic. Turning the structure over to its original position, cover the bottom with glassine, lay a layer of insulation (mineral wool or foam), lay again with glassine and fix the finished floor.
- The walls are insulated in exactly the same way and lined with clapboard from the inside. Thus, you will provide the structure with a thermos effect, which allows you to keep warm from the inside.
- If you do not have the opportunity to put the booth on a hill, or the area is characterized by high humidity, provide the booth with additional waterproofing: lay polyethylene between the surface and the insulation layer when you equip the floor, ceiling and walls.

All these methods will help you to provide protection from moisture, drafts, dampness, which means that the pet will be comfortable and cozy in the booth.
How to properly care for a doghouse
As you know, it is not enough to build a good building, you need to take care of it in order to extend the maximum service life and postpone the time of major repairs. This is especially true for the kennel.

You should clean up at least once a month: sweep away the leftovers, bone remnants, wool and debris that the pet dragged inside. You should also regularly disinfect the kennel: in winter, once a season is enough, from spring to autumn, especially in summer - at least every month. The same applies to the fight against parasites. It will not be superfluous to treat the booth with creolin, lysol or formalin. While the walls treated with mortar are drying, it is better for the dog to stay away from the booth.
For example, with a retractable roof or retractable walls. Thus, you can also simply brush away snow from the surface of the booth in winter, and it will be much easier to disinfect from the inside of the structure.
In addition, in the event of a breakdown or damage to any element of the structure, it is much easier to replace it if it is collapsible than to repair everything completely.
Video about building a dog house
Well, now on your site a place is equipped for your shaggy pet, thunderstorms of the surroundings and a faithful watchman. The dog will certainly be happy with such a cozy and comfortable home, and will feel the love and respect of its owner! If you want to know more about the construction of the booth, ask questions in the comments, we will be happy to help you with your work!
Recommended:
How And How To Insulate The Garage From The Inside With Your Own Hands - Instructions With Photos And Videos

Self-insulation of the garage. Insulation selection, material calculation and process description
How To Insulate A Chimney Pipe With Your Own Hands: Choice Of Materials, Technology, Instructions With A Photo

Why insulate the chimney. What materials are used to insulate chimneys. Preparation and technology of insulation of chimneys of various shapes and designs
How To Independently Insulate Windows For The Winter, Various Methods, Tips, Recommendations (with Video)

Practical advice on self-insulation for the winter of wooden and plastic windows. Materials and tools used
How To Draw A Cat Or A Cat In Stages: Drawing Technique, Nuances Of Drawing A Kitten, How To Draw (tools, Etc.), Photo

How can you quickly draw a cat, cat or kitten. Plot selection. Step by step drawing. Applied technique and tools. Video
Advantages Of Drawing For Adults

How drawing is beneficial for adults
