Table of contents:
- Author Bailey Albertson [email protected].
- Public 2023-12-17 12:53.
- Last modified 2025-01-23 12:41.
Windows 10 PC, laptop or tablet won't turn off or turn on by itself: why this happens and how to fix it

A high-performance PC or tablet can run for months or even years without reinstalling Windows 10. Yet there comes a point when it starts to turn on by itself or not shut down. You can fix the problem by reinstalling the system, but this method is not suitable for all users. Let's consider the causes of the problems and the various ways to fix them.
Content
- 1 Why Windows 10 PC Doesn't Turn Off After Shutdown
-
2 Practical Solutions with Shutting Down Windows 10 PC
-
2.1 How to uninstall Intel RST software component
2.1.1 Video: Diagnosing System Overheating with Intel RST
- 2.2 How to update the Intel ME driver
-
2.3 How to update all drivers on PC
- 2.3.1 How to update the driver in the "Device Manager" Windows 10
- 2.3.2 Video: How to Install and Configure Drivers in Windows 10
- 2.4 How to remove all devices
- 2.5 Checking power settings in Windows 10
-
2.6 Reset BIOS settings
- 2.6.1 How to reset BIOS settings
- 2.6.2 Video: How to Reset BIOS Settings
-
-
3 Why does a PC or laptop turn on by itself after shutdown
-
3.1 Power button faulty
3.1.1 Using the power switch of the system unit instead of a button
- 3.2 Incorrect BIOS settings
- 3.3 Disable Windows 10 Wake Timers
-
-
4 Why Windows 10 Tablet Won't Turn Off
4.1 Video: What to do if your Windows 10 tablet is frozen
Why Windows 10 PC won't turn off after shutdown
The user, having instructed the PC to shut down, may notice that the shutdown of Windows 10 does not occur or freezes with the "Restart" / "Shutdown" screen. The problem can be caused by:
- incorrectly installed (under-installed, stuck at the stage of applying settings) Windows 10 updates;
- Incorrect driver settings (in particular, PC chipset drivers), incompatible driver versions;
- non-working components of the motherboard (main) of a PC, laptop or tablet (in particular, a break or breakdown of the shutdown button of a PC or gadget);
- simultaneous connection of a large number of devices and active work with files and folders on one of them, for example, an external hard drive;
- incorrect BIOS settings related to waking up the PC by devices (mouse, keyboard, Wi-Fi network card, etc.);
- other problems, for example, virus / spyware activity of malicious programs that got from the network.
Practical solutions for shutting down Windows 10 PC
Solutions to the problem can be very diverse: from updating / fixing drivers to minor PC repairs. In the second case, it is recommended to contact the nearest computer service center.
How to uninstall Intel RST software component
Intel RST (Rapid Storage Technology) Driver is a software tool that combines multiple hard drives into a single RAID array. The technology makes sense in server stations where dozens of multi-terabyte storage drives are connected to one PC. An ordinary user, if his computer is not a network server, does not need to combine two or more disks into a single storage partition.
The source archive with the Intel RST driver is a collection of SYS, CAT and INI files, suitable only for installing the driver through the system "Windows Device Manager", which includes the driver update / installation wizard.
Removing Intel RST is simple, the instructions are the same for all versions of Windows from Vista to 10:
-
Give the command "Start" - "Control Panel".

Entering the Windows "Control Panel" The most convenient way to open the panel is from the Windows main menu
-
Select Programs and Features.

Entering the Windows Uninstaller Switch Control Panel icons to Windows Classic List
-
Find Intel RST in the list, right-click on it and click "Uninstall" (or click the "Uninstall" button above the list of programs).

List of installed programs in the "Programs and Features" section Find Intel RST in the list and delete it
Video: Diagnosing System Overheating with Intel RST
How to update the Intel ME driver
If uninstalling Intel RST did not help and Windows 10 reinstalled it soon after, update all Intel drivers, in particular the Intel ME program.
To update the Intel ME driver, do the following:
- Download the updated driver package for your laptop or PC model from the Intel website.
- Go to the Windows "Control Panel" and uninstall the Intel drivers, specifically the Intel Management Engine program. This is recommended if you have not updated the Intel chipset driver for several years, and during this time an update has already been released.
- After uninstalling, Windows 10 may prompt you to restart your PC. When restarting, it is possible that the screen resolution and video mode will be reset to minimum or average values, and the coolers will turn on at maximum speed.
- Run the Intel ME Devices Installer and follow the Windows Installer Wizard prompts.
All Intel drivers will be reinstalled, after which Windows 10 will restart again at higher (or original) screen resolutions and OS performance settings.
After updating the drivers, right-click on Start, select Device Manager and check if the Intel driver is in place and what version it is. The required devices (processor, video adapter, etc.) are located in the corresponding categories of the list.
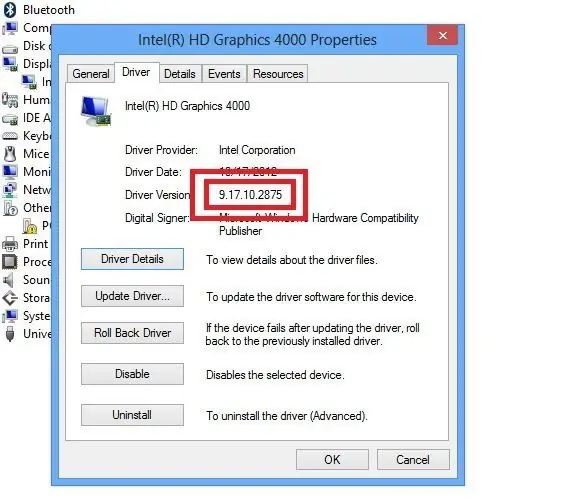
Open Windows Device Manager and check the driver version
The list items are expanded by clicking on the "+". To display driver information, right-click on the title of the device of interest, select Properties, and then Driver.
If you have a pre-downloaded archive with driver service files (do not confuse system files from the archive with the EXE installation package), unpack it and in the properties of the driver of the problem Intel device, click the "Update driver" button. Follow the instructions in the Windows Driver Wizard.
How to update all drivers on a PC
There are several ways to update all drivers on a PC:
- uninstall and reinstall each device in Windows Device Manager;
- delete from the list of programs manually using the "Delete" command / button;
- use the driver disk that came with your PC or laptop;
- use media (DVD / flash drive) for system recovery (installation disc, bootable LiveCD-media, C drive image, etc.).
Which one to choose is up to you. Even in the worst case scenario, getting your PC drivers back into proper condition is easy.
How to update the driver in Windows 10 Device Manager
Launch Device Manager and do the following:
-
Select the problematic device, right-click on it and select "Update Driver".

Command to update the driver in Windows 10 for a failed device Select the failed device and instruct the driver to update
-
Select manual driver installation.

Running a driver search on available drives in Windows 10 Manual search can help if driver autosearch did not work
-
Select the location (location) of the driver files downloaded in advance from any source.

Specifying the path to driver files in the Windows 10 wizard Windows 10 Driver Wizard will update the problematic driver
- The Windows Add New Hardware Wizard will reinstall the driver.
Video: How to Install and Configure Drivers in Windows 10
How to remove all devices
Check if a flash drive, external drive, smartphone or tablet is connected as a storage device, USB TV tuner, 4G modem, printer, etc. First open the Windows "Device Manager" and give the command "View" - "Show hidden devices ".
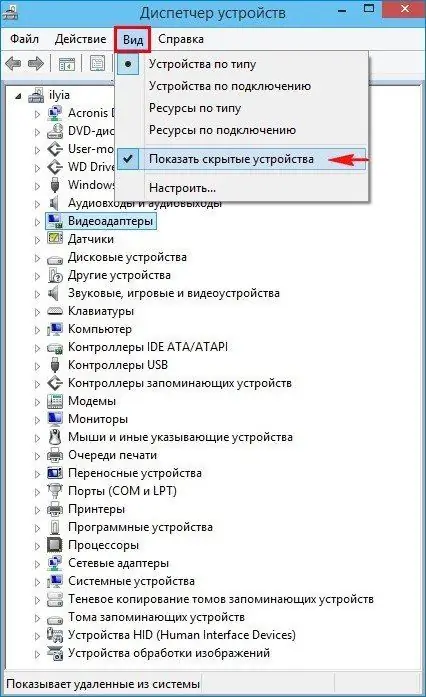
In fact, Windows 10 will show all powered off and old devices
Disconnect any devices that interfere with your operation. The removed devices will be marked as disabled (missing). In normal mode, they would temporarily disappear from the general list. Their icons will be paler than the rest.
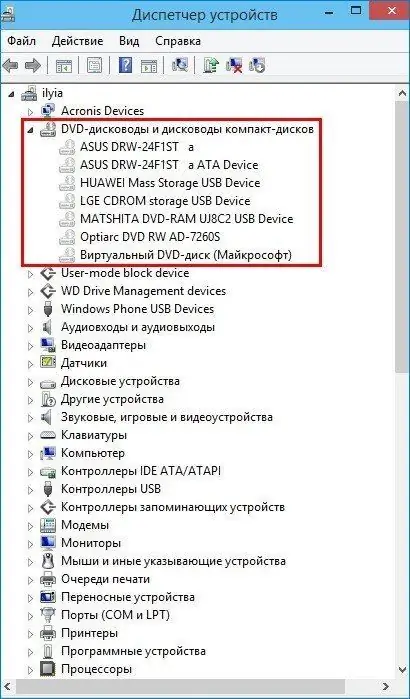
Windows 10 device icons are faded (Windows clipped objects)
Restart Windows 10.
Checking power settings in Windows 10
Do the following:
-
Give the command "Start" - "Control Panel" - "Power Supply". Select the desired power plan and go to its advanced settings by clicking on "Configure power plan".

Entering Windows 10 Specific Power Plan Settings Click on "Power plan settings" to go to advanced settings
-
Get to the following options: Link State Power Management, PCI Express, and Media Settings (video quality optimization). Set everything to maximum. Setting up the processor requires clear distinctions: the minimum frequency (state) of the processor should be zero, and not half or all of the working resource, so that in idle mode the PC or laptop does not consume excess energy and does not overheat. The maximum frequency (or limit value in megahertz for a given processor model) is 100%.

Adjusting the processor frequency in Windows 10 Set the maximum value to full and the minimum to zero
- Close all dialog boxes by clicking "OK" and restart Windows 10.
Most likely, Windows will run noticeably faster (especially if you do not have the most powerful and fastest PC), since it uses all available resources.
Reset BIOS settings
Unlike BIOS, UEFI firmware is mouse controlled and is a more advanced program installed on the motherboard of a PC, laptop or tablet, and is somewhat similar to Symbian or Android. All commands have been translated into Russian.
How to reset BIOS settings
Do the following:
- After turning on the PC and the Intel (or other manufacturer) logo appears on the screen, press Del (on a PC) or F2 (on any type of laptop). This is indicated by the line with the instruction at the bottom of the screen.
-
If you have Award / Phoenix BIOS, give the command “Load / save optimal defaults” and confirm the request by pressing “Y” and Enter on the keyboard.

Resetting Award BIOS settings The BIOS request message to reset the settings in the Award BIOS looks like this
-
If you have AMI BIOS (on laptops), give the command "Exit" - "Exit and reset settings (Reset settings)". Confirm the reset request (if any).

Reset AMI BIOS settings Select Exit & Discard Changes (Discard Changes) to reset AMI BIOS
The PC or laptop will restart in default BIOS mode.
Video: how to reset BIOS settings
Why does a PC or laptop turn on by itself after shutdown
There can be several reasons: from a malfunction of the motherboard and its components to incorrect software settings.
Power button defective
A working, working button, which was pressed once, closes the contacts once using its own jumper. If the contact is broken (for example, a spring or a rubber membrane in a button has burst), then as a result of sinking, the button will be pressed on its own due to jolts (if you are carrying a laptop) or vibration. Do the following:
- Disassemble the case of the PC system unit (or open the laptop) from the side of the button.
-
Find the "Power SW" connector (or with a similar inscription) and check the serviceability of the cable (or loop) coming from the button. Disconnect this ribbon or cable.

Wires of the power button of the PC system unit Remove the cable plug from the PC power button connector
- Assemble the PC (laptop) back and connect it to the mains.
Wait for the PC or laptop to turn on by itself (for example, during the day). If this does not happen, proceed to the next instruction.
Using the power switch of the system unit instead of a button
This method is not a panacea. It will work if the power button is closed tightly, for example, when it is tightly sunk.
After removing the button, do not try to close the contacts from its cable on the motherboard, and do not try to work without this button for many years. If there is a command "Start" - "Shutdown Windows" to turn off a PC or laptop, then turning on the PC will cause inconvenience for the user, especially on a home PC, where the switch, like the outlet, is located in an inaccessible place, somewhere behind the PC or the user himself. The power button must be replaced as soon as possible.
Incorrect BIOS settings
Let's take the Award BIOS version as an example. The instructions in the instructions are given in Russian. Do the following:
-
Enter BIOS in the familiar way and select "Manage power settings".

Entering BIOS Power Settings Go to the Power Management Setup submenu
-
Disable Wake Up On Alarm / Mouse / Keyboard by setting it to Disabled (wherever it was previously Enabled). Navigation instructions are included in each BIOS version - each key is programmed for a specific action (see description at the bottom of the screen).

Disable auto power on PC by keyboard, timer and mouse in BIOS Turn off Power-by-Alarm / Mouse / Keyboad by setting Disabled everywhere (if it was Enabled)
- Press F10, confirm saving the settings and restart the PC.
Disable Windows 10 Wake Timers
All other wakeup settings related to hibernation are unlikely to take effect if you shut down the PC with the Shut Down Windows command and did not put it into Standby / Hibernate mode. Still, a complete shutdown is a power outage of the PC, not a sleep / standby / absence mode.
If you often resort to "Hibernation", do the following:
- Open the familiar Windows 10 Power Options settings and navigate to your current plan.
-
Open the “Sleep” - “Allow wake-up timers” branch of settings and set the “On-line” and “On-battery” sub-items to “Disable”.

Turn off PC wake timers in Windows 10 The timer is only configurable for sleep (including hybrid) Windows 10
- Save the settings by closing all windows with OK (where confirmation is required) and restart Windows 10.
All of the above about resume settings applies to configuring each HID-compliant (Windows-controlled human) device through Windows Task Manager and Task Scheduler, and other methods of waking up a PC.
Why Windows 10 tablet won't turn off
There are several reasons why your Windows 10 tablet won't turn off:
- shutdown button failure. Operate from the sensor by giving the command "Start" - "Shutdown" - "Shutdown". You can also reboot by giving the last command "Reboot". This will help clear your tablet's RAM by saving your work and closing unused programs. However, the off button must be replaced;
- freeze of the tablet. By holding the shutdown button for up to 20 seconds, you can ensure that the tablet goes into "restart". Then restart the tablet and continue working.
If the already proposed solutions to the problem did not help, then you can use the following:
- press the hidden Hard Reset button with a paper clip or a toothpick. This button is usually protected from accidental pressing by a tiny (1 mm) hole;
- wait until the battery is completely discharged. Perhaps Windows 10 will go into hibernation, sleep or shutdown;
- Try to use programs that create a total performance overload as little as possible, especially when you do not have the fastest and most powerful tablet.
Video: What to do if your Windows 10 tablet is frozen
Even if a PC or tablet refuses to turn on and off normally, this does not mean that you will lose Windows 10, installed drivers and application software that you have been successfully working with for a long time. You can fix everything: restoring your computer will not always involve the loss of personal information.
Recommended:
How To Fix An Electric Kettle: How To Seal It, How To Repair It, If It Does Not Turn On, Etc. + Photos And Videos
Detailed instructions for repairing an electric kettle for those who are friends with a screwdriver and a multimeter. How to fix a cracked case. Tips and instructions
What To Do If, After Flashing Android, The Phone Or Tablet Does Not Turn On, Does Not See The Network, Does Not Charge

Why does my smartphone or tablet not work after changing the Android version. How to troubleshoot various problems. How to properly reflash a device
A Laptop Or Computer Does Not See A WiFi Network: What To Do, How To Solve The Problem With Wi-Fi Connection

Why does the system not display your Wi-Fi access point? What to do if only your network is not visible or if the list of connections is completely empty
What To Do If Yandex Browser Does Not Open On A Computer - Why The Program Does Not Start, How To Make It Work

Why "Yandex Browser" does not open in Windows. Solution to the problem: disabling autorun, updating and reinstalling the browser, clearing the cache and registry
The Phone Fell Into The Water: What To Do, Including With An IPhone In The Toilet, If The Gadget Does Not Turn On, The Speaker Does Not Work
What to do if your phone falls into the water: instructions for saving your phone. Features for different models. Frequent misconceptions. Possible problems after drying
