Table of contents:
- Author Bailey Albertson [email protected].
- Public 2023-12-17 12:53.
- Last modified 2025-06-01 07:32.
Intercoms "Visit": advantages, disadvantages, installation and repair features

To improve the security of housing, as well as offices, businesses and other premises, it is necessary to install an access control system. For this purpose, intercoms are increasingly being installed on the entrance doors to an apartment, a private house, as well as on gates and gates. Depending on the type, they allow you to hear and see who has come to you, which is very convenient, since you simply will not open the door to uninvited guests. Modern intercoms "Visit" require minimal maintenance, are easy to connect and have a long service life.
Content
-
1 Advantages and disadvantages of the Vizit doorphone range
1.1 Comparison of popular models of intercoms "Visit"
-
2 Installation of intercoms Vizit
2.1 Video: installation of the "Visit" intercom
-
3 Connecting Vizit intercoms
-
3.1 How to connect Vizit to an entrance intercom
- 3.1.1 Connecting a Video Doorphone to a Digital Entrance Doorphone
- 3.1.2 Connecting to a coordinate access intercom
- 3.1.3 Video: how to connect to a coordinate-matrix driveway intercom
-
3.2 Change of individual code
3.2.1 Video: changing the individual doorphone code "Visit"
-
3.3 Vizit doorphone repair
- 3.3.1 Reasons why the intercom may not work
- 3.3.2 Video: intercom repair
-
- 4 Reviews
Advantages and disadvantages of the Vizit doorphone range
Intercoms "Visit" (Vizit) were first produced in the Soviet Union back in 1984. All the time this trade mark has been constantly developing and now it is registered not only in Russia, but also in some countries of Europe, Asia and the CIS.
The products of the Vizit trademark are presented in a wide assortment, are of high quality and affordable prices, therefore its popularity is constantly growing. The safety and quality of the "Visit" intercoms is annually confirmed by both domestic and foreign certificates (PCT, UkrSEPRO, S).
Intercoms "Visit" are divided into:
-
single-subscriber, they are usually installed on a wicket, entrance gates or entrance doors to a private house;

Single subscriber intercom A single-subscriber doorphone outdoor panel is installed on a wicket, entrance gate or entrance doors to an apartment or private house
- group, provide connection of 2-6 subscribers, therefore they are installed at the entrance to the floor, office or house for several apartments;
-
multi-apartment, they are most often installed in the entrances of apartment buildings. According to the principle of work, they can be:
- coordinate, allow you to connect up to 80 subscribers;
-
digital, up to 255 users can be connected to one intercom.

Multi-subscriber intercom Multi-subscriber intercoms are usually installed in the entrances of apartment buildings
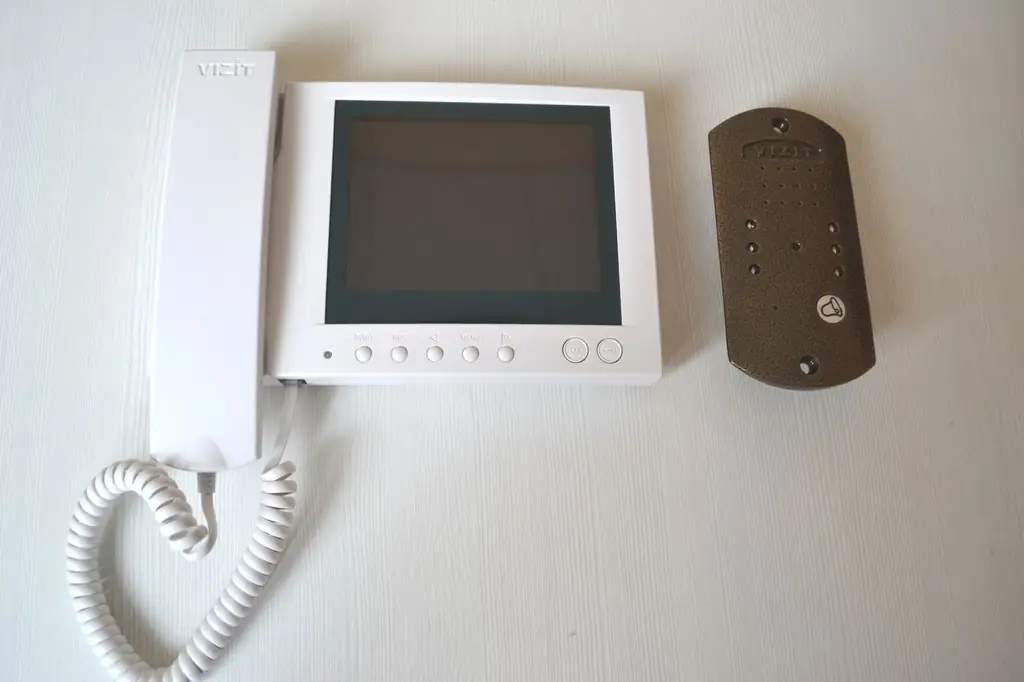
In addition, there are “Visit” audio and video intercoms. The latter option, in addition to voice communication, transmits the video image of the arrived guest.
Advantages of Vizit systems:
- availability of a certificate for quality standards in Russia, Ukraine and Europe;
- a large selection of components, allowing you to create various remote access systems;
- high level of compatibility with similar equipment from other manufacturers;
- good protection from vandals;
- ease of installation and operation;
- the ability to work in a wide range of temperatures - from -40 to +50 o C. The equipment can be used in almost any region of our country;
- affordable cost.
There are practically no disadvantages of the "Visit" intercoms. The disadvantages of such devices are mainly related to their type and do not depend on the manufacturer:
- video intercoms with one camera do not allow you to constantly monitor the entrance to the room, since usually the camera works only at the time of the call. There are modern models to which you can connect several cameras and thus carry out constant video monitoring;
- multi-site models may not always provide complete security. Your neighbors can run strangers into the entrance, so you shouldn't rely only on electronics, you should always remember about vigilance and attentiveness.
Comparison of popular models of intercoms "Visit"
First, let's consider the differences between the call blocks for a single-subscriber audio and video doorphone "Visit":
-
The outdoor audio panel BVD-403A has the following characteristics:
- sound notification of a call;
- loudspeaker communication, which allows you to simultaneously talk with the visitor and hear him;
- button to open the lock;
- sound signal for opening the lock;
- a stand that rotates the unit by 20 o;
- power supply from a constant current source with a voltage of 16-25 V;
-
operating temperature range from -40 to +45 o C.

Outdoor panel BVD-403A The outdoor panel BVD-403A is designed to work as part of an audio intercom
-
Video panel BVD-403CPL has:
- built-in color video camera of PAL standard;
- infrared illumination;
- call block for 1 subscriber;
- sound notification of a call;
- button for remote opening of the lock;
- a stand that rotates the unit by 20 o;
- duplex loudspeaker communication;
- video call control;
- power supply from a constant current source with a voltage of 16-25 V;
-
operating temperature range from -40 to +45 o C.

Outside panel BVD-403CPL The BVD-403CPL outdoor panel has a built-in video camera and is designed to work as part of a video intercom
And now let's compare the monitors of the most popular models of "Visit" intercoms:
-
VIZIT LM-430С:
- color monitor with a diagonal of 2.5”;
- duplex communication;
- lock opening button;
- the ability to adjust the brightness, contrast and saturation of the image, as well as the call volume;
- MONITOR button to view the video image in front of the door;
- the ability to connect an additional video camera;
-
when using the BKM-440 switching unit, it can simultaneously work with the entrance and floor call block.

Monitor VIZIT M-430С The VIZIT M-430C monitor has the ability to connect an additional video camera
-
The VIZIT-MT460CM model has the following differences:
- color screen with a diagonal of 5.6 ";
- the ability to switch signals received from different cameras;
- the ability to connect an additional monitor or tube;
- autonomous memory for 32 frames;
- built-in non-volatile clock;
- the ability to record a frame during a conversation with a visitor;
- information on the availability of new personnel;
-
automatic photo recording in AWAY mode (when the owners are not at home).

Monitor VIZIT-MT460CM The VIZIT-MT460CM monitor has a 5.6 diagonal screen
-
Monitor VIZIT-MT440CM:
- screen with a diagonal of 3.5 ";
- without using a switchboard, you can additionally connect a video camera, a "Call" button and a call unit;
- when installing the switch, you can additionally connect a video camera and simultaneously work with two call units. In this case, the call can come both from the BVD and from the "Call" button;
- 5 call melodies;
-
non-volatile memory for 64 black and white photos.

Monitor VIZIT-MT440CM The VIZIT-MT440CM monitor has a non-volatile memory for 64 black and white photos
Installation of intercoms Vizit
Before proceeding with the independent installation of the "Visit" intercom, you need to prepare the following tools:
- building level;
- knife;
- pliers and wire cutters;
- measuring instruments;
- impact electric drill;
- screwdrivers;
-
cable. If the distance between the calling unit and the monitor is less than 50 meters, then it is enough that the cross-section is 0.6-1 mm 2, with a cable length of more than 50 meters, the cross-section must be increased to 1.5 mm 2.

Video doorphone installation tools To install a video intercom, you will need simple tools that each master has
The easiest option would be to install an audio communication device, since it only includes a handset and a call panel. Installation of a video intercom is a little more difficult, but you can cope with this task yourself without the involvement of specialists.
Most modern video intercoms can connect multiple cameras to increase the field of view. Almost all intercoms have an electric lock control function.
The intercom installation procedure will be as follows:
-
Choosing a place. To ensure the optimal viewing angle for the video doorphone and the ease of use of audio models, it is necessary to correctly install. It is recommended to install the outdoor panel at a height of 1.5-1.6 m from the floor level on the outside of the door. Depending on the selected model, the installation can be carried out in a niche made in the wall, or directly on the wall. In the apartment, the intercom can be placed in any convenient place, the main thing is that its signal can be heard in all rooms.

Choosing a place to install the intercom The intercom is best installed at a height of 150-160 cm
-
Cabling. The stability and durability of the equipment will largely depend on the quality of the wiring. To connect the doorphone, you can use a regular telephone cable, twisted pair or a communication signal wire. At the entrance, the walls are usually not grooved, so the cable is laid in boxes or fixed with special fasteners. Do not run the wire near power cables, as they may degrade the audio and video signal quality. If an electric lock is connected to the intercom, a separate signal cable is laid for it.

Intercom cable To connect the intercom, a four-core cable with one shielded core is required with a long distance from the monitor to the door station
-
Installation of an intercom. After completing the preparatory work, you can proceed to the direct installation of the intercom:
-
a hole is made in the wall for wires;

Hole for wires A hole is made in the wall for laying wires
- on the wall mark the place for the intercom. To correctly position the device, you must use a building level;
-
in the marked places, using an electric drill, make holes for the dowels, and then attach the mounting bracket;

Bracket installation The mounting bracket is secured with self-tapping screws
-
connect the monitor and fix it to the wall.

Mounting the monitor The monitor is installed on a bracket and the wires are hidden under it
-
Video: installation of the "Visit" intercom
Connecting intercoms Vizit
In order to connect the intercom, a four-core cable is usually used. On the calling panel of the audio on-door speakerphone, only the common and audio lines are switched. If an adapter is installed, all cables except "video" are connected to it. All four wires are used to connect the video intercom.

All four wires are used to connect the video intercom
If the distance between the intercom and the call panel does not exceed 40-50 meters, then a regular four-core wire is used for connection. If the distance is more than 50 meters, a shielded coaxial cable must be used.
How to connect Vizit to an entrance intercom
Before you independently connect the "Visit" device to the entrance intercom, you need to find out the type of system installed in the entrance. It can be digital or coordinate. In order to determine this, you can use the following methods:
- score the brand of the intercom in the search engine and get all the information about it from the website of the system manufacturer;
- call the company that performed the installation;
- disassemble the existing tube and look at its printed circuit board. There are jumpers in the digital intercom, but they are not in the coordinate system.
Entrance intercoms Raikmann, Keyman, Laskomex are usually digital, Vizit, Eltis and Cyfral are coordinate. In a digital intercom, when connecting a new tube, you must set the DIP switches to the same position as on the old one, otherwise it will not work. In order to create your own apartment number, you need to jump the corresponding switches. For example, for apartment 13, jumpers 1, 4, 8 are connected. The general principle of setting the jumpers is as follows: the sum of the numbers indicated near the closed contacts should be equal to the apartment number.

It is necessary to install the jumpers in such a position that their sum is equal to the apartment number
Connecting a video intercom to a digital door intercom
In order to coordinate the operation of these devices, the MSC interface module is used. Often it is built into a video intercom, and if it is not there, then you will have to buy an external unit:
- Connect 4 wires from the video monitor to the terminals marked "Monitor" according to the diagram indicated on the interface unit.
- The wires from the outdoor panel are connected to the terminals marked "Call panel" in the same way.
- To contacts "Add. camera "connect an additional video camera, if it is provided in the system.
-
Two wires from the driveway system are connected to the “Line” terminals. The polarity indicated in the diagram must be observed.

Adapter MSC The MSC adapter is used to connect the video intercom to the digital access system
Connection to a coordinate entrance intercom
To connect to the coordinate-matrix entrance intercom, the MSC module is used, it can also be built-in or purchased separately.

The MSC adapter is used to connect the video intercom to the coordinate-matrix driveway system
Connection is performed in the same way as in the previous case.
Video: how to connect to a coordinate-matrix driveway intercom
Change of individual code
In order to open the entrance doors, special codes are used. The general code consists of four digits. It is installed during the installation of an entrance intercom and is communicated to all residents. The individual code usually has three digits and can be selected for each apartment separately.
In order to independently set the code for your apartment, you will need two people: one should be near the intercom, and the second - near the outdoor panel. This algorithm works for both digital and coordinate drive systems:
- The apartment code is dialed on the calling panel. Pick up the tube and press the "door open" button 6 times for 5 minutes.
- The display will show “Dial the apartment number” and one beep will sound. This means that you can write new code.
- A new combination is dialed and reported to the person who is near the outdoor panel, who makes the call.
- The assistant presses the "open door" button and the new combination is written into memory.
Video: changing the individual doorphone code "Visit"
Repair of intercoms Vizit
If you find that the "Visit" intercom has stopped working, you must first find the malfunction, and only then proceed to fix it
Diagnostics:
- if you live in an apartment building, you need to ask your neighbors if the intercom works for them;
-
inspect the door station. It is located in an easily accessible place, so it can be damaged by hooligans or as a result of any negative factors;

Damaged call panel Since the call panel is in an easily accessible place, it is often damaged by vandals
-
use a multimeter to call the wiring to determine a possible break;

Multimeter To determine the location of damage to the wiring, use a multimeter
- check for power supply. If the corresponding indicator on the monitor or on the calling panel does not light up, it means that the required voltage is not supplied. The reason may be a breakdown of the power supply, failure or disconnection of a circuit breaker, or a broken wire.
Reasons why the intercom may not work
The reasons why the "Visit" intercom does not work, and how to eliminate them:
- the tube holder (tongue), which turns on the voice network, may be damaged. Its repair consists in soldering the damaged area or replacing the damaged part;
- the button for opening the electric lock does not work. Most likely, the switch under the button does not work. It may jam from trapped debris or not work due to a broken wire that supplies power. If the switch is out of order, it must be replaced;
- after receiving a signal from a visitor, pressing the door open button will reset the call. You need to check the integrity of the wires;
- after picking up the handset, the call is dropped. The reason is usually a breakdown of a switch that needs to be replaced. If the defect occurred immediately after the installation of the intercom, then most likely the polarity was reversed;
-
it is hard to hear the visitor or the owner of the apartment. The reason is the speaker or microphone. Some tubes have a trimmer. Before adjusting it, you must remember the original position so that you can restore the factory settings.

Intercom repair If wires break inside the device, they must be soldered in place.
If you yourself could not determine the cause of the intercom failure, you will have to invite specialists to solve the problem
Video: intercom repair
Reviews
The organization of the control system of access to the house using the intercoms "Visit" increases the level of security and also improves the comfort of living. It is not necessary to invite expensive engineers to select and install such systems. There are ready-made sets of Vizit equipment, which almost any home craftsman can install without problems. Their cost is affordable, and their high reliability and simple operation only contribute to the popularity of the models discussed in this article.
Recommended:
MDF Doors: Entrance And Interior Doors, Their Varieties With A Description And Characteristics, Advantages And Disadvantages, As Well As Installation And Operation Features

Doors from MDF: features, characteristics, varieties. Making and installing MDF doors with your own hands. Door restoration. Reviews, photos, videos
DIY Installation And Intercom: Connection Diagrams And Installation Features, Description Of The Main Stages

Types of intercoms. Sequence and basic installation diagrams. Features of mounting a wireless intercom. Connecting to a TV
Estet Doors: Types And Models, Their Advantages And Disadvantages, As Well As Installation Features And Customer Reviews

What are the features of the Estet doors. How they might look and what is the production technology. Feedback from real users about Estet doors
Torex Doors: Entrance And Interior Models, Their Advantages And Disadvantages, As Well As Installation Features And Customer Reviews

Doors "Torex": production features, advantages and disadvantages. Model range, fittings and components. Features of installation, tips for use
Composite Tiles, Advantages And Disadvantages, Review Of Popular Brands With Descriptions, Characteristics And Reviews, As Well As Installation Features

Composite shingles: history of use, characteristics, pros and cons. Features of installation. Review of popular brands. Reviews of builders and home owners
