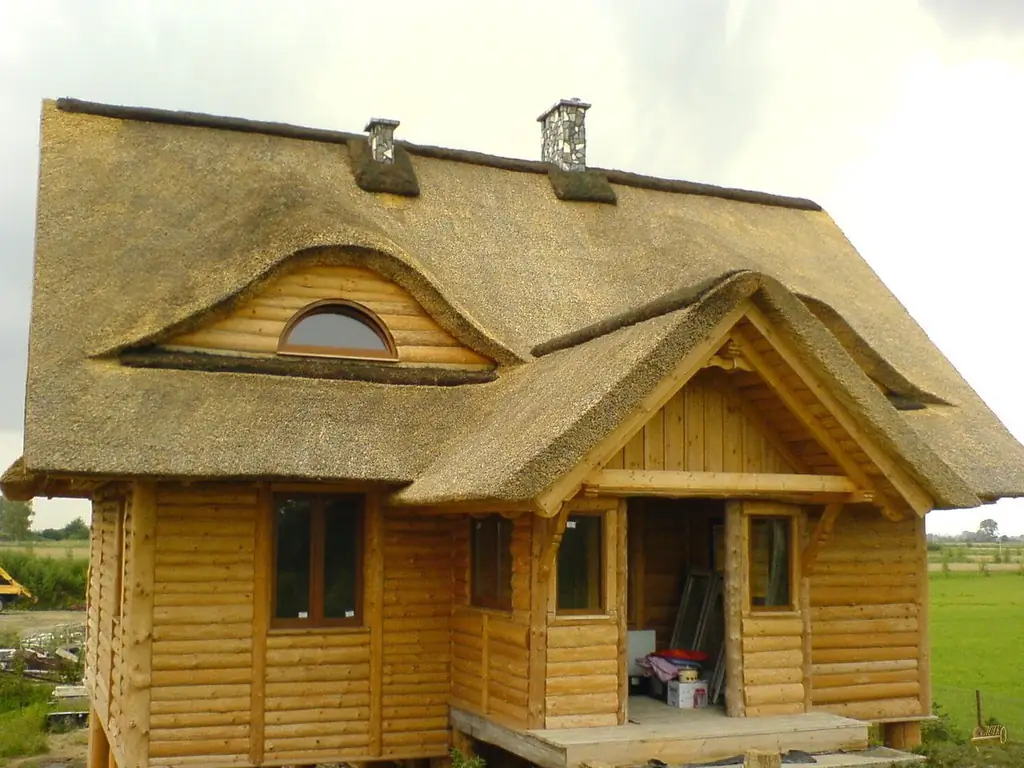
Table of contents:
- Thatched roof - a practical and non-standard solution in construction
- The main features of a thatched roof
- Features of self-assembly of a straw structure
- Basic rules for the construction of a thatched roof
- Thatch roofing system
- How to maintain the protective qualities and attractive appearance of a thatched roof
- Artificial thatch roofing in modern construction
- Thatched roof reviews
- Author Bailey Albertson [email protected].
- Public 2023-12-17 12:53.
- Last modified 2025-06-01 07:32.
Thatched roof - a practical and non-standard solution in construction

Straw is an affordable and inexpensive material that reliably protected the roof of our ancestors' homes for a long time. Modern developers rarely use natural raw materials in the construction of buildings and residential buildings, but they appreciate its quality characteristics and erect straw structures when a non-standard solution, a special design is required.
Content
-
1 The main features of a thatched roof
1.1 Video: Thatched Roofs - Design Ideas
- 2 Features of self-assembly of a straw structure
-
3 Basic rules for the construction of a thatched roof
- 3.1 Video: Old Secrets of a Thatched Roof
- 3.2 How to prepare the straw
-
4 Construction of a thatched roof system
- 4.1 Video: a method of laying a straw roof with wire and screws
-
4.2 Step-by-step instructions for installing a thatched roof
4.2.1 Video: installation of a reed roof
-
5 How to maintain the protective qualities and attractive appearance of a thatched roof
5.1 Can a thatched roof be repaired?
- 6 Artificial thatched roofing in modern construction
- 7 Reviews of thatched roofs
The main features of a thatched roof
For construction, the highest quality straw is selected - it can be grain crops, stems of wild reeds, reeds and other high-growing cereal plants. The most suitable is the reed due to its long stems and impeccable resistance to constant exposure to moisture, low temperatures, and abrupt climate changes. A reed roof can last for more than 50 years, subject to competent high-quality installation and timely maintenance.

Thatch is great for covering the roof of a private house
The material is unattractive to rodents, copes with extreme operating conditions, does not absorb moisture. To improve the fire-fighting properties, it is enough to treat the straw with fire retardants, then the reeds in terms of the degree of protection will be comparable to modern roofing materials, for example, with bituminous tiles.
Among the main advantages of a thatched roof are the maintenance of a comfortable temperature regime for people, both in summer and in winter. Such a roof looks original and adds a special flavor to the design of the building, while the costs are quite cheap, which increases the demand for it among the owners of private houses, cottages, suburban real estate.

Thatched roof is fire resistant
Video: Thatched Roofs - Design Ideas
Features of self-assembly of a straw structure
Do-it-yourself roofing construction will save money, but doing all the work alone is quite difficult.
The assembly of a reed roof is completed in less than a month, taking into account all the recommendations of experts. The optimal slope angle of the structure is from 35 degrees. The thickness of the material and the level of the wear layer is determined by the technological characteristics of the roof (slope angle, slope size) and the length of the reed itself. The absence of a drainage system implies an individual choice of spillway systems.

Thatched roof has a clear structure
Today, a thatched roof is classified as an elite and expensive type of roofing, which is used by wealthy people in European countries. Handwork, environmental friendliness of raw materials and their limitedness are the main factors in the formation of the cost of the coating - from 150 euros per 1 m 2. The absence of a hydro and thermal insulation system brings the cost of building a thatched structure closer to a tiled roof.

You need to put straw on the roof in a certain sequence
Basic rules for the construction of a thatched roof
The special properties of the material make the installation of the structure unique, different from the technologies known to the modern consumer.
The roofing cake system is represented by the following elements:
- wooden truss system;
- a layer of solid crate from OSB sheets;
- clamping bar on the ridge element;
- stiffening ribs as a basis for OSB boards;
- straw sheaves, fastened by means of clamps;
- metal mesh to cover the ridge element;
- tiled or straw roofing for the ridge.
The complexity of the work lies only in the correct assembly and strengthening of the straw. Installation of such a coating is allowed regardless of the features of the roof structure. These can be gable, domed or semicircular roofs. With experience in installation work, you can make the roof unique in its kind.

Thatched roof can be any shape
If you understand the features of the structure, then the rafter system, together with the crate and support rails, is experiencing the main load, so they should be given maximum attention.
To provide maximum protection for your home, a thatched roof has the following requirements:
- for small structures with slopes less than 2 meters, an angle of inclination of 30 degrees is allowed;
- large structures are equipped with an inclination of more than 40 degrees;
- with round slopes of roof windows, the optimal slope is more than 30 degrees.
When building a straw roof, you should pay attention to a number of features:
-
Depending on the region of the roof, in the places of the straw protrusions outside the roof structure, the material is compressed within 4-6 cm. Taking this feature into account, the reed is laid without gaps, pressing it tightly against the base, while the amount of protrusion beyond the bar should not exceed 15 cm.

The reed is laid on the crate The reed should fit snugly against the base
-
For stitching sheaves with corner beams, steel wire is used, the fixing pitch is 22 cm.

Sheaf of straw for the roof Straw on the roof is stacked in sheaves
- If the roof slopes are over 40 degrees, provided the distance from the ridge to the clamping strip is less than 7 m and the length of the roofing material is up to 1.5 m, the reed should be laid at the junction to the roof with a layer of 25 cm, and at the top of the structure - from 22 cm. In addition, a layer of roof wear with a thickness of 9 cm should be provided. If the length of the slope from the ridge to the plank exceeds 7 m with a slope of the structure up to 40 degrees and the length of the roofing material is from 1.5 m, then the reed is laid with a thickness of 28 cm and 25 cm accordingly, and the level of the wear layer should be about 10 cm.
With a flat and solid foundation, a straw roof will turn out to be reliable and strong. Initially, the reed may vary in color, length and thickness, but within the first year, all differences will be ironed out. In the process of laying the material, it is important to keep the gap from the ridge to the reed layer up to 6 cm.
Video: Old Secrets of a Thatched Roof
How to prepare straw
The construction of a high-quality roofing structure requires careful selection of material, therefore, reed stems are selected only strong, flexible, free of foliage, they should not be moldy.

When choosing stems, it is important to consider their length and thickness.
It is recommended to harvest the material in autumn or early winter, when the plants are completely dry. It is necessary to cut the stems with a sharp tool, best of all with a sickle. The straw is transported in bundles with soft steel wire.
Before proceeding with installation, you should make sure of the following:
- the sheaves are not damaged, there are no traces of rot, burning;
-
during harvesting and transportation, the integrity of the stems is not violated.

Reed stalks Straw or cane must be prepared in advance
Thatch roofing system
A roof made of such an unusual material as straw will turn out to be durable and beautiful if you follow the installation technology. Consider the main options for assembling sheaves of straw construction.
-
Sewing with wire and needle. When accessing the roof space from the outside and inside, the work is carried out simultaneously by two builders, when the straw is stitched with wire in a circular manner, bypassing the structure beam. If work from the inside is not possible, then a special needle and wire fastening rings are used. The complexity of the operation makes this method of firmware the most unclaimed among specialists.

Wire You can fix the bundles of straw with a wire
-
Stitching with nails. It is very easy to work with such fasteners, and in the case of correctly assembled battens, installation is quick. The main condition is that the crate must be thick. The only drawback of construction is the high consumption of nails, which affects the total cost of laying the coating.

Thatched roof sheathing Straw can be attached to thick crate with nails
- Using constrictions. A piece of wooden board, a piece of strong wire or 8 mm bamboo can be used as a constriction. This method is widely used for mounting reeds to a structure, as well as as a decorative design for a roofing surface.
- Fastening straw with screws. Thanks to the screws, the wire reliably fixes the straw not only outside, but also inside the roofing cake. The basis for the fasteners is a lathing or a roof beam. Before proceeding with the installation, you should prepare the fasteners - fix the screws to the wire at the required distance, while the length of such a structure should cover the entire roof area. Straw sheaves are reliably attached to sheathing panels made of fiberboard (plain or glued) or plywood
When laying straw, a reliable insulation of the roof is created, since the sheaves are attached to the lower structure without a gap, which guarantees its tightness. Due to the separation of the inner and outer layers of the roof, high strength, fire safety and ease of use of the roof are achieved.
Video: a method of laying a straw roof with wire and screws stitching
Step-by-step instructions for installing a thatched roof
Consider the most common technology for laying reed roofs.
-
We lay the lathing taking into account the load of 35 kg per m 2. For this we use a wooden beam with a section of 50x50 or 40x60. The distance between the elements is 30-35 cm.

Sheathing device The length, cross-section and pitch of the rafters must correspond to the expected loads on the roof structure
-
We make the base for the reeds. It can be made of multi-layer moisture-resistant plywood or drywall, fiberboard or chipboard. The substrate must be clean, even and have a good seal. If skylights or a chimney are planned on the roof, the openings for them must be waterproofed.

Thatched roof side The reed is laid on the base
- We prepare the reeds: remove the leaves and spoiled stems, treat with antiseptics.
- We divide the reeds into three groups: thick stems, long and short. Long and medium ones are used for laying on the widest part of the roof. Short ones - along the pediments, on the ridge and in the corners. We select sheaves from stems of the same diameter and length.
- The first layer can be created from old reed or cattail stalks (no more than 0.02 of the total volume of material). If the stems of the reeds go beyond the boundaries of the base of the roof, they must be squeezed towards the outside so that there are no gaps left. For this we use stainless steel wire made of galvanized materials. The first fastener is carried out with an indent from the bar of 20 cm, the second - at a distance of 12 cm, all subsequent ones - every 30 cm.
- We fix the sheaves as tightly as possible, stitching with thin wire on the corner beams. The section of the fixing wire is 1 mm.
- First, we fix the sheaves with temporary fasteners - this will help to present the final result and take into account the installation features. Clamps can be numbered to control layer thickness.
-
We fix the reeds. With an open roof, you can use wire-stitching technology; for a closed roof, screws or nails with wire clamps are better suited. We bend one end of the nail to make a loop, we hook the wire onto it.

Fastening straw with screws Fastening with screws - the easiest way
-
Fill in and align the layer. For this we use a spade-bat. Heavy shovels are used for final leveling and small ones for joining planes.

The worker presses the bundles of straw A spade-bit is used to tamp the layers
- Cut off the protruding stems. It is recommended to leave the topmost layer of reeds a little loose, this will increase the protective functions.
- We process the roof with a flame retardant compound.
- If the house has a fireplace or wood-burning stove, it is necessary to protect the reeds from sparks around the chimney.

Thatched roof looks very original
Video: installation of a reed roof
How to maintain the protective qualities and attractive appearance of a thatched roof
The construction of a roof by highly qualified craftsmen using quality materials can be unjustified if the roofing is not properly maintained during operation. To preserve the original appearance of the roof, home owners need to perform a number of actions.
-
To avoid the accumulation of dampness, attic rooms should be ventilated with dormer windows. To maintain natural ventilation at the locations of the cornices, you can build 10 × 20 cm holes on each side of the house, then it will be possible to achieve increased air exchange.

Thatched roof with attic Thatched roof loft equipped with a dormer
- Do not allow moss and lichen to germinate on the roof, the roots of which will gradually destroy the structure. It is enough to inspect the roof several times a year, removing germinating plants from its surface with a rake.
- If a leak or other defect is found, it is important to restore the integrity of the coating as soon as possible.
- In a strong wind, the ridge structure may gradually collapse, so it is disassembled and laid again, having previously eliminated the breakage points.
- Rodents and birds can often also destroy a thatched roof, therefore, if damaged areas are found, they are repaired, followed by processing with special compounds and thorough drying.
To carry out dismantling work, specialists use special ladders, very light and simple, which are equipped with a bend - it is attached to the roof ridge. The bend serves as a place of support for a thin board, which is laid on the roof slope.

When laying straw on the roof, use special ladders
Thatched roofs have a dense structure that does not allow air to pass through, therefore temperature changes and stagnant air contribute to the formation of moisture on the surface of the wooden roof elements. In such an environment, fungal microorganisms and mold develop rapidly. As a rule, the coating of a four-slope structure, not equipped with dormer windows, exhaust and ventilation systems, is exposed to such a lesion.
Roofs with two or three slopes are equipped with two holes for timely ventilation so that one is located at the highest point of the pediment, and the other at the lowest. With only the upper opening, it will be difficult to achieve adequate ventilation of the attic, especially in calm weather. The optimal hole size is 5 × 10 cm, the smaller diameter of the lumen is not able to cope with the task.
If a thatched roof is erected on a building without an attic for keeping livestock, then the number and size of holes is determined based on the thermal technical requirements of the room, the design features of the roof, the animals, and the region of location.

Thatched roof perfectly protects the house from snow
Four-slope or hipped-roof structures without gables are equipped with half-gables - they are attached directly to the ridge. Holes are made on the half-gables (their total size is up to 150 sq. Cm), which are closed with gratings with wooden frames or upholstered with a simple metal mesh. To prevent birds and rodents from entering the lower cornice holes, it is also enough to nail the nets.
If it is not possible to make half-fronts, then the hipped roof is equipped with insulated exhaust pipes and air vents.
With a small additional investment for good ventilation in the animal housing, a favorable microclimate will be ensured, as well as heat retention.

Thatched roof maintains an ideal indoor climate
It is necessary to ventilate the under-roof space of any building. In the cold season, tow or straw plugged into the ventilation holes will help to avoid strong cooling of the attic. Stables, cowsheds, chicken coops and other livestock buildings are equipped with open vents, regardless of the season.
Can a thatched roof be repaired?
The appearance of bast loops, which fasten the straw bundles, serves as a signal for roof repair. As a rule, such a roof is restored by laying a new layer of material on top of the old one. Installation can be carried out using flexible wooden branches or thin wire.
To fully assess the situation, it is necessary to carefully inspect the place of deformation and the adjacent elements. At this stage, it is not necessary to leave material even with minor defects, therefore all rotten reeds are replaced. Otherwise, old stems can become a source of infection for the whole canvas.
With timely dismantling, it is enough to replace a small section, but in case of technology violations at the stage of roofing, the likelihood of larger-scale works increases.
The most vulnerable spots in a thatched roof are valleys, adjoining strips, ridge, skylights. It is best to do repairs in the summer, because it is at this time that a good view of the roof is achieved, and there are no obstacles to the performance of work.
Artificial thatch roofing in modern construction
Successful experience in using straw as a roofing material prompted the development of a new product that is not inferior in properties to natural raw materials and surpasses them in operational characteristics. Ordinary straw has good thermal insulation properties, it is easy to get and use in construction, but like all natural materials, it cannot withstand the processes of burning and decay. Such a roof is not able to compete with modern products that protect residential and industrial premises from any kind of negative impact.

For the roof, you can use imitation straw
Developers are trying in various ways to improve the original quality of thatched roof by subjecting it to chemical treatment, but as it is used, such a roof still becomes vulnerable to rodents, birds, ultraviolet rays, and fire.
The solution to the problem was artificial straw, which has fire-fighting properties, resistance to climatic changes. Outwardly, it is practically impossible to distinguish a modern analogue from a natural material due to the precise transfer of the shape and size of each straw stem. Due to the special structure, the roofing cover better drains rainwater, and the fasteners hold the structure and reduce the risk of defects in strong winds.
Among the main advantages of an artificial thatched roof are:
- wide temperature range of application - from +50 to -50 degrees;
- lack of sources of an allergic reaction;
- resistance to dust and dirt accumulation;
- maintaining the saturation of the color palette throughout the entire service life;
- delivery of only high quality material - cases of fake are completely excluded;
- the ability to mount on a roof of any design and shape;
- ease of installation and maintenance;
- ease of installation even in the absence of skills for such work.

Artificial straw in appearance and characteristics is not inferior to the real
Thatched roof reviews
The design of the thatched roof will not only emphasize the uniqueness of the design solution, highlighting the house or cottage among similar buildings, but will also guarantee the durability and protection of the premises. Country houses with straw or reed roofs attract people's attention, create a cozy atmosphere and harmoniously fit into the natural environment.
Recommended:
Roofing From Vulture Panels, Its Structure And Main Elements, As Well As Features Of Installation And Operation
Brief information about roofing SIP panels. Design features of roofs assembled from multi-layer products. Sandwich panel installation rules
Metal Roofing, Including The Features Of Its Design And Operation, As Well As Installation Errors
Features of the device of a metal roof, structural elements. How to properly equip such a roof and avoid mistakes. Operating rules
Roofing From A Profiled Sheet, Including The Features Of Its Design And Operation, Repair, As Well As How To Avoid Mistakes During Installation
What kind of profiled sheet can be used for the roof. DIY cold and insulated roof device. What mistakes are possible. Features of operation and repair
Polycarbonate Roofing, Including The Features Of Its Construction, Operation And Repair, As Well As How To Avoid Mistakes During Installation
Characteristics of polycarbonate as a roofing material. How to make a polycarbonate roof with your own hands. Features of operation and repair. Photo and video
Soft Roll Roofing And Its Structure, As Well As Features Of Installation, Operation And Repair
Brief information about rolled roofing materials. The device of a soft roll roof, especially its installation and repair. Recommendations for use
