Table of contents:
- Author Bailey Albertson albertson@usefultipsdiy.com.
- Public 2023-12-17 12:53.
- Last modified 2025-06-01 07:32.
Roof made of SIP panels: design features and the procedure for performing installation work

The construction of a gable roof using traditional technology is a rather complicated process. But labor and time costs can be significantly reduced if, instead of the usual materials, modern composite products are used - SIP panels. How exactly to do this will be described below.
Content
-
1 What is SIP panels
1.1 Materials for SIP panels
- 2 Roof construction from SIP panels
-
3 Installation of a roof from SIP panels
-
3.1 Algorithm for calculating snow load
3.1.1 Table: standard snow load by region
-
3.2 Calculation of wind load
- 3.2.1 Table: Regulatory Wind Load Values by Region
- 3.2.2 Table: Wind pressure coefficient (pulsation coefficient)
- 3.2.3 Table: the value of the aerodynamic coefficient for a gable roof - the air flow vector is directed to the slope
- 3.2.4 Table: the value of the aerodynamic coefficient for a gable roof - the air flow vector is directed to the pediment
- 3.2.5 Table: load-bearing capacity of roofing sandwich panels with uniformly distributed load according to the "single-span beam"
- 3.3 Required tools
- 3.4 In what weather can you work
-
3.5 Installation of SIP panels
3.5.1 Video: Installing a SIP Roof
-
- 4 Operation of the roof from SIP panels
- 5 Roof repair from SIP panels
- 6 Reviews about SIP panels for the roof
What are SIP panels
The correct name for these panels is SIP, which stands for Structural Insulated Panel. And if in Russian, then this is a well-known sandwich - a three-layer panel, the outer layers of which are durable sheet material, and insulation is laid inside. The edges of the panels are made in such a way that they can be tightly connected to each other, that is, the joint is absolutely tight.

The sandwich panel is a shell made of a durable weather-resistant material, filled with insulation
SIP-panels are perfect for the construction of building envelopes erected using frame technology. Wall and roof panels are somewhat different from each other, but both are:
- allow you to build a structure in an incredibly short time;
- reduce the amount of work due to the fact that the insulation is already present in the structure;
- due to the high manufacturing accuracy, they perfectly match each other, which greatly simplifies the construction process and minimizes the costs associated with the human factor.
This building material also has negative sides: due to the fact that the temperature of the inner and outer layers of the panel in winter is very different, a bending moment arises between them, leading to the appearance of gradually accumulating deformations. If even the slightest mistakes were made during installation, these deformations will lead to leaks.
Materials for SIP panels
By the type of facing layers, SIP panels are divided into two types:
- On the one hand - corrugated steel sheet with a polymer coating, on the other - OSB-board (a multilayer type of chipboard, in which chips in each layer are laid in one direction, and at the same time from layer to layer the direction alternates with a rotation of 90 degrees).
-
On both sides - OSB board.

OSB sandwich panel OSB sandwich panels are usually used as a base under a soft roof
The first option can be used as a roof covering in its pure form, the second as a basis for bituminous tiles, ondulin, roll materials, etc
The following can be used as an insulating layer:
- expanded polystyrene (in everyday life we usually call this material foam);
- polyurethane foam;
- polyisocyanurate foam;
- mineral wool.
The first three varieties are foamed polymers. They are cheap and absolutely not afraid of getting wet, but at the same time:
- burn with the formation of extremely toxic smoke (polyisocyanurate is slightly flammable and belongs to category G1);
- even with slight heating (for expanded polystyrene - from +80 o C), harmful gases begin to emit into the air (the result of thermal decomposition of polymer molecules);
- do not provide sound insulation.
With mineral wool, the opposite is true: it does not burn, does not emit gases, it is an excellent sound insulator, but it costs more and, when wet, completely loses its heat-insulating properties. In addition, in SIP panels, mineral wool has an important drawback: as practice has shown, from the effect of alternating loads, this material soon exfoliates and peels off from the shell, as a result of which the panel falls apart.
For the construction of a roof from SIP panels, you will need the following materials:
- threaded fasteners - bolts or screws;
- a sealant based on silicone or polyurethane foam (commonly called polyurethane foam), which does not give an acidic reaction;
- roofing material (if SIP panels with OSB sheathing are used).
Roof construction from SIP panels
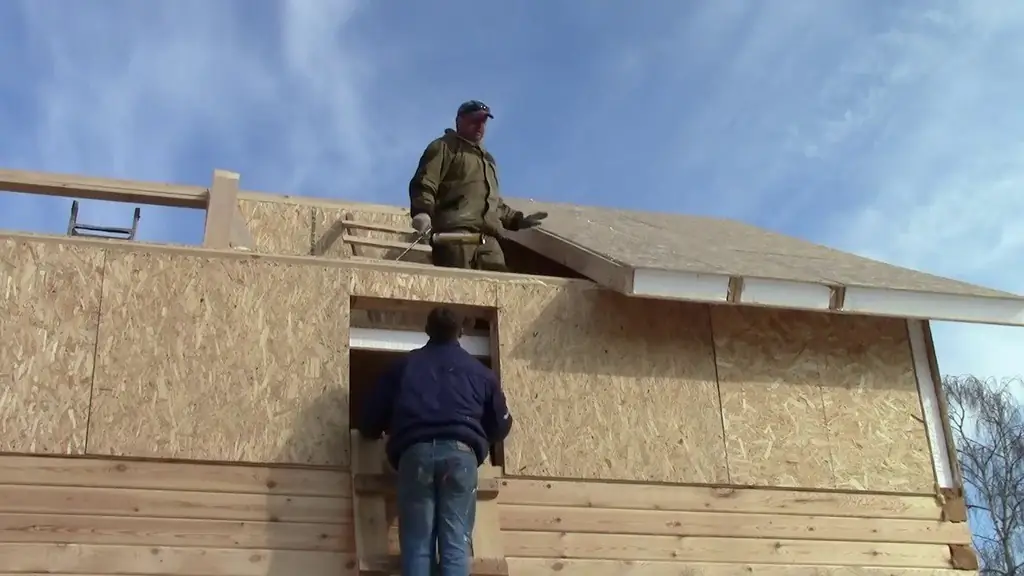
A roof made of SIP panels, in contrast to the usual one, is extremely simple: the panels just need to be laid obliquely, resting the lower edge on the Mauerlat, and the upper edge on the ridge beam. The latter fits on racks or gables. As you can see, the design in its simplicity resembles a house of cards, only of a much larger size. It is so strikingly different from a regular roof that these differences are worth discussing in detail:
-
Lack of rafters and lathing. This fact is explained by the fact that SIP panels themselves have sufficient rigidity to resist snow and wind loads. Two sheets of durable material, spaced at some distance, work like a set of I-beams laid side by side. Likewise, a sheet of paper folded like an accordion becomes hard enough to place a glass on top of it.

Demonstration of the strength of the SIP panel The SIP panel does not deform even under the weight of the car
- No ventilated gap. Accordingly, there is no need to install grids on the eaves, aerators, special ridge elements for air circulation, which, moreover, must also be correctly calculated. A ventilated gap is simply not necessary: SIP panels are designed in such a way that steam cannot penetrate to the cold outer layer, on which it could condense. The inner layer, due to the presence of a heat insulator, has room temperature, so that the steam on it does not turn into water.
- Lack of vapor barrier. This circumstance stems from the previous one. Indeed, if the steam, due to the structural features of the SIP panel, cannot penetrate where it is not supposed to penetrate, then there is no need to lay the vapor barrier.
With a significant ramp length (more than 4 m), an intermediate run has to be installed between the ridge and the Mauerlat, but this is much easier to do than to assemble a conventional rafter system
The gap between the panels in the area of the ridge is filled with insulation and then covered first with a plastic cover, and then with a ridge strip made of galvanized steel.

Insulation is laid under the ridge strip, covered with a plastic pad
Installation of a roof from SIP panels
Before proceeding with the construction of the roof, it is necessary to take into account the restrictions regarding its slope. The latter cannot be less than:
- 5% (2 o 51 '), if the panels are not extended in length (that is, one panel overlaps the distance between the Mauerlat and the ridge) and no skylights are expected in the roof;
- 8% (4 o 30 ') otherwise.
When choosing a slope, one should also take into account the peculiarities of the climate in the construction region. If precipitation falls in large quantities, the optimal angle of inclination will be 40 o or more - in this case, the risk of moisture getting into the joints between the panels will be the smallest. In regions with a warm and dry climate, roofs made of SIP panels are installed with a slope of up to 25 o. With a lower slope and less material, less material is required, respectively, the roof will turn out to be cheaper.
Algorithm for calculating snow load
Knowing the slope and dimensions of the slopes, it is necessary to calculate the snow and wind loads to which the roof will be subjected. The calculation method is described in SNiP 2.01.07-85 “Loads and Impacts”. For the calculation, you will need the standard values of snow and wind loads for a given region - they are taken from SNiP 23-01-99 * "Construction climatology".
The snow load on the roof slope can be determined by the formula S = S g ∙ m, where S g is the standard weight of the snow cover, m is the coefficient that takes into account the roof slope and is equal to:
- 1 - if the angle of inclination of the slope does not reach 25 o;
- 0.7 - with a slope of 25-60 o;
- 0 - for steeper roofs (snow load is not taken into account).
The standard snow load is determined using a reference table.
Table: standard snow load by region
| Snow region | I | II | III | IV | V | VI | Vii | VIII |
| S g, kgf / m 2 | 80 | 120 | 180 | 240 | 320 | 400 | 480 | 560 |
The region to which the construction site belongs can be determined by the climatic map issued by Roshydromet.

The entire territory of our country is divided into 8 regions, each of which has its own level of snow load.
For example, if it is planned to build a house in the Nizhny Novgorod region with a roof slope of 45 o, then the calculation of the snow load will look like this:
- Nizhny Novgorod is located in the IV climatic region, which means that S g = 240 kgf / m 2.
- The factor m for an angle of inclination of 45 o is 0.7.
- S = S g ∙ m = 240 ∙ 0.7 = 168 (kgf / m 2).
Wind load calculation
Strong winds can damage the roof of a house: tear off the roof covering or overturn the entire structure. This is due to the separation of the wind force into horizontal and vertical components when the air flow collides with a stationary obstacle located at an angle.
Wind load is calculated by the formula W m = W o ∙ k ∙ C, where:
- W o - the normative value of the wind pressure, typical for the wind region;
- k is the ripple coefficient;
- C is the aerodynamic coefficient, which depends on the geometric parameters of the building structure;
- W m is the required value of the wind load.
Table: guideline values of wind load by region
| Wind region | I a | I | II | III | IV | V | VI | Vii |
| W o, kgf / m 2 | 24 | 32 | 42 | 53 | 67 | 84 | 100 | 120 |
The belonging of an object to a specific wind region can be established by the wind map of Russia.

The standard value of wind pressure depends on the location of the object on the map of the country
Table: wind flow pressure coefficient (pulsation coefficient)
| Height h above ground level | Ripple coefficient k for terrain types | ||
| A | IN | WITH | |
| five | 0.85 | 1.22 | 1.78 |
| ten | 0.76 | 1.06 | 1.78 |
| 20 | 0.69 | 0.92 | 1.5 |
The type of terrain is determined by the following characteristic features:
- A - open space: forest-steppe, deserts, steppes, shores of water bodies, tundra;
- B - forests, cities and villages, an area with buildings more than 10 meters high, evenly distributed over the surface;
- C - densely built-up cities with buildings over 25 meters high.
The aerodynamic coefficient depends on the angle of inclination of the roof and the slope zone.
Table: the value of the aerodynamic coefficient for a gable roof - the air flow vector is directed to the slope
| Slope of the slope, deg. | F | G | H | I | J |
| fifteen | -0.9 | -0.8 | -0.3 | -0.4 | -1.0 |
| 0.2 | 0.2 | 0.2 | |||
| thirty | -0.5 | -0.5 | -0.2 | -0.4 | -0.5 |
| 0.7 | 0.7 | 0,4 | |||
| 45 | 0.7 | 0.7 | 0.6 | -0.2 | -0.3 |
| 60 | 0.7 | 0.7 | 0.7 | -0.2 | -0.3 |
| 75 | 0.8 | 0.8 | 0.8 | -0.2 | -0.3 |
Table: the value of the aerodynamic coefficient for a gable roof - the air flow vector is directed to the pediment
| Slope of the slope, deg. | F | G | H | I |
| fifteen | -1.8 | -1.3 | -0.7 | -0.5 |
| thirty | -1.3 | -1.3 | -0.6 | -0.5 |
| 45 | -1.1 | -1.4 | -0.9 | -0.5 |
| 60 | -1.1 | -1.2 | -0.8 | -0.5 |
| 75 | -1.1 | -1.2 | -0.8 | -0.5 |
A negative value of the C coefficient means that there is an air depression at the roof surface, which tends to tear off the roof. A positive value of the coefficient indicates the presence of wind pressure.
Let's continue the above calculations for a house in the Nizhny Novgorod region. Suppose that it is being built on the shore of a reservoir (type A terrain), the roof height is 10 m, and the prevailing winds blow into the pediment:
- Nizhny Novgorod is located in region I, therefore, the value of the standard wind load is 32 kgf / m 2.
- Based on the height and type of territory, we select the value of the coefficient k from the corresponding table: k = 0.76.
- With prevailing winds in the pediment, the maximum wind load will correspond to the value of the pulsation coefficient C = -1.4.
- Calculated wind load W m = W o ∙ k ∙ C = 32 ∙ 0.76 ∙ (-1.4) = -34.05 (kgf / m 2).
A negative wind load value means that the force will be directed to lift the roof off the building. It must be taken into account when designing a rafter system. But to correctly determine the total load from snow and rain, which will tend to bend the load-bearing frame of the roof, it is necessary to calculate the structure according to the second limiting state when the wind blows into the slope. For this, we use the value of the pulsation coefficient equal to 0.7: W m = 32 ∙ 0.76 ∙ 0.7 ≈ 17 (kgf / m 2). Thus, the total value of the snow and wind loads on the roof will be equal to 168 + 17 = 185 (kgf / m 2).
Having calculated the loads, such a layout of the intermediate runs (additional supports between the ridge and the Mauerlat) is selected so that the bearing capacity of the SIP panels is sufficient. In this case, one should be guided by the data from the table.
Table: load-bearing capacity of roof sandwich panels with uniformly distributed load according to the "single-span beam"
| Span length, m | Standard panel thickness, mm | ||||||
| 50 | 80 | 100 | 120 | 150 | 180 | 200 | |
| 1.0 | 242 | 460 | 610 | 759 | 977 | 1194 | 1341 |
| 1.5 | 151 | 297 | 393 | 490 | 631 | 780 | 874 |
| 2.0 | 106 | 211 | 285 | 358 | 460 | 570 | 641 |
| 2.5 | 65 | 160 | 220 | 275 | 360 | 445 | 501 |
| 3.5 | fifteen | 69 | 110 | 155 | 221 | 294 | 340 |
It can be seen from the table that when using, for example, SIP panels with a thickness of 100 mm for the house we are considering, the span length can be no more than 2.5 m. If it is necessary to close a large area, you should choose thicker panels or arrange additional runs.
Intermediate runs, like a ridge beam, must also be designed for strength. According to the results of the calculation, the section of these elements is selected.
The location of the purlins is chosen taking into account the following requirements:
- self-tapping screws must be screwed in at least five centimeters from the edge of the panel;
- if the panels are extended in length, then there must be a purlin under the joint.
Required tools
In the process of installing the roof, you will have to perform the following operations:
- trimming panels;
- their delivery to the place of installation;
- sealing joints;
- drilling holes;
- screwing threaded fasteners.
Accordingly, the following tools will be required:
- hacksaw (can be replaced with electric shears or a machine with a circular saw);
- vacuum or mechanical gripper (with its help it is convenient to move panels);
- drill or screwdriver;
- rubber mallet;
- measuring instruments: tape measure, level, plumb;
-
assembly gun.

Tools for working with roof SIP panels When installing SIP panels, you will need a standard set of tools for roofing
You cannot cut SIP panels with a steel profiled sheet sheath with a grinder, a gas cutter and any other tools that have a high-temperature effect, as this will damage the protective polymer coating and the steel will soon begin to rust.
What kind of weather can you work
SIP panels with low weight have significant windage, so you can install them at a wind speed of no more than 9 m / s. Installation does not provide for "wet" processes, therefore frost is not an obstacle. But it should be borne in mind that the joints should be sealed with a sealant at a temperature not lower than +4 o C.
During rain, snow or fog, when surfaces become slippery, it is not allowed to work on roofing.
Installation of SIP panels
The construction of a roof from SIP panels is carried out in the following sequence:
- If necessary, the panel is trimmed to the desired size. To do this, lay it on a flat base covered with a soft material - felt or foam. The shavings must be carefully brushed off immediately, otherwise they may subsequently damage the plastic coating. Next, the grip is recorded on the panel. In the place where the grip will be placed, remove the protective film from the panel.
-
The panel is raised to the roof. If there is no lifting device on the site, you can feed the panels along the slipways - leaning boards leaning against the wall.

Lifting SIP panels to the roof With the help of a simple device in the form of two long boards, SIP panels can be lifted onto the roof without the involvement of special equipment
- Immediately before installation, remove the protective film from the bottom surface of the panel.
-
Having laid the panel on the beams, holes are drilled in it, into which stainless steel screws are then screwed. The fasteners should be installed strictly perpendicular to the plane of the panel. Washers and gaskets made of synthetic rubber (EPDM) should be placed under the heads of the hardware. It is not necessary to tighten the self-tapping screws too much - the transferred EPDM gasket will soon harden and no longer provide tightness. Before laying the panel, do not forget to check the horizontalness of the support beams with the help of the building level.

Installation of SIP panels If the SIP panel covers the entire slope, then it is laid and fixed with special screws to the cornice and ridge
- If the roof slope exceeds 15 o, a stop is mounted under the panel in the overhang area, which keeps it from slipping.
-
The next panel is delivered and screwed in the same way. In this case, it must be connected to the previous lock connection. The type of this connection can be different: sometimes there are panels connected with a seam seam, but in most cases the top sheet of one panel has a protruding edge with a wave, which must be laid in the recess of the other panel. A special tool is required for mounting the seam joint.

Locking connection of SIP panels The most common method of joining SIP panels is a thorn-groove lock
- The joint between the panels must be sealed. For this purpose, use a silicone sealant or a special adhesive tape, for example, "Abris Lb 10x2". If the roof is adjacent to the wall, then the junction is also sealed with tape.
-
If the length of the panels is less than the length of the slope, then they are laid with a vertical overlap, starting from the bottom element. The amount of overlap in the transverse joint (between the panels of the second and first row) depends on the slope of the roof:
- up to 10 o - 300 mm;
-
more than 10 o - 200 mm.

Laying scheme for SIP panels If SIP panels are stacked in several rows, then they must be started to be mounted from the lower corner from the eaves to the ridge, gradually moving along the slope
- To ensure the projection of the upper layer necessary for overlap, the insulation and the lower layer on the panel of the second and subsequent rows are trimmed.
- When all the panels are laid, the protective film is removed from them (the film has already been removed from the bottom surface before installation). It is important to do this in a timely manner: if the film stays in the sun for some time, it will no longer be possible to remove it. In this case, the attractive appearance of the panel will be lost. Walking on SIP panels should be done with great care, it is advisable to step on those places where the panels rest on the girders. To avoid damaging the coating, you need to wear shoes with soft soles.
- At the end, the ridge knot is decorated. The gap between the ends of the panels is filled with insulation. If a foamed polymer is used as a heater, then the lumen must be filled with polyurethane foam. If the panels are filled with mineral wool, then the same should be placed in the ridge knot.
The filled gap is covered with a plastic plate on top, which is fastened with self-tapping screws, and then with a ridge strip made of galvanized steel. After installing the panels, additional elements are installed: gutters and pipes of the drainage system, snow holders, etc.
When working with SIP-panels, do not put them on the side where there is a structural element for the lock connection - it can be crushed by the weight of the product
Video: installing a roof from SIP panels
Operation of the roof from SIP panels
The weak point of SIP panels is the protective polymer layer on the steel shell. Being a soft material, plastic does not show special resistance to mechanical stress, that is, it is scratched relatively easily. And the bare metal under the scratch soon begins to rust. Therefore, when operating the roof, you must adhere to the following recommendations:
- Check the roof regularly (about once a year) for scratches. If any are found, the protective coating must be urgently restored.
-
At the beginning of winter, remove leaves and other debris from the roof. You need to walk on it as little as possible and very carefully, while wearing shoes with soft soles. The tool should be soft - use brushes, wooden or plastic shovels.

Cleaning the roof from leaves and debris To clean the roof and gutters, use wood or plastic products
- Do not use solvents or other active chemicals to remove dirt. If it cannot be removed with clean water, a diluted soap solution can be prepared, which must be rinsed thoroughly after cleaning. Use a cotton cloth as a tool.
- In the most extreme case, you can use white spirit, but very limitedly: a cotton rag moistened with it is allowed to move back and forth no more than forty times. If dirt remains, the next attempt can be made only after a half-hour pause.
- Keep the elements of the drainage system clean. If they are clogged with leaves, water will not drain well, which will lead to the formation of ice. Ice, due to its hardness, has a detrimental effect on the polymer coating.
- Be careful when removing snow. Only a wooden shovel can be used.
In order to avoid damage to the roof, it is better to remove the snow not completely, but leaving a layer about 5 cm thick.
Roof repair from SIP panels
If during the inspection, scratches were found, the damaged areas must be treated with a special repair paint corresponding to this type of polymer coating (usually supplied by the manufacturer of SIP panels). The repair is done as follows:
- If the damage reaches the metal and it begins to corrode, the rust is removed.
- The area to be repaired is degreased (white spirit can be used).
- Apply repair paint: if the scratch is superficial - in one layer, when exposed to metal - in two layers with a preliminary primer.
A roof made of SIP panels can leak in interpanel joints and in places where self-tapping screws are installed. With self-tapping screws, proceed as follows:
- An elastic gasket and a washer of a larger diameter are installed under the cap.
- The caps are filled with silicone sealant or bitumen mastic.
-
If these measures did not help, it means that the screw is twisted with a large skew and you need to unscrew it, and install another next to it - strictly perpendicular to the surface of the panel. The hole from under the old self-tapping screw must be filled with sealant with a syringe.

How to properly tighten the roofing screw The roofing screw must be tightened in a strictly vertical position, without pinching the rubber gasket too much
The current joints are restored with patches made of dense fiberglass (grade 220 and higher), impregnated with a special glue containing bitumen mastic.
Trying to seal the joints with a sealant with a reinforcing tape by applying it to a surface, even if scratched with sandpaper, is pointless: very soon the sealant will begin to flake off
More radical renovation consists in covering the roof with bitumen or its more durable alternative - roofing mastic, colloquially referred to as “liquid rubber”. This is a fairly expensive operation, which makes sense only after obtaining objective evidence of its necessity.
Reviews about SIP panels for the roof
The list of advantages of a roof made of SIP panels, as you can see, deserves attention. But the following must be taken into account: firstly, the installation, namely the installation of self-tapping screws and the sealing of the joints, is relatively complex and requires thorough adherence to the technology, and secondly, much depends on the quality of the panels. Hence the conclusion: you should very carefully choose the panel manufacturer and hire only qualified installers with extensive experience in working with this particular material.
Recommended:
Inverted Roof, Its Structure And Main Elements, As Well As Features Of Installation And Operation
What is an inversion roof. Inverted roof types. What materials can be used. DIY installation of an inverted roof. Operating rules
Copper Roof, Its Structure And Main Elements, As Well As Features Of Installation And Operation
Copper roof, its types and advantages. Installation of roll and tiled copper roofs and features of their installation. Copper roof maintenance and repair
Roofing Made Of Ceramic Tiles, Its Structure And Main Elements, Installation And Operation Features

Types and main manufacturers of ceramic tiles. Tiled roof device. How to correctly calculate the parameters and install ceramic tiles
Liquid Bulk Roof, Its Structure And Main Elements, As Well As Features Of Installation And Operation
What are the properties of a liquid roof. How does it differ from other roofing materials. Liquid rubber roofing instructions
Wooden Roof, Its Structure And Main Elements, As Well As Features Of Installation And Operation
What is a wooden roof. What materials is it made of. Installation of a wooden roof and its features. Safety and operation
