Table of contents:
- Author Bailey Albertson albertson@usefultipsdiy.com.
- Public 2024-01-17 22:26.
- Last modified 2025-06-01 07:32.
Do-it-yourself bed for cats: making patterns and sewing products
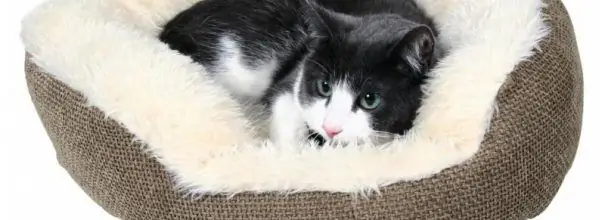
Pet stores sell many different models of beds for domestic cats, differing in color, materials and price. Choose from hammocks, mattresses and baskets for purring pets. But it is better to make a bed or a bed for a domestic cat yourself. This is not as difficult as it seems at first glance.
Content
- 1 Why does a cat need a bed
-
2 How to make a do-it-yourself bed for a cat
- 2.1 Beds with high sides
- 2.2 Lounger with low sides
-
2.3 Cat cushion
2.3.1 Author's experience of making a cushion bed
- 2.4 Lounger sofa
- 2.5 Photo gallery: beds for cats
- 3 Choosing a place for a cat bed
- 4 Testimonials of cat owners about the self-production of beds
Why does a cat need a bed
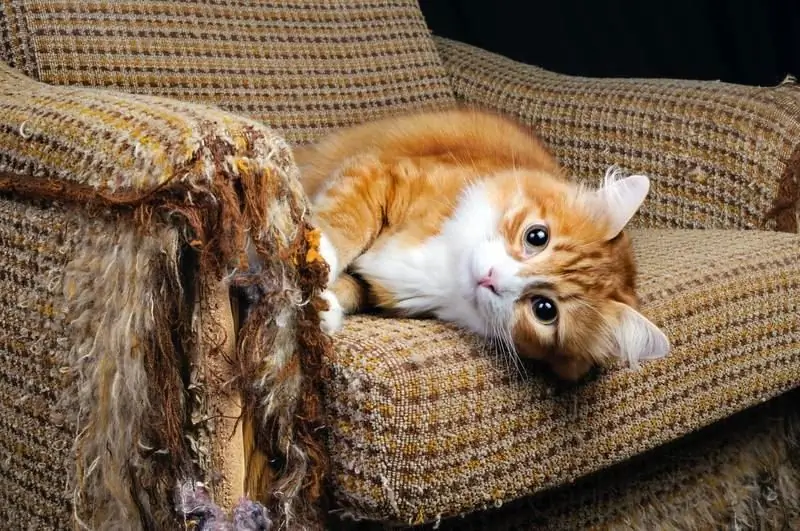
Any domestic cat is looking for a cozy place for a relaxing holiday. Often her choice does not coincide with the desire of the owner. Not everyone will allow an animal to sleep on its own bed or other furniture in the house. The only way out is to provide the cat with an alternative in the form of its own sleeping place.
It is better to make a soft bed for a fluffy pet with your own hands. And it's not just about saving money. The owner will select safe materials and high-quality fabric for the product himself, implementing the idea taking into account the animal's habits. Cats can gnaw and swallow the upholstery of the bed, so it is better not to use velor or other long-pile fabrics for sewing it.
It is better to sew a sleeping place with a bed for a kitten or an adult cat from fabric that is resistant to damage from sharp claws and is easy to wash. The cat sheds, and the stove bench must be periodically cleaned of wool, debris from cat paws accumulates in the sleeping place. Some cats bring food there. A couch is a piece of cat furniture for constant use.
How to make a do-it-yourself cat bed
To make a simple bed, it is enough to take any soft fabric, cut out a shape, fill it with filler and sew the edges. Used clothing that smells familiar to the cat will be immediately accepted. A cat gets used to a new sleeping place bought in a store for a long time or ignores it completely.
For work you will need:
- newspaper or cardboard for patterns;
- felt-tip pen or bright pencil;
- reinforced threads in the color of the main fabric;
- scissors;
- needle;
- needle threader;
- ruler 50-75 cm long;
- pins for fastening parts;
- soft and dense fabric;
- synthetic winterizer or holofiber for stuffing.
If your cat likes to sleep on the bed, then she likes the fabric of the bedding. It is easy to sew a lounger from it, but it will last little if the fabric is made of cotton or silk. It is better to take a blended one for sewing, where cotton in half with polyester or viscose. This fabric is more durable, it will survive more than one wash. Denim is difficult to work with, but the wool is easily removed from it, so the care of the product is easier. Linen fabric wrinkles, it is better to sew a cover from it on a removable mattress for a couch.
To fasten the parts of the bed manually, we use a blind seam. Inject the needle from the inside out to the front side of the fabric and back, fasten the thread with a knot. Having connected both folded edges, we make a stitch from the wrong side, bring the thread to the front side and again connect the folds, pulling the thread.
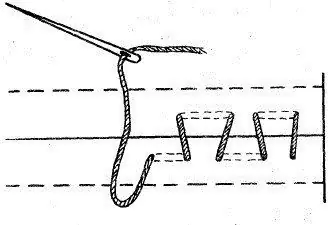
A hidden seam is used in the manufacture of the bed
To make a hand seam that imitates a machine stitch, you need to fasten the thread with a knot and sew with stitches of 0.5 cm. After passing the stitch on the front side and the wrong side, the needle is stuck back. The thread is pulled to prevent the stitches from drooping. On the face of the fabric there will be an even machine stitch, on the wrong side there will be stitches 1 cm long. Another way is to sew the same stitches with a seam "forward needle", and from the end of the line sew again in the opposite direction.
For stuffing the bed, worn soft blouses, light in weight, trimming fabrics, etc., are suitable if the existing padding polyester or holofiber is not enough.
Loungers with high sides
For stuffing high sides, you need foam rubber to keep the shape, or you need to fix the upper edge of the side on a cord (tape) inserted into the seam, which is tied in a knot. The third method is quilting the side filled with padding polyester with parallel lines or bartacks at a distance of 3-5 cm from each other, since after filling with soft filler, the size of the sides decreases.
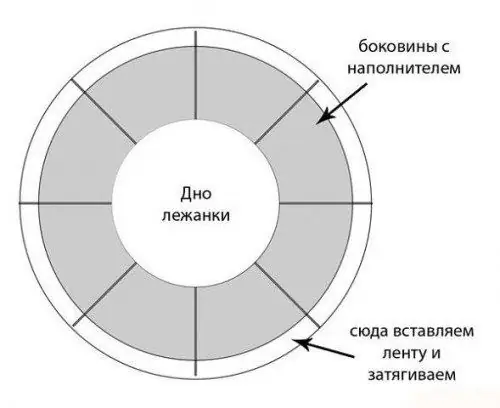
The high sides of the round bed are held by a strapped band
Making a simple one-piece bed with high sides:
- Draw a circle on paper or immediately on a fabric folded in half. From the center, lay 20 cm in all directions to obtain a bottom 40 cm in diameter. The height of the sides is 20 cm and the addition is 3 cm for the top seam, where the tape, cord or braid will be inserted. The total diameter of the circle is 86 cm.
- For structural strength, the resulting circle is divided into 12 equal segments in two ways. In the first case, the bottom diameter of 40 cm is not divided. In the second case, the segments are equal to the diameter of the entire circle, but the very center of the product is not drawn by 10 cm, otherwise it will not be possible to insert the filler, it is too narrow. Lines are pinned, bumped and sewn by hand or on a sewing machine, stitching on the right side of the fabric.
- Segments of the product are stuffed with holofiber or padding polyester. Sew up the sides of the bed at the top with two parallel lines in order to insert a tape or cord between them to assemble and fix the height of the sides. The edges of the fabric are carefully folded inward and hemmed with small stitches, leaving two holes for the tape separate. If the sides are without decor, it is threaded through the upper edge of the bed and the ends of the ribbon are tied together.
- To decorate the sides of the lounger, they are sheathed with lace or frills (flounce) and only after that the ribbon is inserted. The edges of the frills are hidden under a sewn-on tape (a strip of fabric cut along the seam for finishing). Separately, bows or silhouettes of butterflies are made from fabric, contrasting to the color of the bed. The simplest decor is to tie the upper fragments of the sides filled with padding polyester with a thread, and you will get protruding balls from the main fabric.
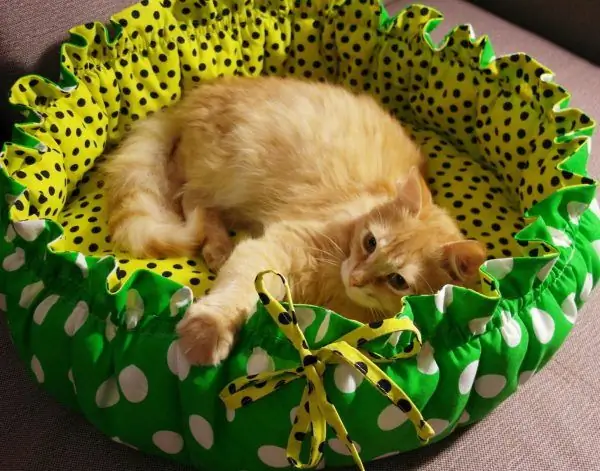
Round bed - one of the product options
To make a one-piece rectangular bed with stable high sides, the fabric is cut based on the entire size of the product when unfolded, with allowances for seams. If the dimensions of the bottom of the bed are 50x40 cm and the height of the sides is 25 cm, then the total dimensions of the pattern will be 92x102 cm.
The fabric is folded in half with the right sides together and covered with a pre-made pattern. If an entrance to the bed is provided, then it is drawn with an oval or rectangular size of 15-20 cm and a depth of 10 cm. Cut with scissors, based on the method of attaching the sides to the folds. If there are ribbons for tying, the fabric in the corners is removed. If the folds between the sides of the bed are gathered into folds and sewn together, the drawing of both parts on the fabric is washed with thread of a contrasting color to indicate the seams.
The order of sewing a rectangular bed:
- Fold both parts of the bed with the right sides together, pin them together, or sweep and sew the edges, leaving one side for stuffing. Sew the shape of the bottom and pillow 50x40 cm in size. The cut corners are not completely sewn, so that the fabric can then be turned to the right side.
- If the corners between the sides are pleated, they are sewn from the front of the product.
- Part of the side with the entrance is sewn only from the top and bottom, and the sides are left half sewn.
- Having turned the bench on the face, the bottom and sides are filled with filler through the open parts.
- The remaining holes are sewn and the ties-ribbons are attached to the upper parts of the sides in the corners. Two lines are laid parallel to the bottom of the bed for stability and improved appearance.
- In another case, the excess fabric at the folds is pushed out or in, wrapped in a roll and sewn over the entire height of the side. Bartacks are made so that the filler does not move.
- You can do it differently, using the protruding fabric in the corners of the sides for decor, sewing on large flowers or silhouettes of butterflies from a fabric of a different color.
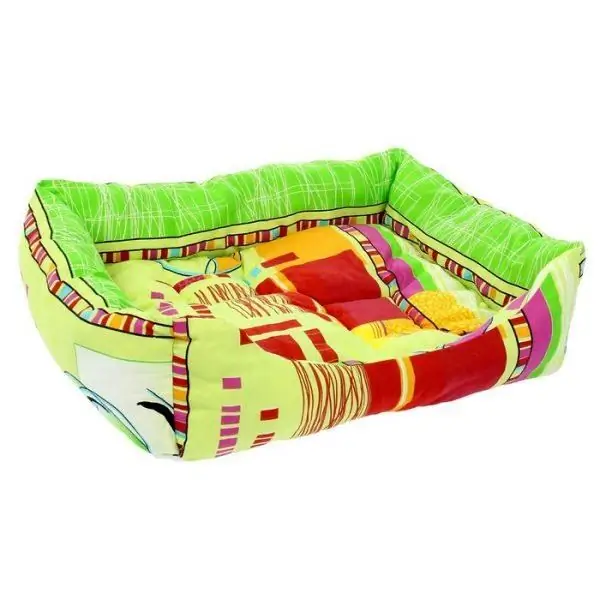
You can make a rectangular bed for your pet
Lounger with low sides
A rounded or oval sleeping place is suitable for domestic cats if they like to sleep curled up in a ball. We sew a stove bench with one-piece sides and a replaceable mattress pad.
For sewing the product, we use two types of fabric: white flock for the side and a colored print with a pattern on a cat theme for the bottom of the bed. Dark cat footprints on a light background are in vogue now. There are fabrics with figures of cats walking with multi-colored umbrellas. Soft fleece is also suitable, but it is difficult to remove wool from it, it is better not to sew from such fabric.
Stages of making a bed:
- We make two patterns (templates) from paper. The first one is 32 cm in diameter. We measure with a ruler 16 cm from the center in both directions. Draw a circle according to the marks made. It will be a removable mattress for the bottom of the bed from two parts. Put the resulting circle on the second sheet of the newspaper and outline the edges with a felt-tip pen.
- To the drawn line, add the double width of the side with a seam allowance, i.e. 10 + 10 + 1 = 21 cm. Draw a line at a distance of 21 cm using a ruler. The result is a circle with a diameter of 53 cm. The second piece for the bottom of the bed is ready. Cut and cut out the bottom from the printed fabric.
- From a strip of thin padding polyester 150 cm long and 30 cm wide, we roll up a roll, pin it off with pins and wrap it with thread along its entire length. Sew the edges of the roll together. Don't forget to use the needle threader. The synthetic winterizer will keep the bead shape.
- From white flock we cut a 12 cm wide board. Fold the fabric in half with the wrong side up. Fold the pattern with a diameter of 32 cm in half and put the folded part on the fold of the flock. We cut it with pins so that nothing moves. We circle with a felt-tip pen and a ruler, mark a circle 12 cm from the resulting line. Draw a dotted line and get a pattern for the upper part of the side.
- Cut out the pad for the mattress from padding polyester with scissors according to a small pattern. We cut the top from flock and the bottom from the print with an allowance, that is, with a diameter of 33 cm. Folding both parts with the right sides together, we pin them with pins and sew along the edge, leaving 12 cm without a seam. Turning to the right side, we put in a synthetic winterizer and sew to the end, bending the edges of the fabric inward. In the finished mattress, we make 5 bartacks, threading from top to bottom through both fabrics and a synthetic winterizer so that the filler does not move inside.
- We put a small piece in the center of the bottom part of the bed on the seamy side of the fabric, circle it with a felt-tip pen. We pin the edges of the bottom of the bed and the side with pins and sew together on the wrong side. We connect the narrow edges of the flock side.
- We put a padding polyester roll and wrap the face of the white flock board on the line along the bottom made with a felt-tip pen. We collect the white board in small folds and secure with pins. We look at how evenly it is gathered. Sew along the line, take out the pins.
- We decorate the seam of the bead with a bright cord with tassels or sew on bows from printed fabric. Decorating the sides with colored lace will make the bed more elegant.
- We put the mattress in the finished bed with the side of white flock on top. The product is ready.
- It is convenient to wash the mattress once a month, so it is better to sew several pieces for one bed.
If you want to make a stove bench with low removable sides and a place to enter, roll up the foam rubber in the form of a roll of wallpaper and the length to match the edge of the finished pillow minus 15-20 cm. Sew the finished bead around the edge of the pillow and turn the seam inside. The bed is ready.
Cushion for cats
A cat bed in the form of a pillow is suitable for an adult cat, but not for a kitten. Toddlers don't like open space. Inside, the pillow is tightly packed with filler: padding polyester, padding polyester, holofiber.
Shapes for a pillow-bed:
- heart;
- square;
- a circle;
- rectangle;
- styling under the muzzle of a cat or dog.
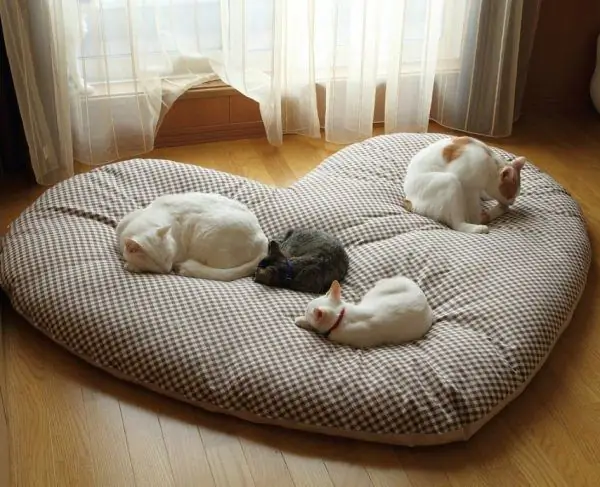
The shape of the cushion can be any
The cut for such a bench is simple, since the top and bottom are the same in shape. The size is selected according to the length of the cat with four outstretched legs, if she likes to sleep in this position. This is 90-120 cm, depending on the age and breed of the animal. To cut parts, a piece of fabric is cut into two equal parts.
Manufacturing procedure:
- To cut the heart-shaped bed, fold half of the prepared fabric in half with the front sides together. We fasten it with pins so that it does not move. We measure along the fold a height of 38 cm from bottom to top. This is the main point of the pattern. From it, with chalk or a piece of soap, draw a left-sided half of the heart, since the lateral fold of the fabric is on the right side. The width of the half is 30 cm to the left of the center. The total height of the piece is 53 + 2 = 55 cm with an allowance.
- Cut out the resulting half of the heart with scissors. We put it on the second part of the fabric, folded in half. We circle or stick in the pins. Cut off excess fabric. The details of the pillow are ready.
- Fold the bottom and top of the pillow with the wrong sides outward, pin and sew, leaving 15 cm for filling with filler.
- We turn the workpiece out onto the front side, insert the holofiber. We bend the edges of the hole inward, sew with a blind seam. On the entire surface of the bed, we make through bartacks every 15-20 cm.
- To decorate the side seam of the pillow, sew a lace ribbon or fringe. The bed is ready.
Author's experience in making a cushion
Today I decided to make a cushion for resting my cat in the hot season. Enough for her to take a place at the interior door on the floor, where there is a draft. So you can get sick. The model of the bed will be in the form of a cat's face. The fabric has taken a thin, cotton jersey. It stretches, which is what I need. Two big blue T-shirts and a piece of white jersey. Procedure:
- For a pattern, I glue two sheets of newspaper. At first I decided to make the pattern completely, but noticed that it turns out asymmetrically. It is easier to draw half of the couch by measuring the height of 60 cm with a ruler along the edge of the newspaper, that is, I set aside 30 cm up and down from the center of the pattern. Width - 38 cm for half of the piece.
- I draw half of the forehead with a segment 13 cm from the center line to the left, mark the point. Its location is 3 cm below the upper edge of the forehead.
- From it I draw an ear 14 cm wide and 11.5 cm high with a rounded edge.
- I outline the side and bottom of the bed.
- Then I mark the white fabric part at a distance of 10 cm from the edge.
- I draw a line from the central point of the pattern to the right by 28 cm and up and down by 20 cm and lay the line parallel to the edge of the pattern. The width of the strip is 8 cm. Its border is a seam for the center of the pillow with dimensions of 20x12 cm on half of the pattern.
- I circle the pattern on the folded fabric and cut with an allowance. Two large pieces of blue jersey are ready. To them - a white oval 56x40 cm and a blue pillow 40x24 cm.
- Now I cut a small white ear and a black overlay on it from old socks, cutting them out of newspaper 3 cm smaller than the main pattern.
- Next, I put a white oval on the front side of the top of the bed, pin it off with pins, fold the edges inward and sew, leaving 6 cm on both sides of the center of the bed for stuffing.
- Then I put a blue fabric 40x24 cm in size on white (central pillow), sew, leaving the seam area open.
- I sew two black corners for the ears on the white part and sew both the resulting details on the blue background of each ear.
- Now I fold the bottom and top of the bed with the front sides together, I outline the edges of the product. I check the uniformity of the fastening.
- Facing on the sewing machine, leaving room for stuffing.
- I turn it over to the front side.
- I sweep and sew the top and bottom of the bed along the line of the inner part of the pillow (40x24 cm), leaving 12 cm unstitched.
- Now I put holofiber in the center of the bench, under the blue oval.
- I sew it up to the end by hand.
- Now I stuff the sides of the bed to elasticity and sew the hole with a blind seam. The work is done. The result is a bed-pillow that resembles an inflatable beach mattress.
To dry the bed-pillow after washing, it is hung on the ribbons, previously sewn to the bottom. After the product has dried, they are carefully tied so that they do not dangle and the cat does not bite them off.
Lounger sofa
At cat shows, owners show their pets lying on miniature replicas of designer furniture. Photo sessions are held with them. For the manufacture of such couches, an expensive fabric of bright colors with patterns and a velvet-like surface is used. The frame is made of several layers of foam rubber with the addition of the same number of cardboard parts glued together. The decor of the sofa is carried out along the visible seams on all details of cords with gold threads, bright fringe with tassels. The clips are decorated with sequins, imitation of precious stones. The cost of such a work of art in the store is very high.
The cat bed consists of three separate parts: a seat, a backrest and one or two armrests. Each piece of furniture and a cover for it are made according to different patterns and connected together.
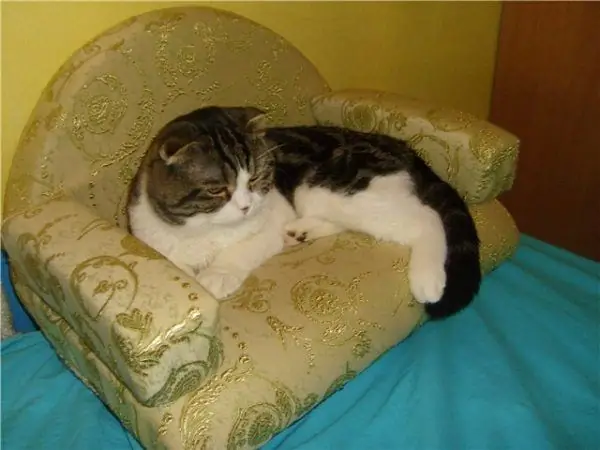
The bed for a cat in the form of a sofa consists of a seat, a back and one or two armrests
To make a rectangular sofa with a round back, you will need cardboard for the drawing and foam rubber to keep the volumetric shape of the parts. The top of the sofa is sheathed with furniture fabric (tapestry or chenille) 60x150 cm.
Operating procedure:
- Make patterns for four sofa parts. The first is the bottom, its thickness is 6 cm, the dimensions of the fabric rectangle are 62x72 cm with seam allowances.
- The second pattern is the back of the product. The drawing is done on paper or directly on fabric, folded in half with the right sides together. The width of the lower part of the back is 62 cm. From it, 6 cm is laid up on both sides. A line parallel to the bottom is drawn. From its center - up 19 cm. They put a serif. Two arcs are drawn down on both sides of it. The total height of the backrest is 25 cm.
- The back of the sofa is cut with seam allowance. Then the covers for the armrests are prepared. Dimensions - 40x26 cm. Cut out all the details of the sofa with scissors.
- Split off with pins, fold and sew the cover to the bottom, leaving the side, which will be fastened to the back, open. The back and armrests are sewn in the same way. Turn the finished parts onto the front side.
- Covers made of fabric are stuffed with holofiber to the stop, or foam rubber cut to the size of the sofa's parts is inserted and filler is added.
- Sew the side holes manually with a blind seam. Then the back is sewn to the bottom, and the armrests are sewn to them. The product is ready.
To make the armrests in the form of a roller, a rectangular pattern measuring 36x24 cm is drawn, a wide edge is sewn and one round side is collected on a thread, pulled together and tied. After that, it is turned onto the front side, stuffed with filler, the hole is sewn together and the roller is fastened to the bottom and back of the sofa.
Photo gallery: beds for cats
-

A cat on a large brown bed with a high side-back on a soft stand - A large bed with a high side will be spacious for the cat
-

Cat in a double bed, where the outside is made of green fleece and the inside is made of light cotton - The double bed has a removable part
-

Oval lounger made of a flannel shirt in a cage with a side-roller, a cat is sprawled on the product - A low-sided lounger can become a favorite sleeping place
-

Homemade pillow-bed of light green color in the shape of a cat's head with black and white fabric on rounded ears, a cat is sleeping on the product - A pillow-bed in the shape of a cat's head with ears will look original
-

Round blue silk bed with high sides decorated with frills and edging (a narrow strip of fabric along the edge of the product) - The bed can be decorated with ruffles and piping (a narrow strip of fabric along the edge of the product)
-

A colorful bed with heart-shaped bumpers and a mouse head with large ears - The sides of the bed can be decorated with a mouse head
-

Cat in a rectangular red lounger with stitched folds at the corners of the side - The corners of the side are sewn on the rectangular bed
-

Pink bed-pillow with a side in the form of a stretched black-and-white cat, on it - a ginger kitten - A bed with a side-cat will look interesting
Choosing a place for a cat bed
Any cat chooses a place in the house to rest where it will not be disturbed. Sometimes there are several of them. Most of the day, the animal sleeps with closed eyes, and sometimes snores like a sleeping person. It happens that during a sound sleep, the cat falls off the bed on the floor and even with it. Therefore, the owner of the animal, placing a soft bed on the windowsill, attaches its side so that it does not fall and is not blown through by a draft. The cat will gladly take up the bed, from which you can clearly see everything that happens on the street. In the cold season, it is better to install the stove bench on an ottoman near the heating radiator.
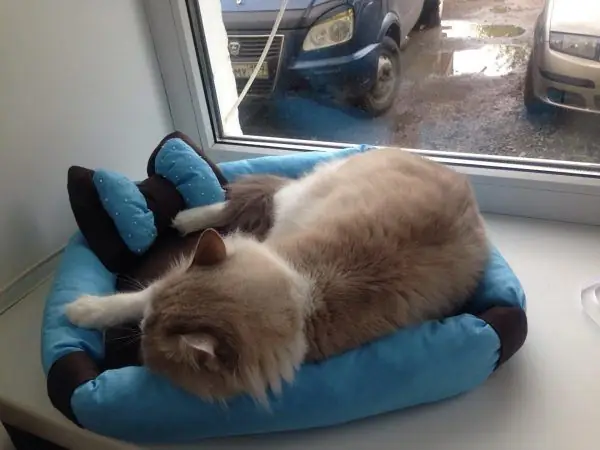
You can install the cat's sleeping place on the windowsill, but you need to take care that the bed does not fall from there
The bedroom is a secluded and quiet place for the cat bed, since this room is the least used in the house during the day. There is always a corner in the kitchen where a resting cat will not disturb the owners.
Many cats feel comfortable at height by climbing onto a closet of clothes or books. From here, they control everything that happens in the house. The back or seat of the master's chair is one of the most favorite places for a cat's nap. Therefore, when choosing a bed for your cat, consider placing it on top of the furniture rather than on the floor.
Some cats do not want to immediately sleep on the new bed you have suggested. This is because they are already accustomed to resting in the same bed. Allow time to settle into your new bed.
For a cat with small kittens, a bed with high sides is placed on the floor, in a secluded and shaded place. For example, between a wardrobe and a wall or behind the back of a sofa. The offspring must be hidden from prying eyes. If the side of the bed has an entrance, it is better to close it by sewing on a mattress, otherwise the kittens will crawl out of the bed.
Testimonials of cat owners about the self-production of beds
The task of a loving owner is to equip a cozy resting place for a pet, so that the animal feels calm and safe in it. Having received its own bed, the cat will forget about other furniture in the house. A bed made of things that are familiar to a cat, emitting a native smell, will become its favorite place to sleep.
Recommended:
How To Make A Long Burning Stove With Your Own Hands: Manufacturing Instructions With A Diagram And Drawings + Video

How to make a long burning stove with your own hands. Consumables, recommendations, diagrams, design features
Screens-partitions For Zoning Space In The Room: Varieties And Design Features, Manufacturing And Installation By Hand
What is a partition-screen. What are the types of screens, their features, advantages and disadvantages. How to make a partition screen yourself
Anatomy Of A Cat And A Cat: Structural Features Of The Body, Why Does An Animal Need A Tail And Other Interesting Facts
Domestic cats - class and family. Skeleton structure. Sense organs and their features. Endocrine, nervous and digestive systems of cats. Reproduction
How To Make A House For A Cat And A Cat With Your Own Hands: Types Of Cat Houses (out Of The Box, Other), Drawings, Sizes, Instructions, Photos Step By Step
Requirements for the cat house. Step-by-step instructions for making a house from different materials. Where is the best place to place a house for a cat
How To Wean A Cat And A Cat To Tear Wallpaper And Furniture, Features Of Weaning Kittens And Adult Animals, Useful Tips And Tricks, Reviews
Why does a cat tear wallpaper and furniture? How to prevent damage to property. What to do if you can't wean your cat
